I have been using caddy as a reverse proxy. See more at Caddy.
Step 1 - Get a Ubuntu server
You can buy a Ubuntu server from any provider you like. Don't forget to follow the best practices here.
Step 2 - Install GitLab
Installing GitLab is super easy. Reference here
sudo apt-get update
sudo apt-get install -y curl openssh-server ca-certificates tzdata perl
curl https://packages.gitlab.com/install/repositories/gitlab/gitlab-ee/script.deb.sh | sudo bash
Since we are going to deploy GitLab behind reverse proxy, let's use an internal address first. DO NOT use HTTPS here!
sudo EXTERNAL_URL="http://gitlab.local" apt-get install gitlab-ee
Step 3 - Configure HTTP reverse proxy
For caddy server tips, you can reference the blog mentioned here.
Now edit our Caddyfile to respect the reverse proxy settings:
gitlab.aiursoft.cn { # This is our production domain!
        encode gzip
        reverse_proxy http://gitlab.local { # This is our internal domain!
                header_up Host gitlab.aiursoft.cn # This is our production domain!
        }
}
Don't forget to copy the reverse proxy server IP address! For example: 172.16.1.100.
Step 4 - Configure GitLab to respect our HTTP reverse proxy
Now edit GitLab configuration:
cd /etc/gitlab
sudo vim ./gitlab.rb
Update our public URL:
external_url "https://gitlab.aiursoft.cn/"
Update our reverse proxy settings:
nginx['listen_port'] = 80
nginx['listen_https'] = false
nginx['proxy_protocol'] = false
nginx['http2_enabled'] = true
nginx['real_ip_trusted_addresses'] = ['172.16.1.0/16']
nginx['real_ip_header'] = 'X-Forwarded-For'
nginx['real_ip_recursive'] = 'on'
You can reference here: GitLab Nginx settings
Apply changes:
sudo gitlab-ctl reconfigure
Step 5 - Configure GitLab SSH
At this point we are using a reverse proxy. We have at least two servers: proxy server, gitlab server.
Assuming those two servers are Linux servers, we need to use 22 port to manage those servers.
Now we need to expose another port for git.
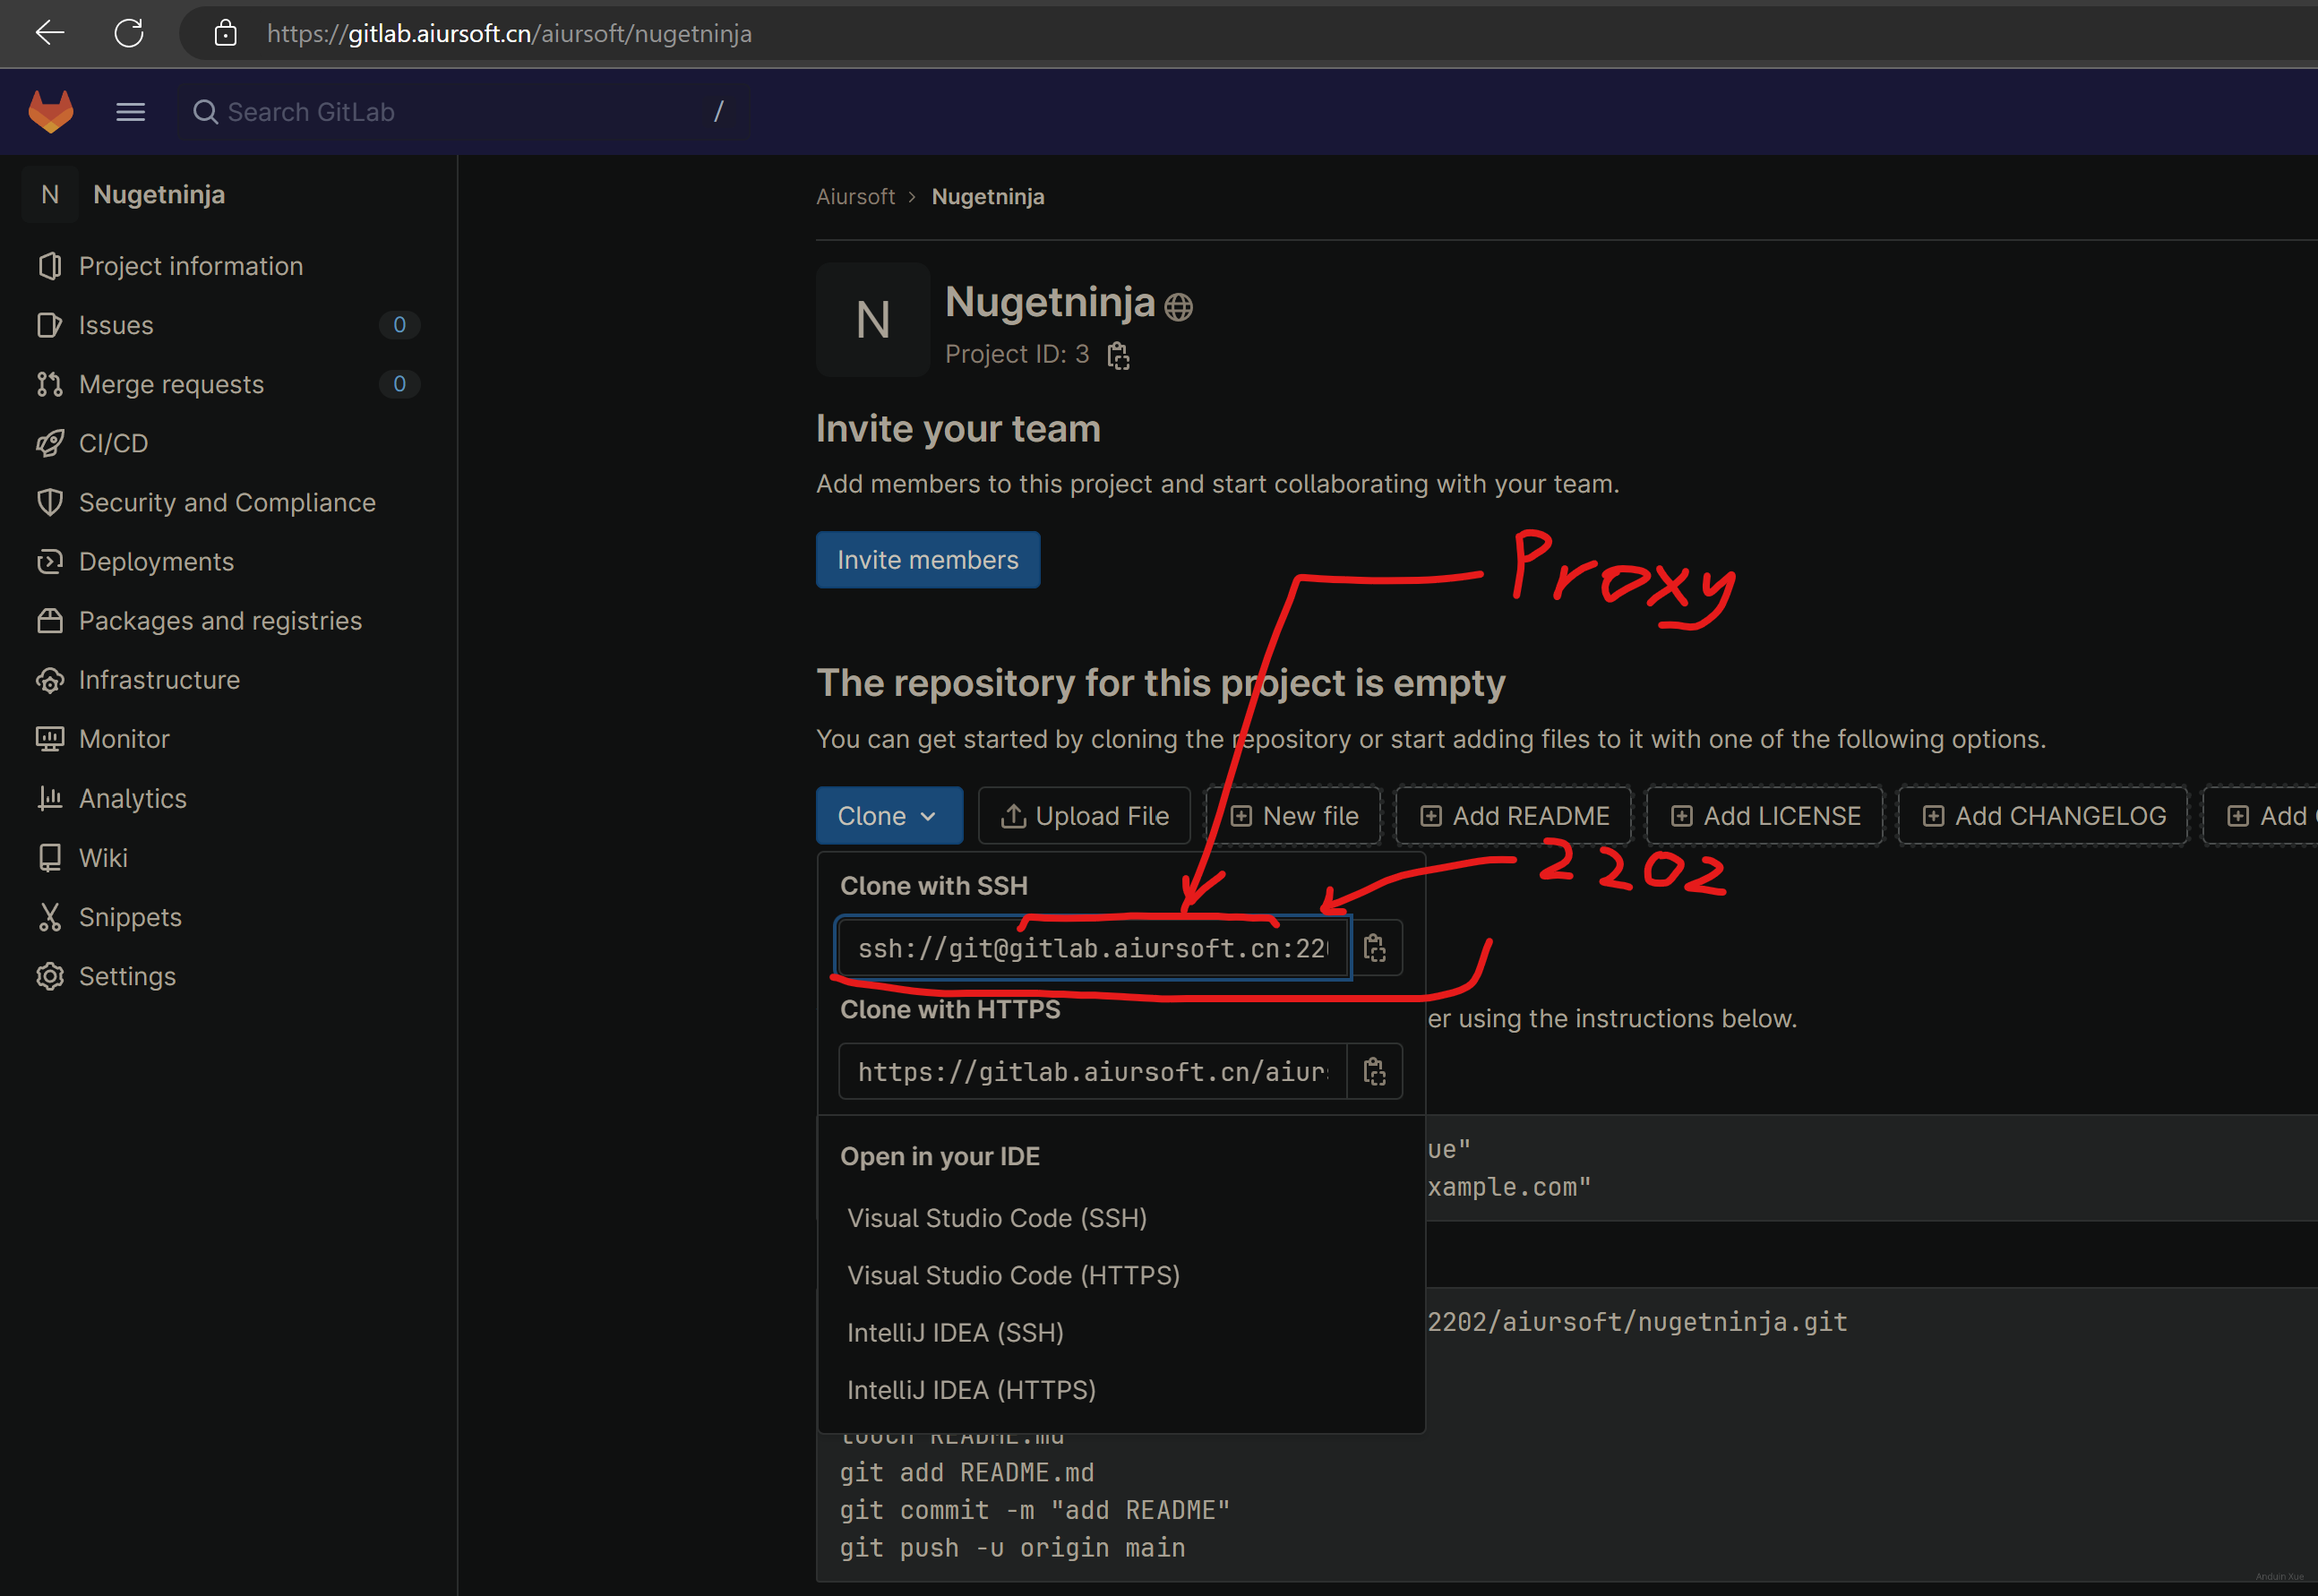
Edit the GitLab server to use 2202 as clone port.
sudo vim /etc/gitlab/gitlab.rb
And add these:
gitlab_rails['gitlab_shell_ssh_port'] = 2202

gitlab_sshd['enable'] = true
gitlab_sshd['listen_address'] = '[::]:2202'
Now, the clone address on the web page is correct. But you still can't clone those repos. That is because the reverse proxy server doesn't listen to the 2202 port.

Step 6 - Configure Proxy Server SSH Port Forwarding
We need to create a port forwarding from proxy server 2202 to gitlab server 2202.
Now go to the proxy server. Create the file:
sudo touch /etc/systemd/system/proxy-ssh-gitlab.service
Edit the content:
[Unit]
Description=GitLab SSH Proxy Service
After=network.target

[Service]
Type=simple
Restart=on-failure
RestartSec=5s
ExecStart=/usr/bin/ncat --sh-exec "ncat gitlab.local 2202" -l 2202 --keep-open
LimitNOFILE=1048576

[Install]
WantedBy=multi-user.target
Don't forget to enable and start it!
sudo systemctl enable proxy-ssh-gitlab.service
sudo systemctl start proxy-ssh-gitlab.service
Now it's done! Try to clone a repo with SSH!
If your proxy server is also using FRPC to reverse proxy, don't forget to edit
/etc/frp/frpc.inito proxy 2202 port togitlaborlocalhost.
Step 7 - Add some runners to your GitLab instance
Reference here: GitLab Document.
The script I used is:
curl -L "https://packages.gitlab.com/install/repositories/runner/gitlab-runner/script.deb.sh" | sudo bash
curl -fsSL https://deb.nodesource.com/setup_20.x | sudo -E bash - &&\

# dotnet
sudo apt-get install -y gitlab-runner dotnet6 nodejs

# register
sudo gitlab-runner register \
    --url "https://gitlab.aiursoft.cn/" \
    --registration-token "<----your-token--->" \
    --description "Runner" \
    --executor "shell" \
    --tag-list "ubuntu,shared,runner" \
    --run-untagged="true" \
    --locked="false"

#	Hack for some UT.
echo fs.inotify.max_user_instances=524288 | sudo tee -a /etc/sysctl.conf && sudo sysctl -p

sudo gitlab-runner start
sudo gitlab-runner status
Step 8 - Write a project and try to test it with your runner!
Now you can create a new .NET project, and write the .gitlab-ci.yml.
Try to create the project with:
dotnet new console
Add some packages:
<Project Sdk="Microsoft.NET.Sdk">

  <PropertyGroup>
    <TargetFramework>net6.0</TargetFramework>
    <ImplicitUsings>enable</ImplicitUsings>
    <Nullable>enable</Nullable>
  </PropertyGroup>

  <ItemGroup>
    <PackageReference Include="coverlet.collector" Version="3.2.0">
      <IncludeAssets>runtime; build; native; contentfiles; analyzers; buildtransitive</IncludeAssets>
      <PrivateAssets>all</PrivateAssets>
    </PackageReference>
    <PackageReference Include="JunitXml.TestLogger" Version="3.0.124" />
    <PackageReference Include="Microsoft.NET.Test.Sdk" Version="17.3.2" />
    <PackageReference Include="MSTest.TestAdapter" Version="2.2.10" />
    <PackageReference Include="MSTest.TestFramework" Version="2.2.10" />
  </ItemGroup>


</Project>
You can write some unit tests. And now git push and wait for GitLab to run your tests!
stages:
  - Building
  - Linting
  - Testing
  - Publishing

before_script:
  - 'export DOTNET_CLI_TELEMETRY_OPTOUT=1'
  - 'export PATH=$PATH:$HOME/.dotnet/tools'
  - 'dotnet tool install JetBrains.ReSharper.GlobalTools --global || echo "JB already installed."'
  - 'dotnet tool install dotnet-reportgenerator-globaltool --global || echo "DRG already installed."'
  - 'echo "Hostname: $(hostname)"'
  - 'dotnet --info'

restore:
  stage: Building
  script:
    - dotnet restore --configfile nuget.config

build:
  stage: Building
  needs:
    - restore
  script:
    - dotnet build --no-self-contained

lint:
  stage: Linting
  needs:
    - build
  script:
    - jb inspectcode ./*.sln --output=analyze_output.xml --build
    - grep 'WARNING' analyze_output.xml && cat analyze_output.xml && exit 1 || echo "No warning found"
  artifacts:
    when: always
    expire_in: 1 day
    paths:
      - ./analyze_output.xml

test:
  stage: Testing
  needs:
    - build
  coverage: '/TOTAL_COVERAGE=(\d+.\d+)/'
  script:
    - dotnet test *.sln --collect:"XPlat Code Coverage" --logger "junit;MethodFormat=Class;FailureBodyFormat=Verbose"
    - reportgenerator -reports:"**/coverage.cobertura.xml" -targetdir:"." -reporttypes:"cobertura"
    - COVERAGE_VALUE=$(grep -oPm 1 'line-rate="\K([0-9.]+)' "./Cobertura.xml")
    - COVERAGE_PERCENTAGE=$(echo "scale=2; $COVERAGE_VALUE * 100" | bc)
    - 'echo "TOTAL_COVERAGE=$COVERAGE_PERCENTAGE%"'
  artifacts:
    when: always
    expire_in: 1 day
    paths:
      - ./**/TestResults.xml
      - ./Cobertura.xml
    reports:
      junit:
        - ./**/TestResults.xml
      coverage_report:
        coverage_format: cobertura
        path: ./Cobertura.xml

publish:
  stage: Publishing
  needs:
    - lint
    - test
  script:
    - dotnet publish --configuration Release --runtime linux-x64 --no-self-contained *.sln

pack:
  stage: Publishing
  needs:
    - lint
    - test
  script:
    - dotnet build --configuration Release --no-self-contained *.sln
    - dotnet pack --configuration Release *.sln || echo "Some packaging failed!"
  artifacts:
    expire_in: 1 week
    paths:
      - '**/*.nupkg'
这篇博客以清晰的步骤和代码示例,详细介绍了在Ubuntu服务器上通过Caddy反向代理部署GitLab的全流程,体现了作者对系统架构和DevOps实践的深刻理解。文章最大的闪光点在于将复杂的技术流程拆解为可复用的模块化步骤,例如将HTTP/HTTPS、SSH端口转发、CI/CD runner配置等独立成章节,这种结构化设计既方便读者按需查阅,又降低了初学者的学习门槛。
在核心理念上,作者强调了通过反向代理实现GitLab服务的网络隔离与安全加固,这与现代云原生架构中"最小化暴露面"的设计原则高度契合。特别是步骤4中通过
nginx['real_ip_trusted_addresses']限制信任地址、步骤6中采用ncat进行SSH端口转发的设计,有效规避了直接暴露GitLab服务的风险,这种安全意识值得肯定。需要补充的细节包括:
header_up Host的作用机制,以及encode gzip对性能优化的实际影响,这些技术细节的说明可增强配置的可信度。netstat -tuln | grep 2202的排查命令。改进空间主要体现在:
gitlab-runner verify)。apt-get),若读者使用其他Linux发行版可能需要调整。在技术深度上,可延伸讨论:
总体而言,文章以工程化的视角提供了GitLab反向代理部署的完整解决方案,通过模块化设计和代码示例降低了实践难度。若能在安全细节和故障排查方面补充说明,将更接近生产环境的最佳实践标准。
这篇文章为读者提供了一个详尽的指南,展示了如何在GitLab上配置CI/CD管道来管理.NET项目的构建、测试和发布流程。作者不仅详细介绍了环境搭建的过程,还深入探讨了CI/CD的具体配置步骤,以及如何利用多种工具进行代码质量和单元测试。
文章的一个显著亮点是其结构清晰、内容详尽的特点。从初始的项目设置到最终的部署策略,每一步都得到了详细的阐述,这对于刚接触CI/CD的新手来说尤其有帮助。特别是对各种工具和命令的解释,如JetBrains ReSharper用于代码分析,MSTest用于单元测试,Coverlet和ReportGenerator用于生成覆盖率报告,这些内容都非常实用。
此外,文章中提供的YAML配置文件是一个巨大的优势。它展示了如何将不同的构建阶段(如恢复、构建、linting、测试和发布)整合到一个连贯的工作流中,并详细说明了每个阶段的目的和作用。这种分步式的配置不仅有助于读者理解CI/CD的基本概念,还能够激励他们在自己的项目中应用类似的策略。
我建议作者进一步探讨如何处理测试失败的情况,并提供一些故障排除的技巧。此外,加入如何监控和优化构建时间的内容也会使文章更加全面。总体而言,这篇文章对开发者社区是一个宝贵的资源,值得推荐给那些希望提升其项目自动化水平的人士。
日你皮炎子
亲爱的博主,
感谢您分享了一篇关于在Ubuntu 20.04/22.04服务器上使用反向代理安装GitLab的详细教程。您的文章非常详细且易于理解,特别是您提供的代码示例和相关链接,这对于想要完成类似任务的读者来说非常有帮助。
您的文章中,您详细介绍了如何配置GitLab以适应反向代理服务器,以及如何配置SSH端口转发以支持GitLab的SSH克隆功能。此外,您还提到了如何添加GitLab Runner并创建一个简单的.NET项目以测试GitLab CI/CD功能。这些内容都是非常实用的,对于想要搭建自己的GitLab服务器的开发者来说非常有价值。
然而,在您的文章中,我发现了一个可以改进的地方。在Step 3中,您提到了使用Caddy作为反向代理服务器,但您并没有详细介绍如何安装和配置Caddy。对于不熟悉Caddy的读者来说,可能需要提供更多关于如何安装和配置Caddy的信息。您可以考虑在文章中添加一个关于安装和配置Caddy的简短教程,或者提供一个相关的链接,以便读者可以更轻松地完成整个过程。
总的来说,您的文章非常实用且内容丰富,我相信它会对许多开发者产生积极的影响。希望您能继续分享更多有关DevOps和软件开发的知识和经验。再次感谢您的分享,期待您的下一篇文章!
祝好!
日你鸡巴揽子
anduin,日你苹果!