
Background
Recently I was building a VMware ESXI cluster, aka Vsphere.
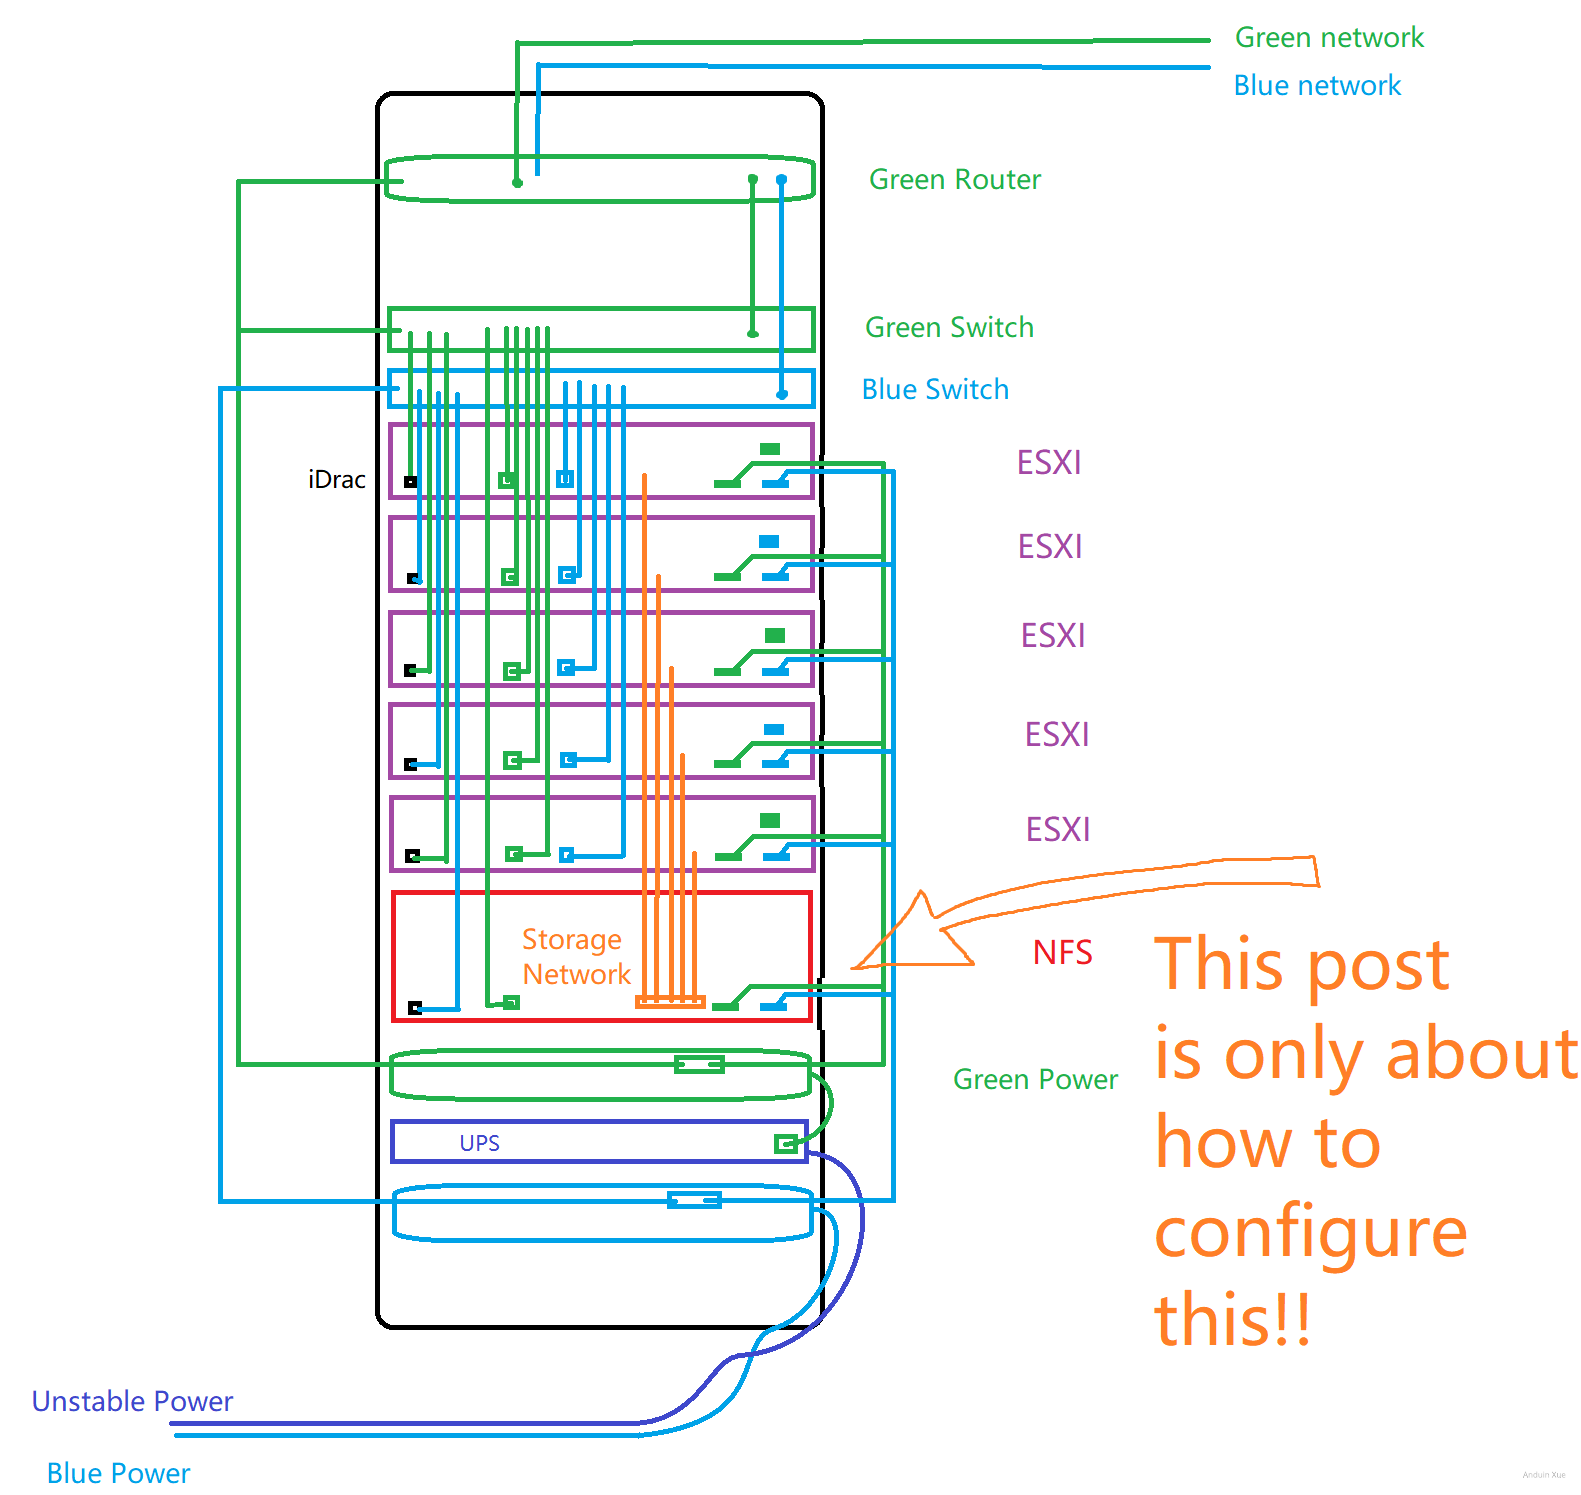
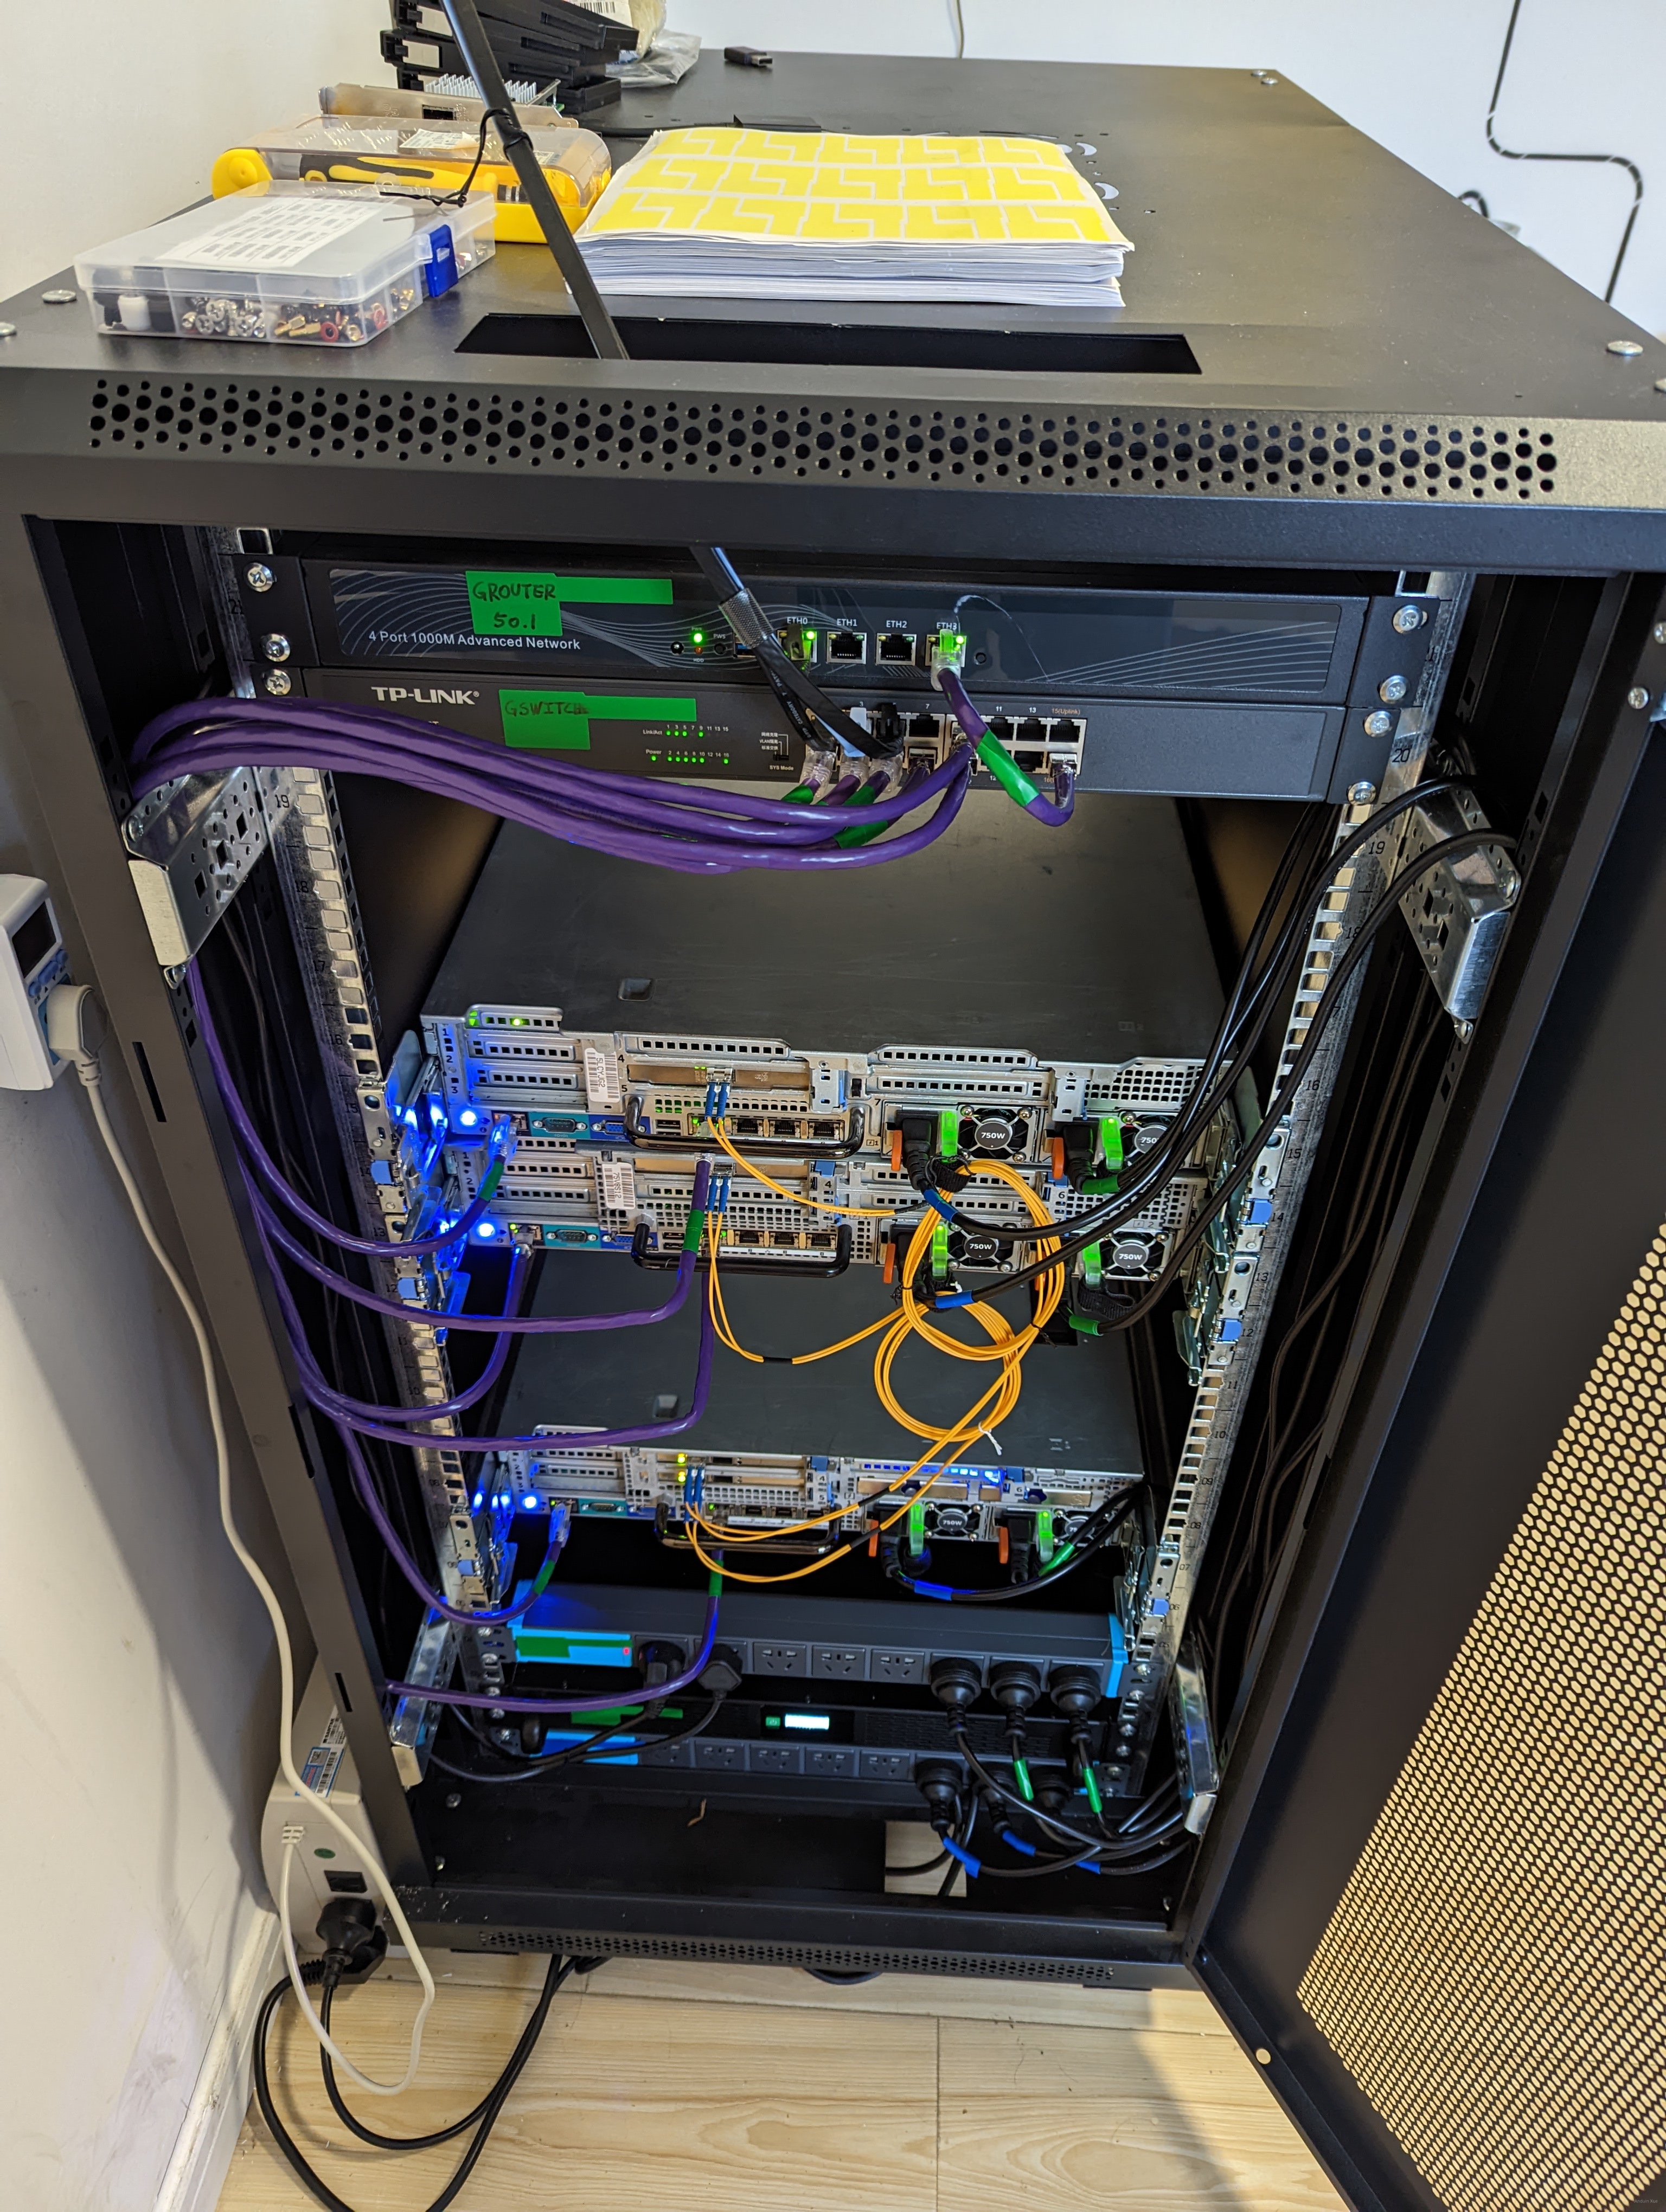
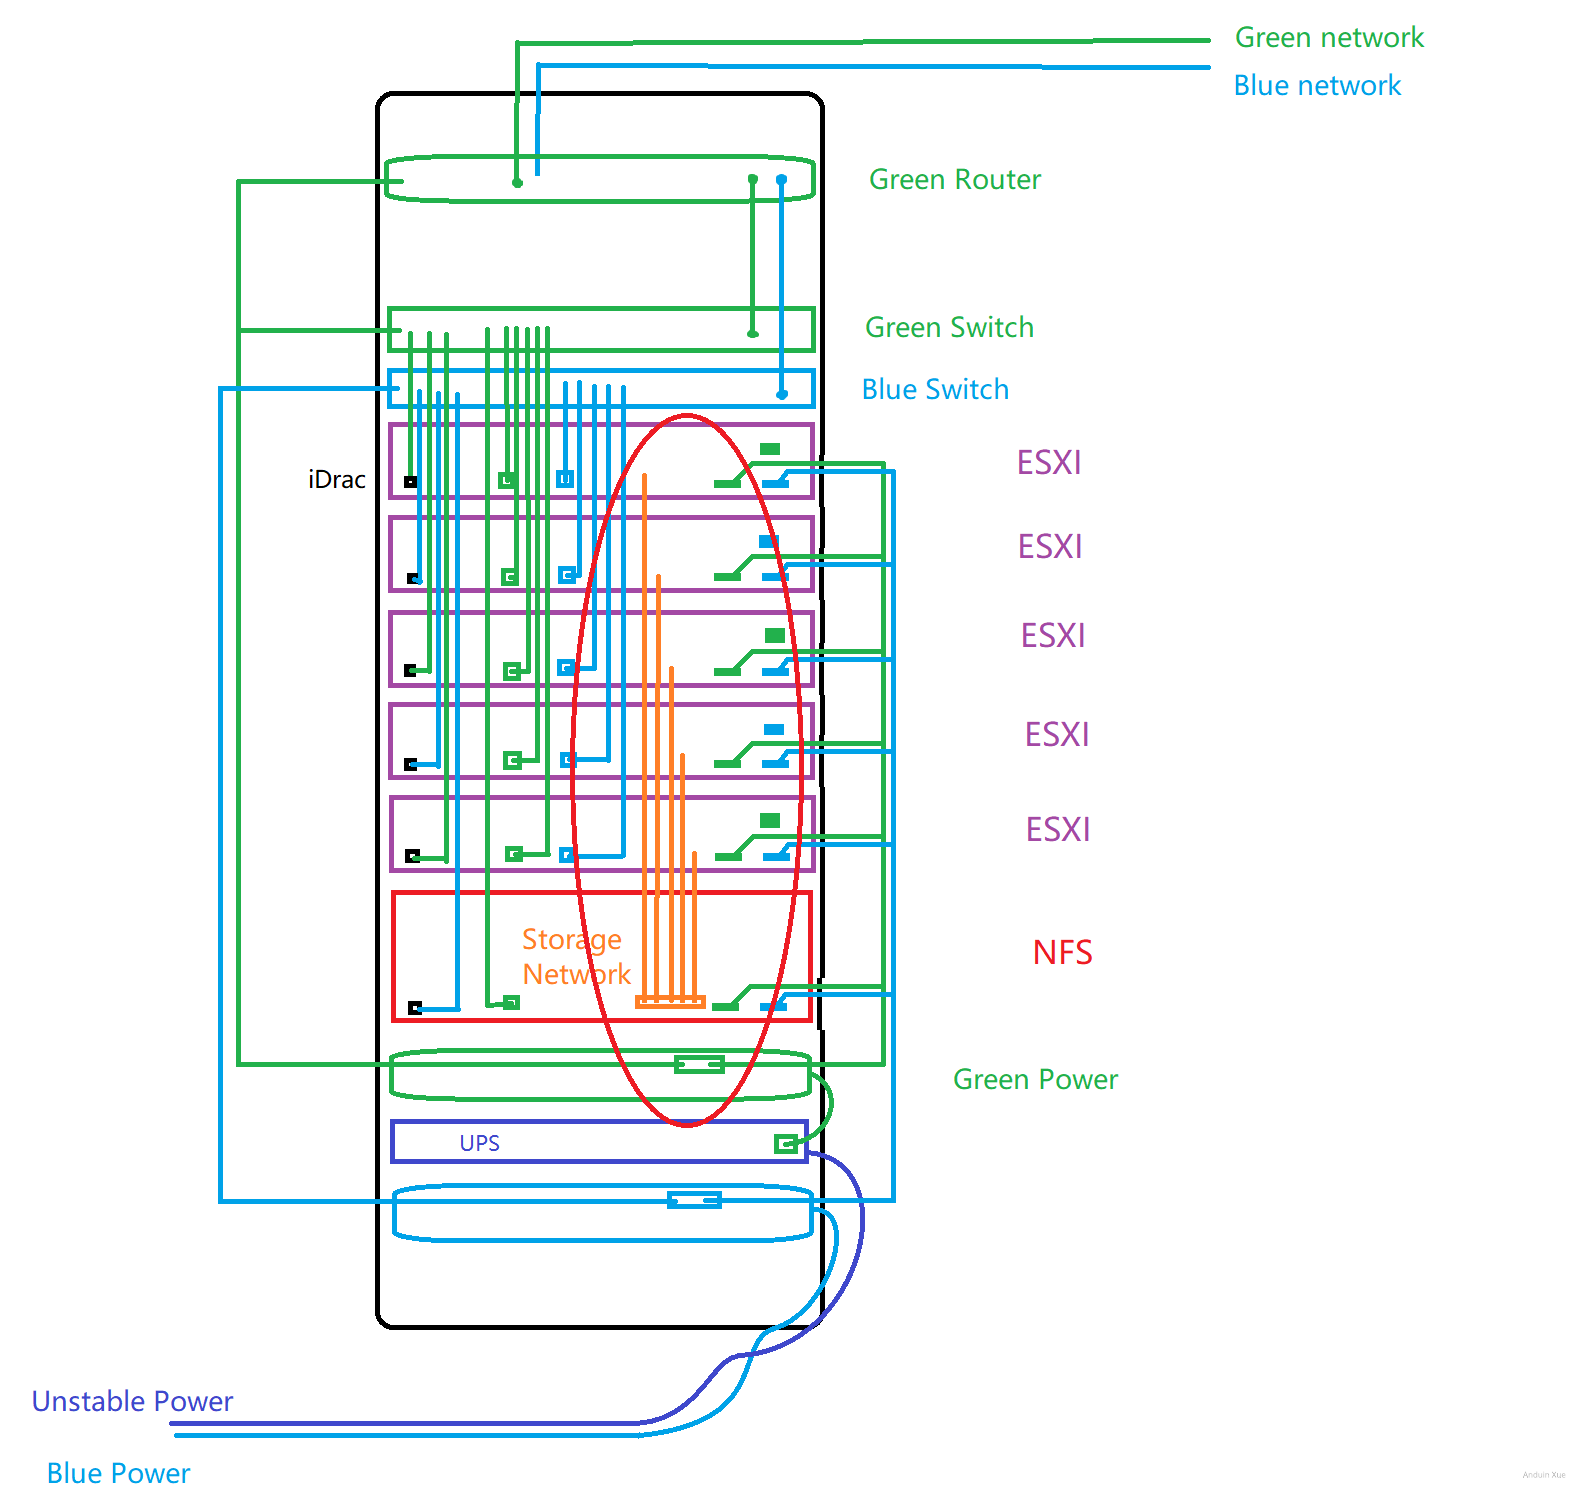
My rack structure is like this. I am using my own server as shared NFS storage.
This post is about how to configure this server.
Why am I doing this?
We all know that Vsphere clusters require separate storage so that ESXI hosts can migrate virtual machines between multiple hosts.
There are professional solutions like Dell PowerStore. However, those machines are really really expensive, about 20,000 USD.
So how can we get a similar solution as an ESXI storage server with only around 800 USD?
Step 1 - Buy hardware
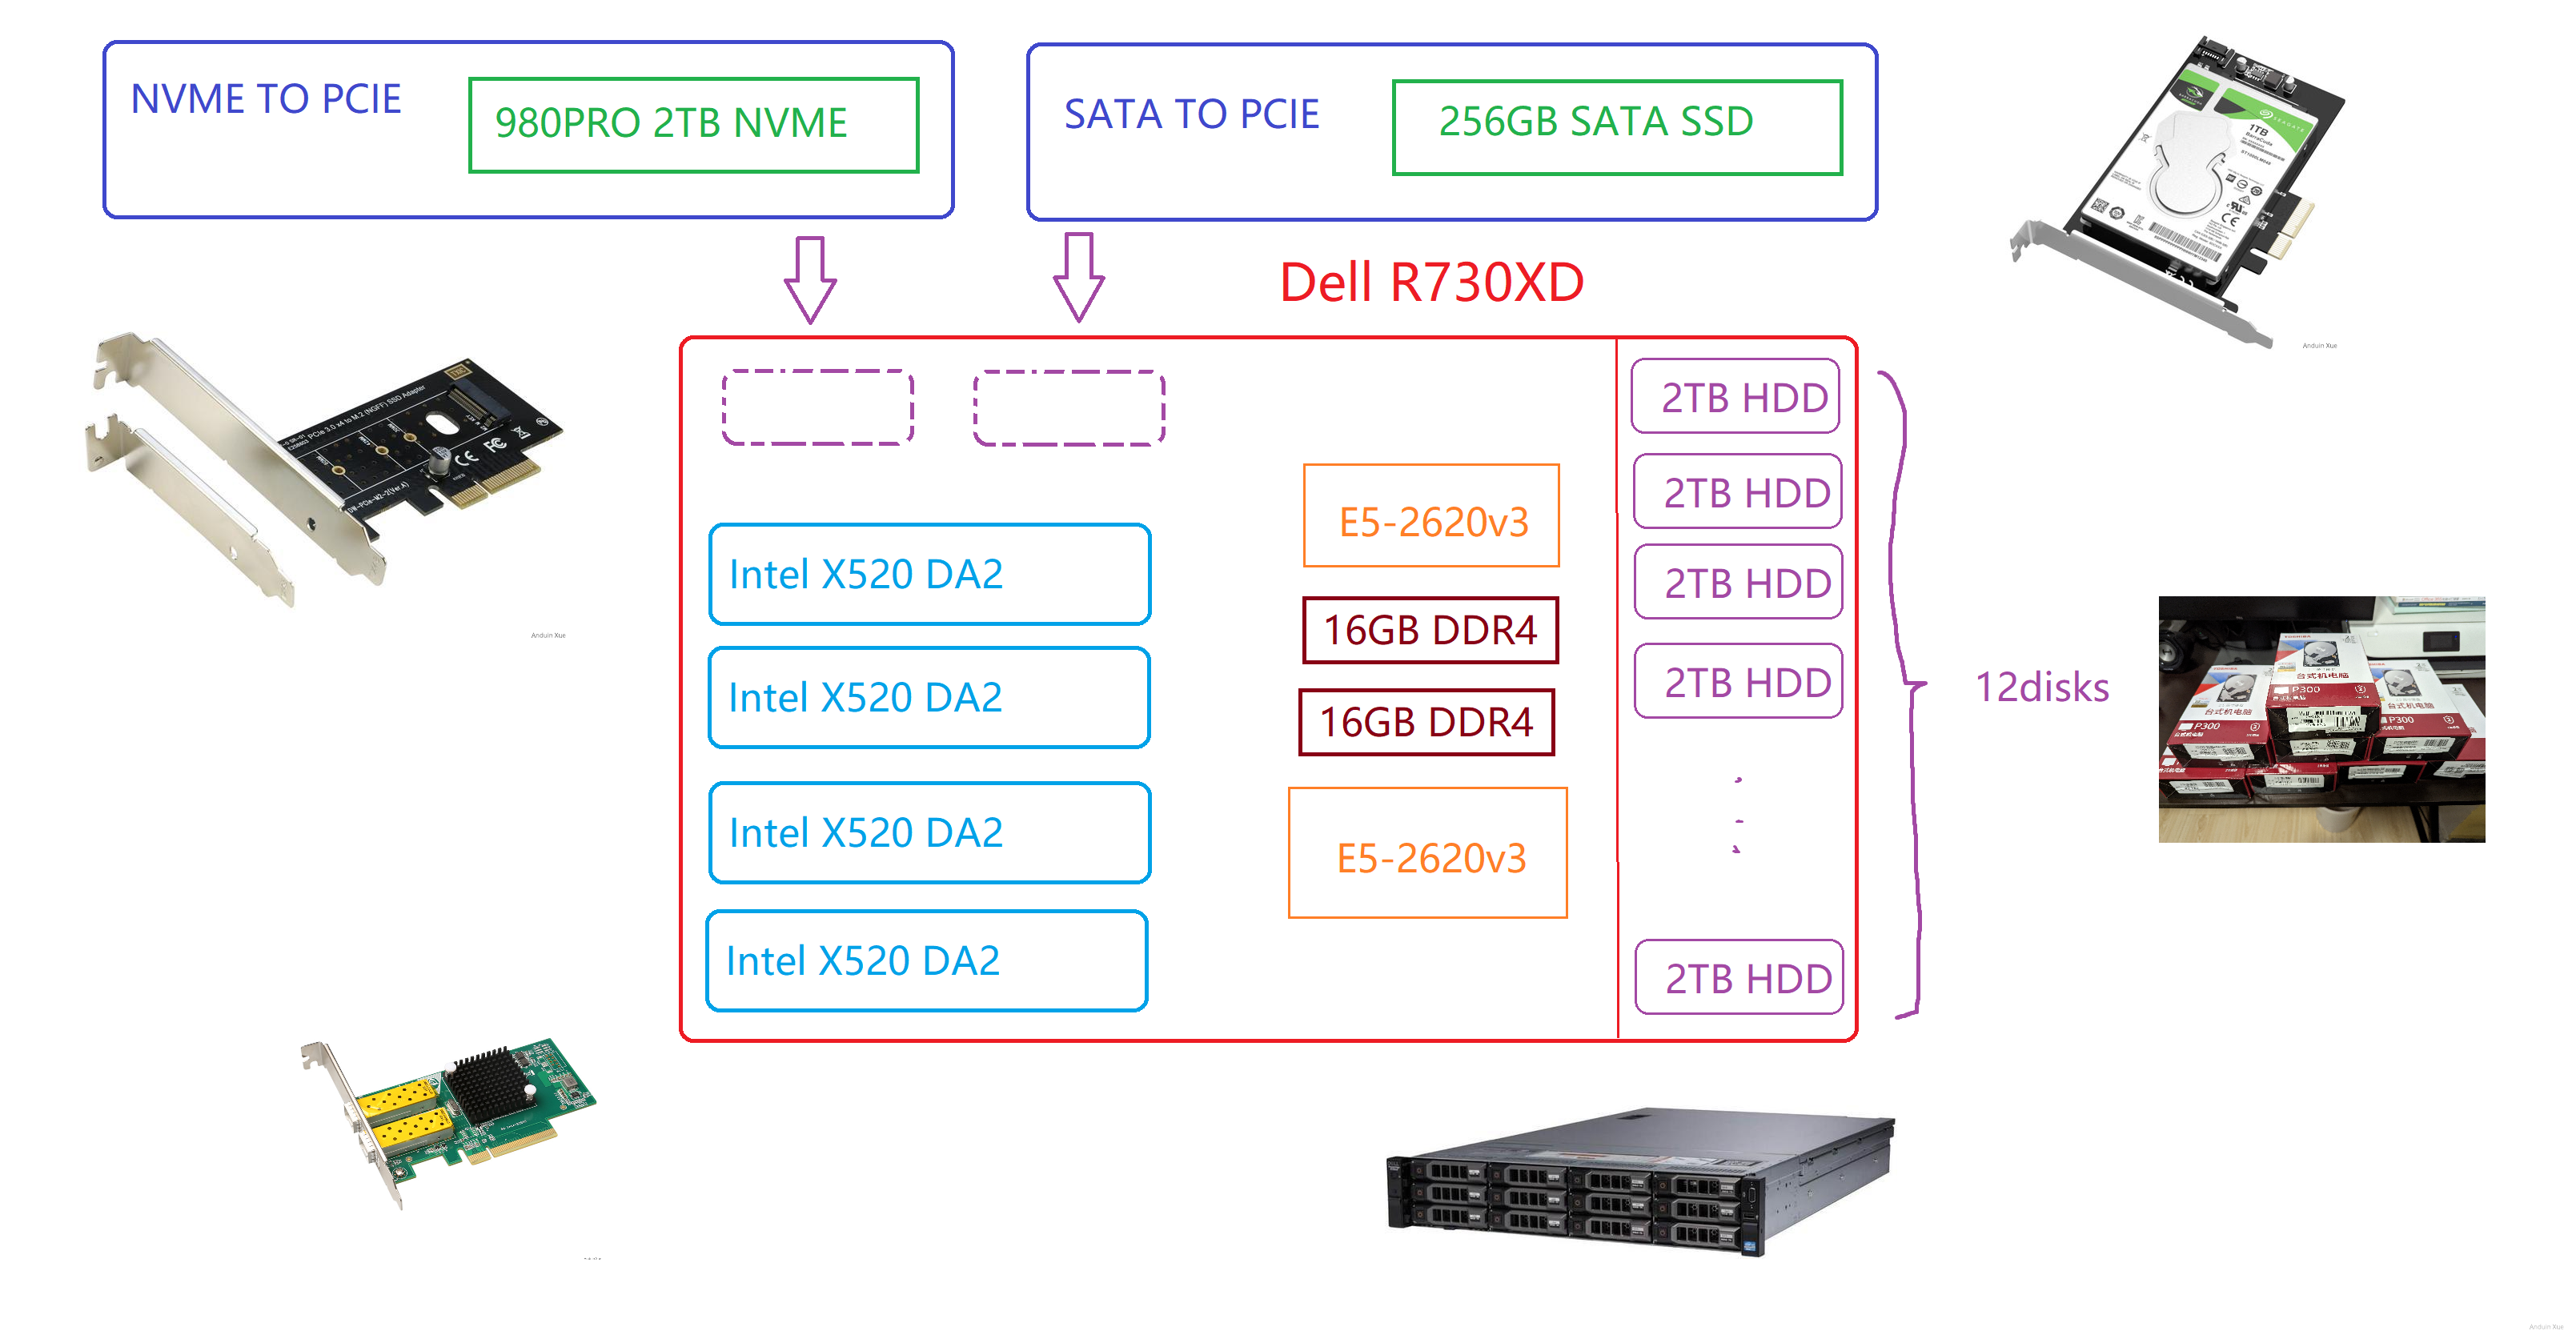
1.1 Buy a server (400USD)
My personal suggested hardware is:
| SKU | CPU | RAM | SATA SSD | NVME SSD | HDD |
|---|---|---|---|---|---|
| Dell R730XD 12 disks | Intel E5-2620v3 * 2, 2.4GHz, 12 Cores, 24 Threads. | 16GB x 2 DDR4 | 256GB x 1 | 2TB | 2TBx12 |
_,met$$$$$gg. anduin@NFS
,g$$$$$$$$$$$$$$$P. ----------
,g$$P" """Y$$.". OS: Debian GNU/Linux 11 (bullseye) x86_64
,$$P' `$$$. Host: PowerEdge R730XD
',$$P ,ggs. `$$b: Kernel: 5.10.0-18-amd64
`d$$' ,$P"' . $$$ Uptime: 1 day, 4 hours, 34 mins
$$P d$' , $$P Packages: 571 (dpkg)
$$: $$. - ,d$$' Shell: bash 5.1.4
$$; Y$b._ _,d$P' Resolution: 1024x768
Y$$. `.`"Y$$$$P"' Terminal: /dev/pts/0
`$$b "-.__ CPU: Intel Xeon E5-2620 v3 (24) @ 3.200GHz
`Y$$ GPU: 0b:00.0 Matrox Electronics Systems Ltd. G200eR2
`Y$$. Memory: 650MiB / 31816MiB
`$$b.
`Y$$b.
`"Y$b._
`"""
The server costs about 400USD.
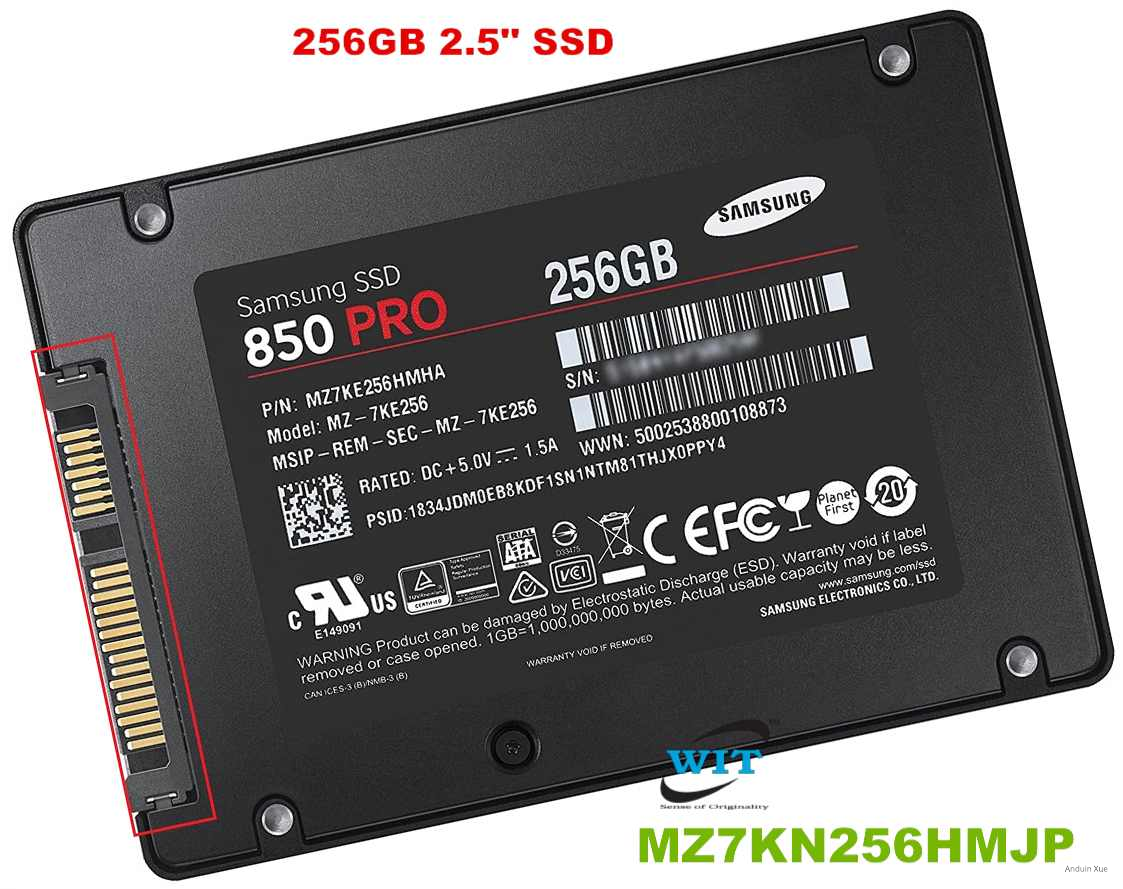
1.2 Buy a SATA SSD (30USD)
You need to buy a SATA SSD to install the Operating system. This is because Dell R730XD only has 3.5 inches size HDD slot. I really not like to install my OS to an HDD.
And also, Dell R730XD is a very old server that doesn't recognize NVME SSD before booting. So you also could not install your OS on NVME SSD.
That's why it's painful that you have to buy an another SATA SSD only for OS to install.
1.2 Buy NVME (300USD, Optional)
You will need some NVME.
The NVME disk is for some need for machines which requires a high random access speed. For raid doesn't speed up random access speed.
I am using SAMSUNG 980 PRO as NVME storage. It costs about 300USD. (2100CNY).

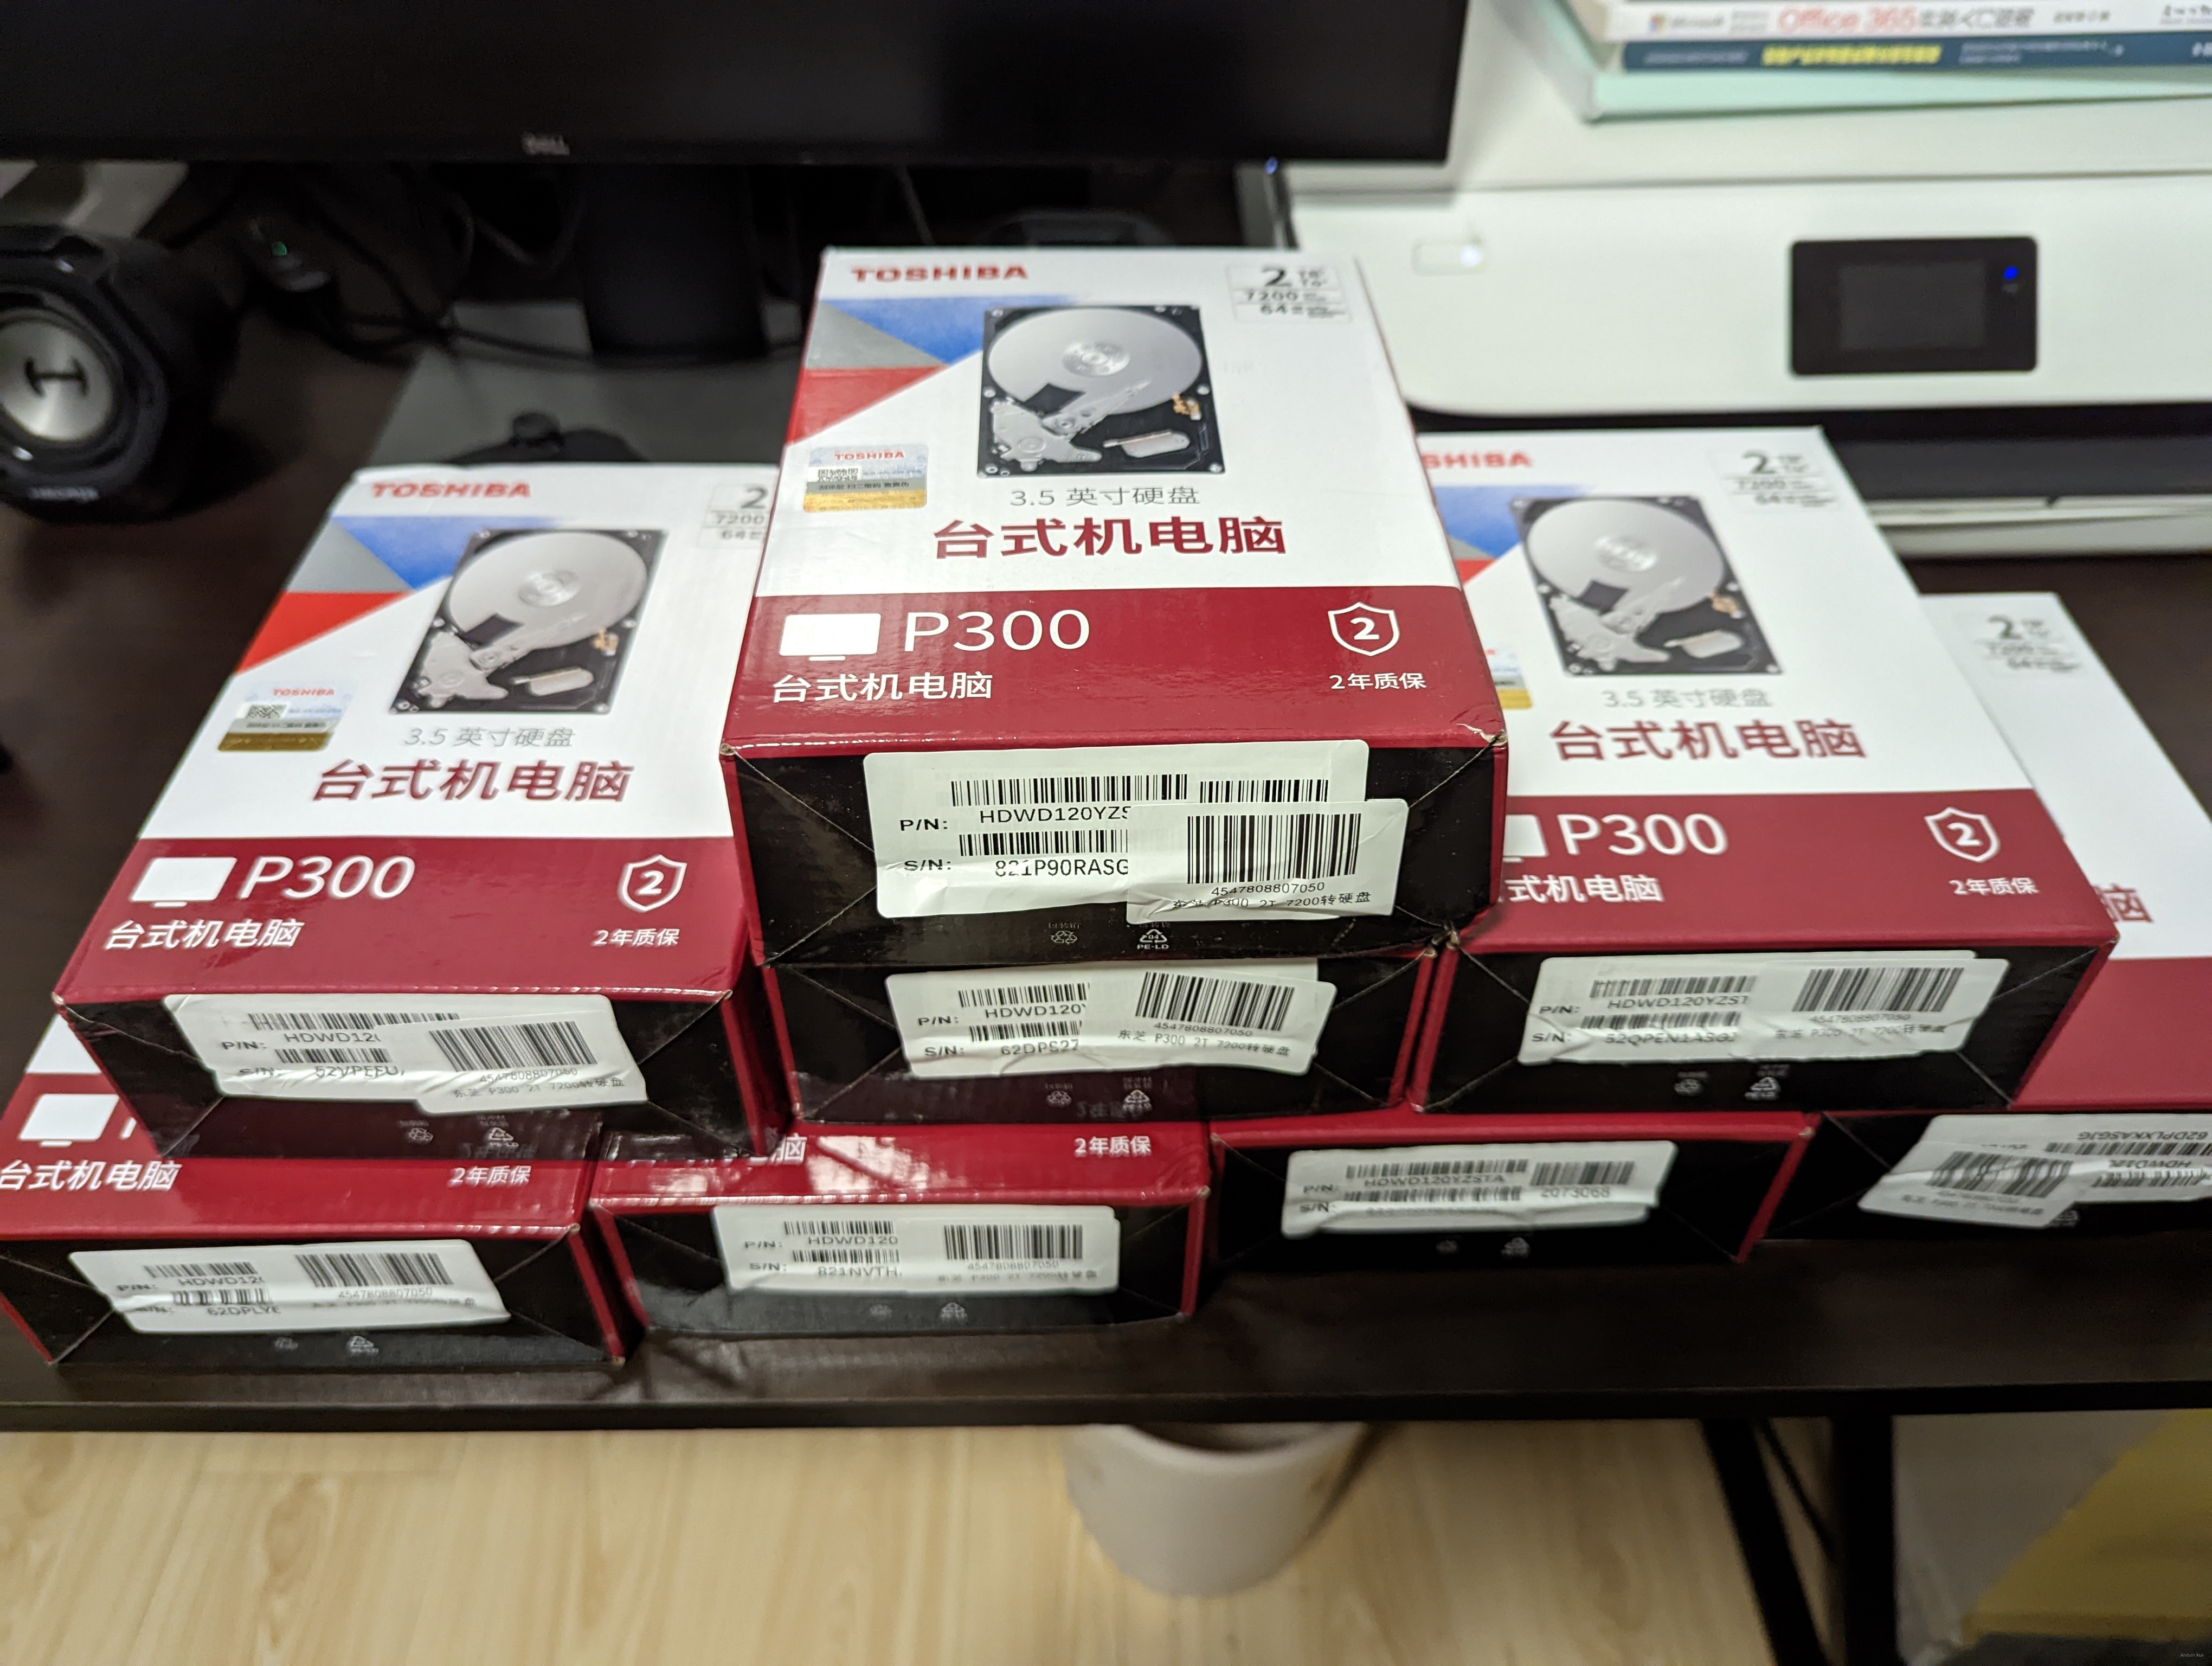
1.3 Buy some disks (400USD)
You will need some HDD. For example, I'm using TOSHIBA P300.
12 disks costs about 400USD.
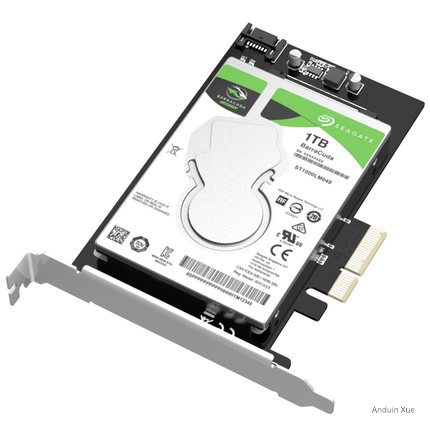
1.4 Buy NVME to PCIE converter (3USD)
Yes. You need NVME to PCIE converter to connect your NVME SSD to your server!
Usually this is super cheap. About 3 USD.

1.5 Buy SATA to PCIE converter (3USD)
Yes. You also need to buy a SATA to PCIE converter, so you can connect your SATA SSD to PCIE port.
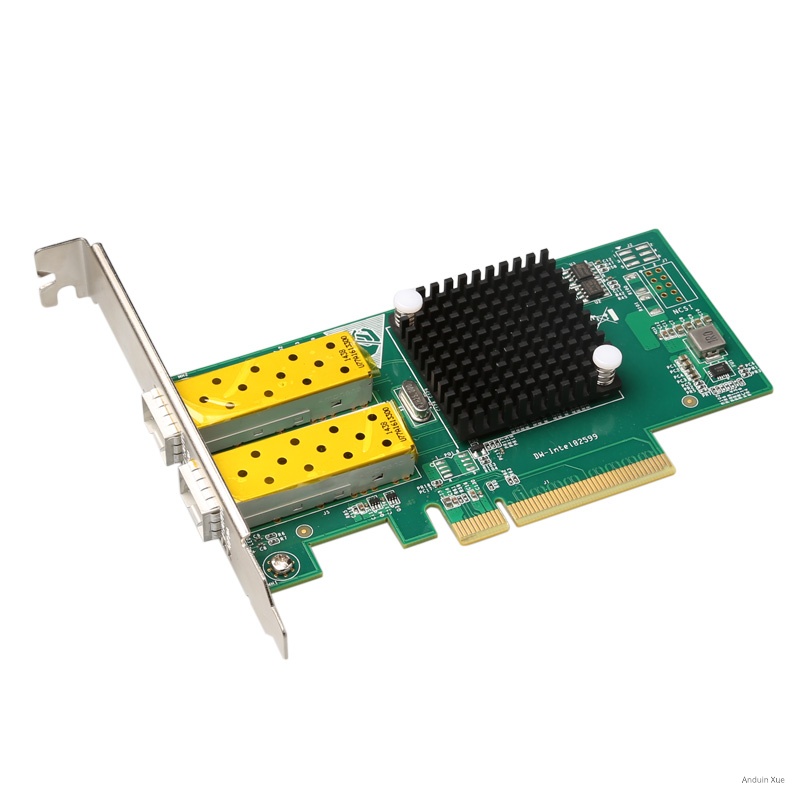
1.6 Buy fiber network adapter (80USD)
You need to buy some fiber network adapter. It is suggested to buy at least 3.
I am using Intel X520 DA2. Make sure it supports 10Gbps.
1.7 Assemble your server like this!
Step 2 - Configure iDRAC
Step 2.1 Upgrade your firmware
First, you need to upgrade the firmware.
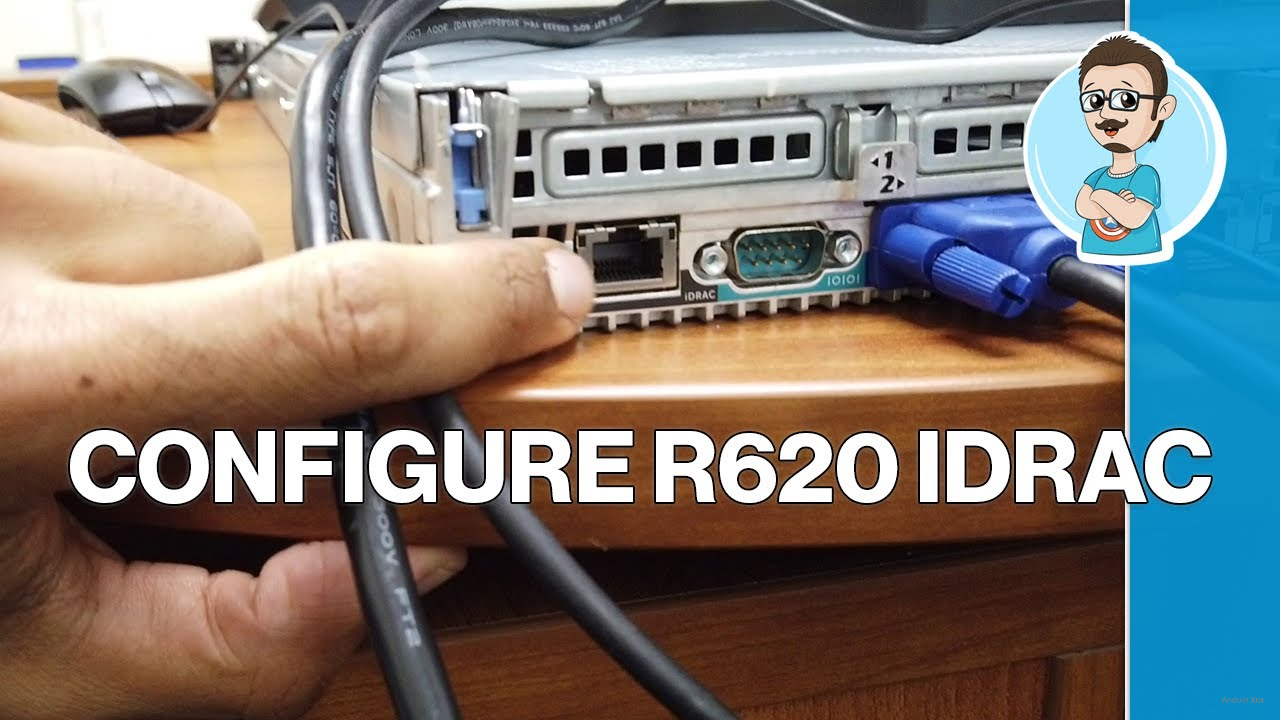
You need to use a cable to connect the iDRAC port to your router. Try to find it's IP address and sign it in.
Connect this port to your LAN. Try to get the IP address.
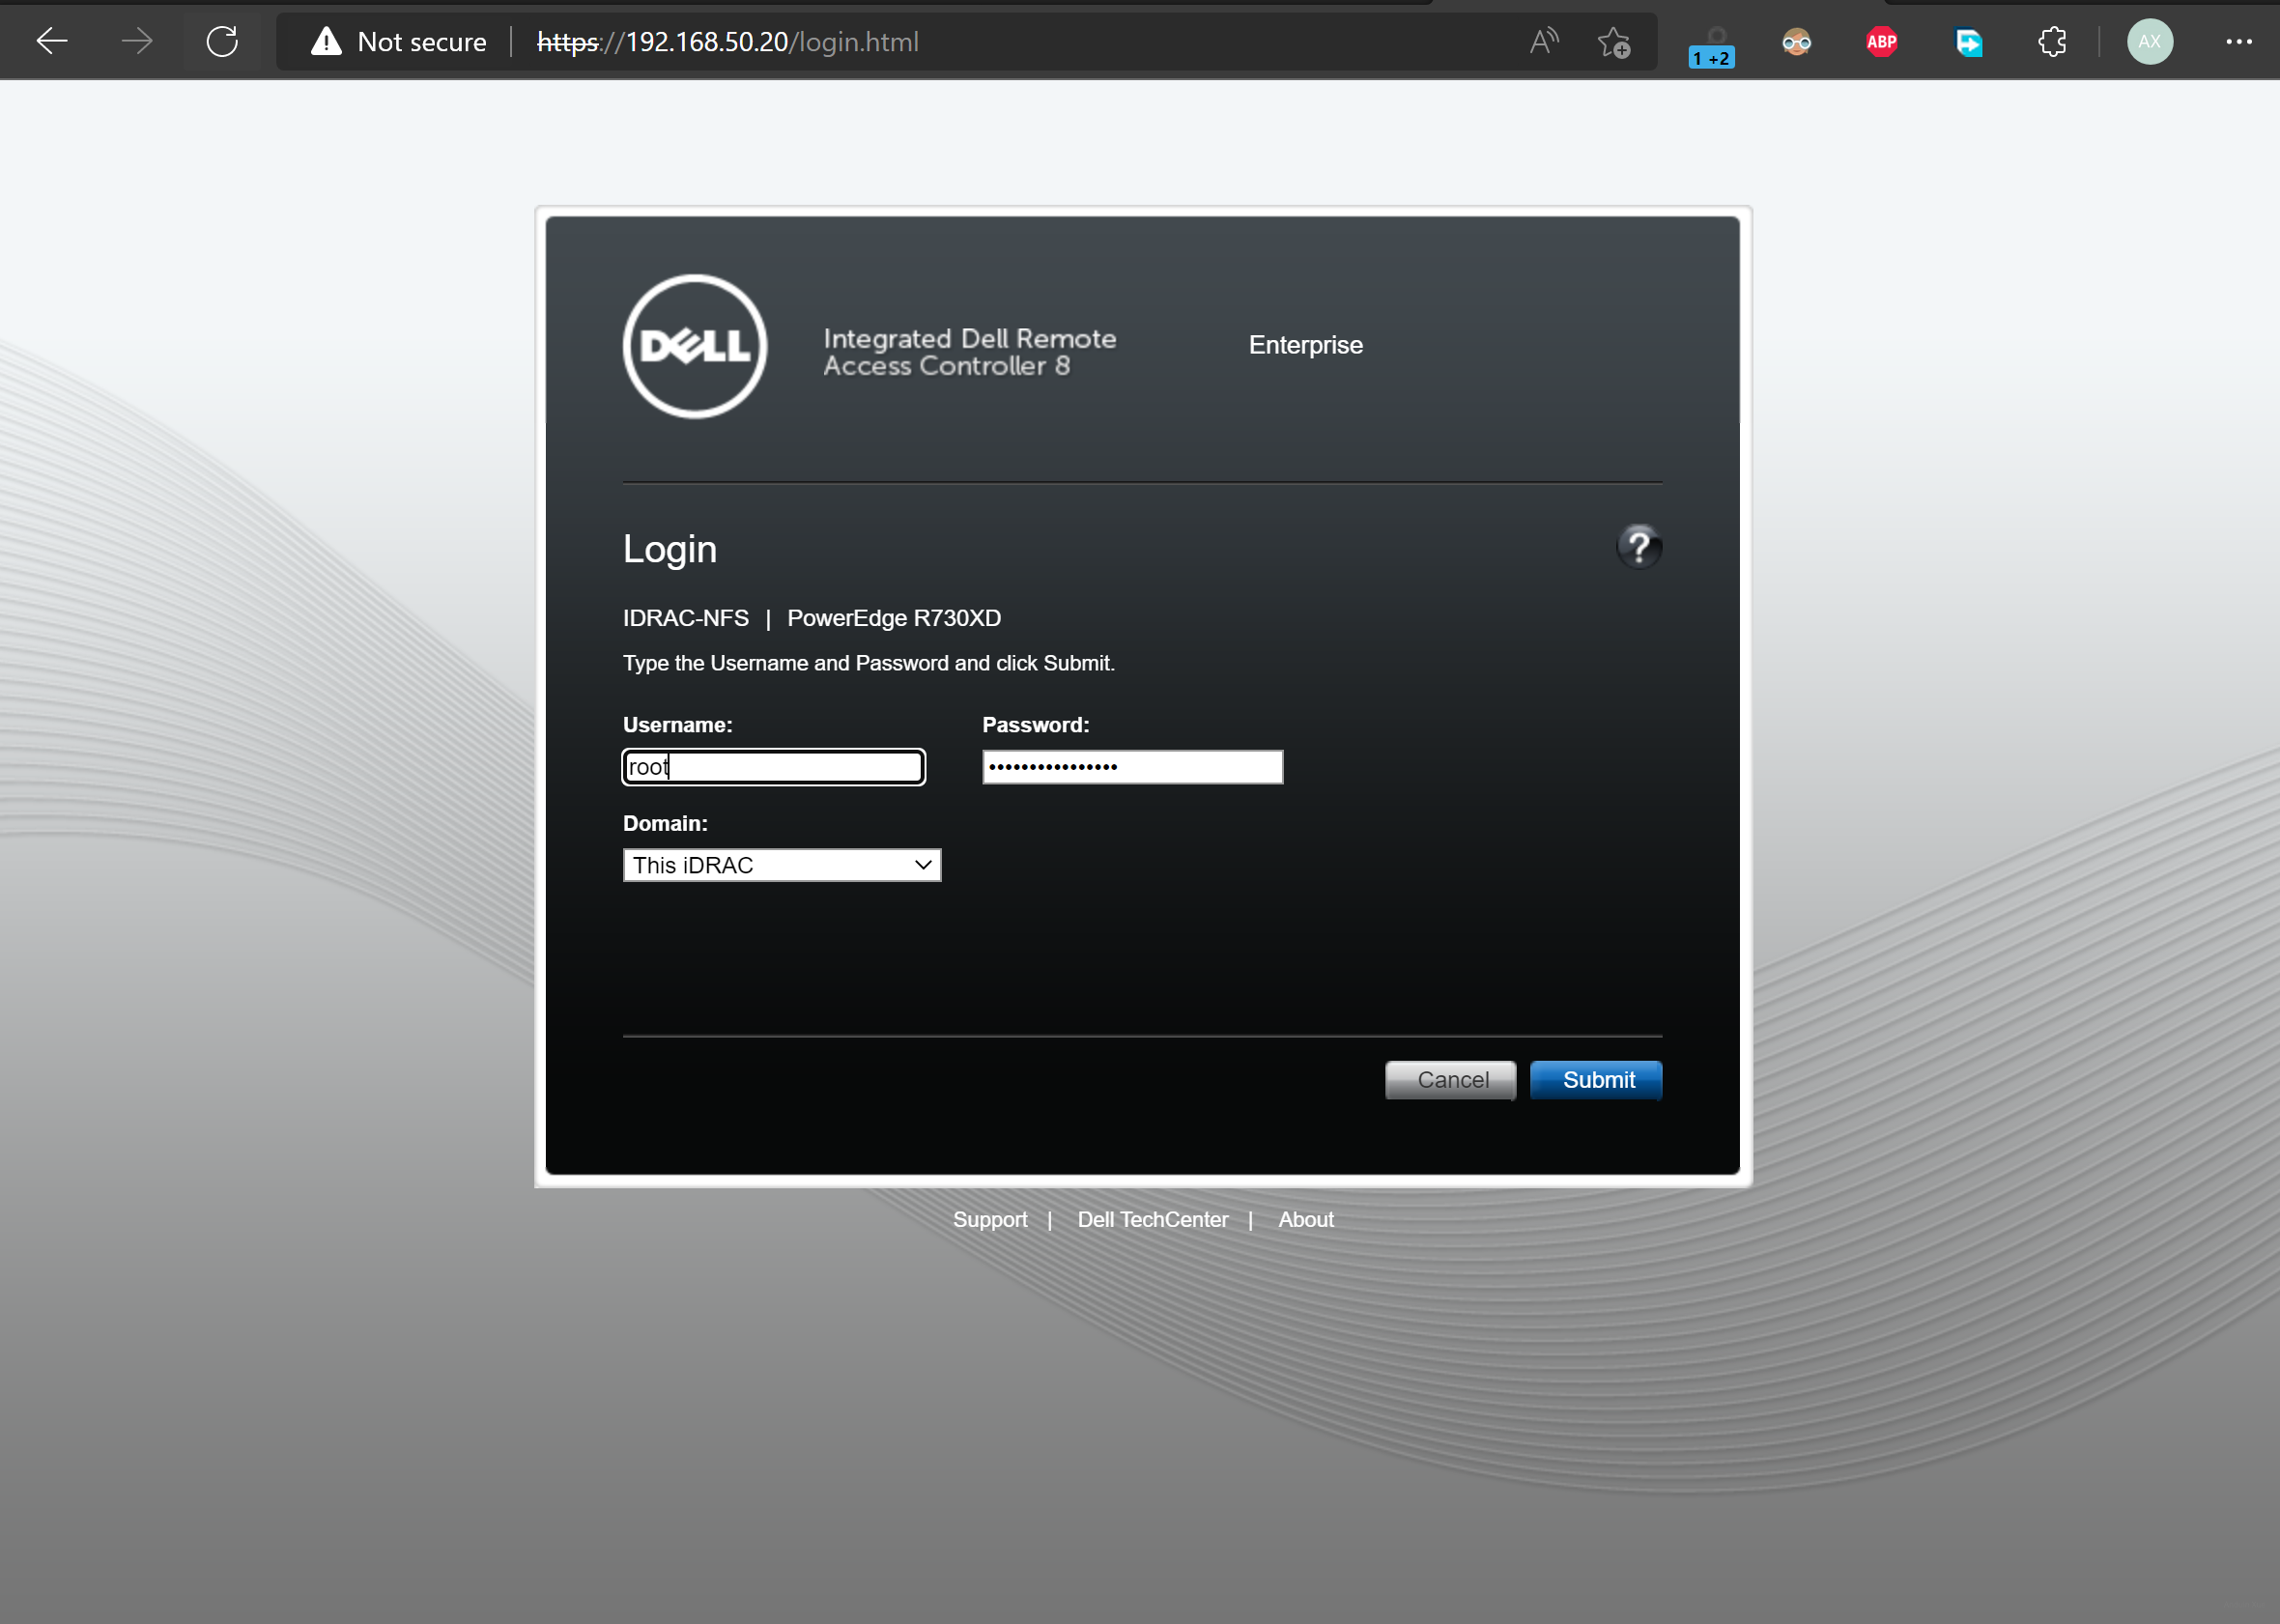
Default username: root.
Default password: calvin.
To upgrade the firmware, you need to download it from Dell.
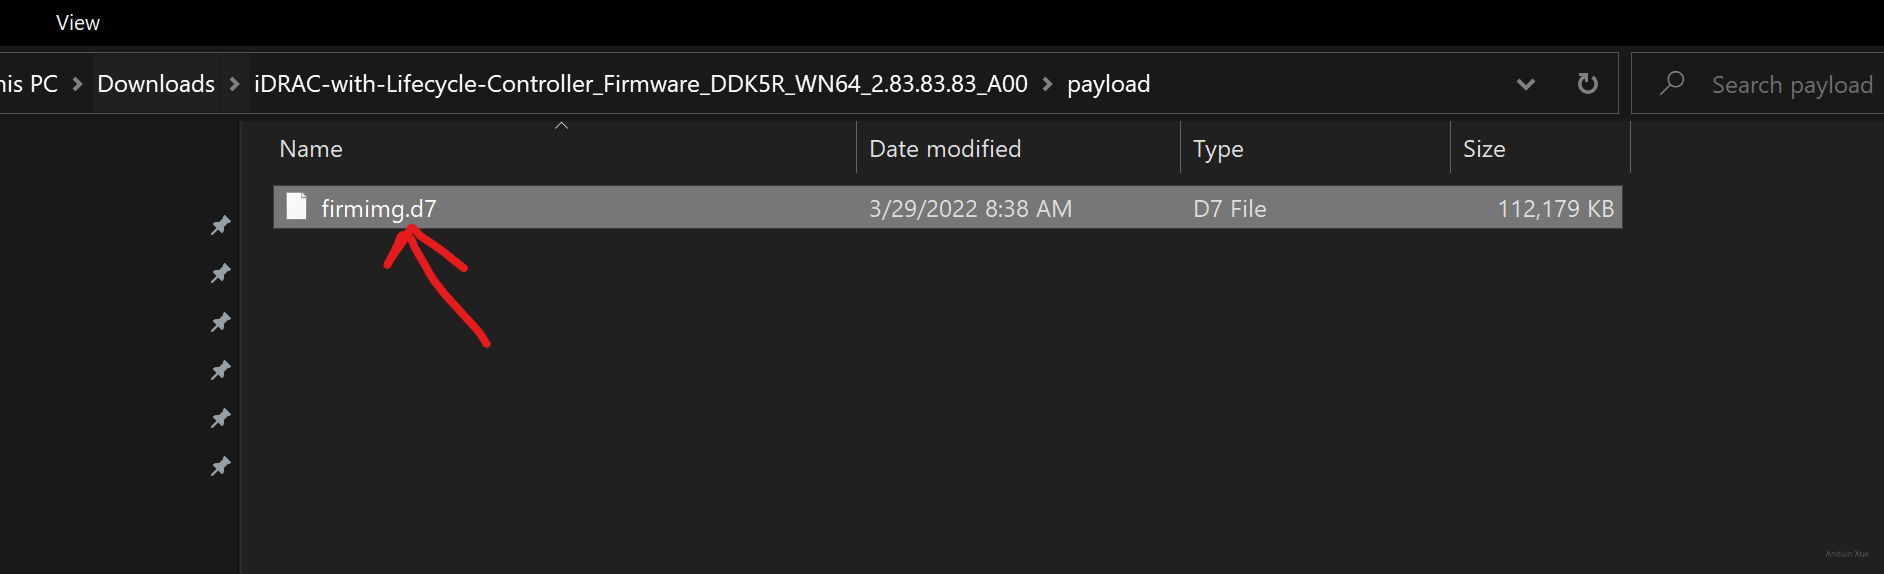
Download latest BIOS and iDRAC. Download the Windows x64 installer, and unzip it.

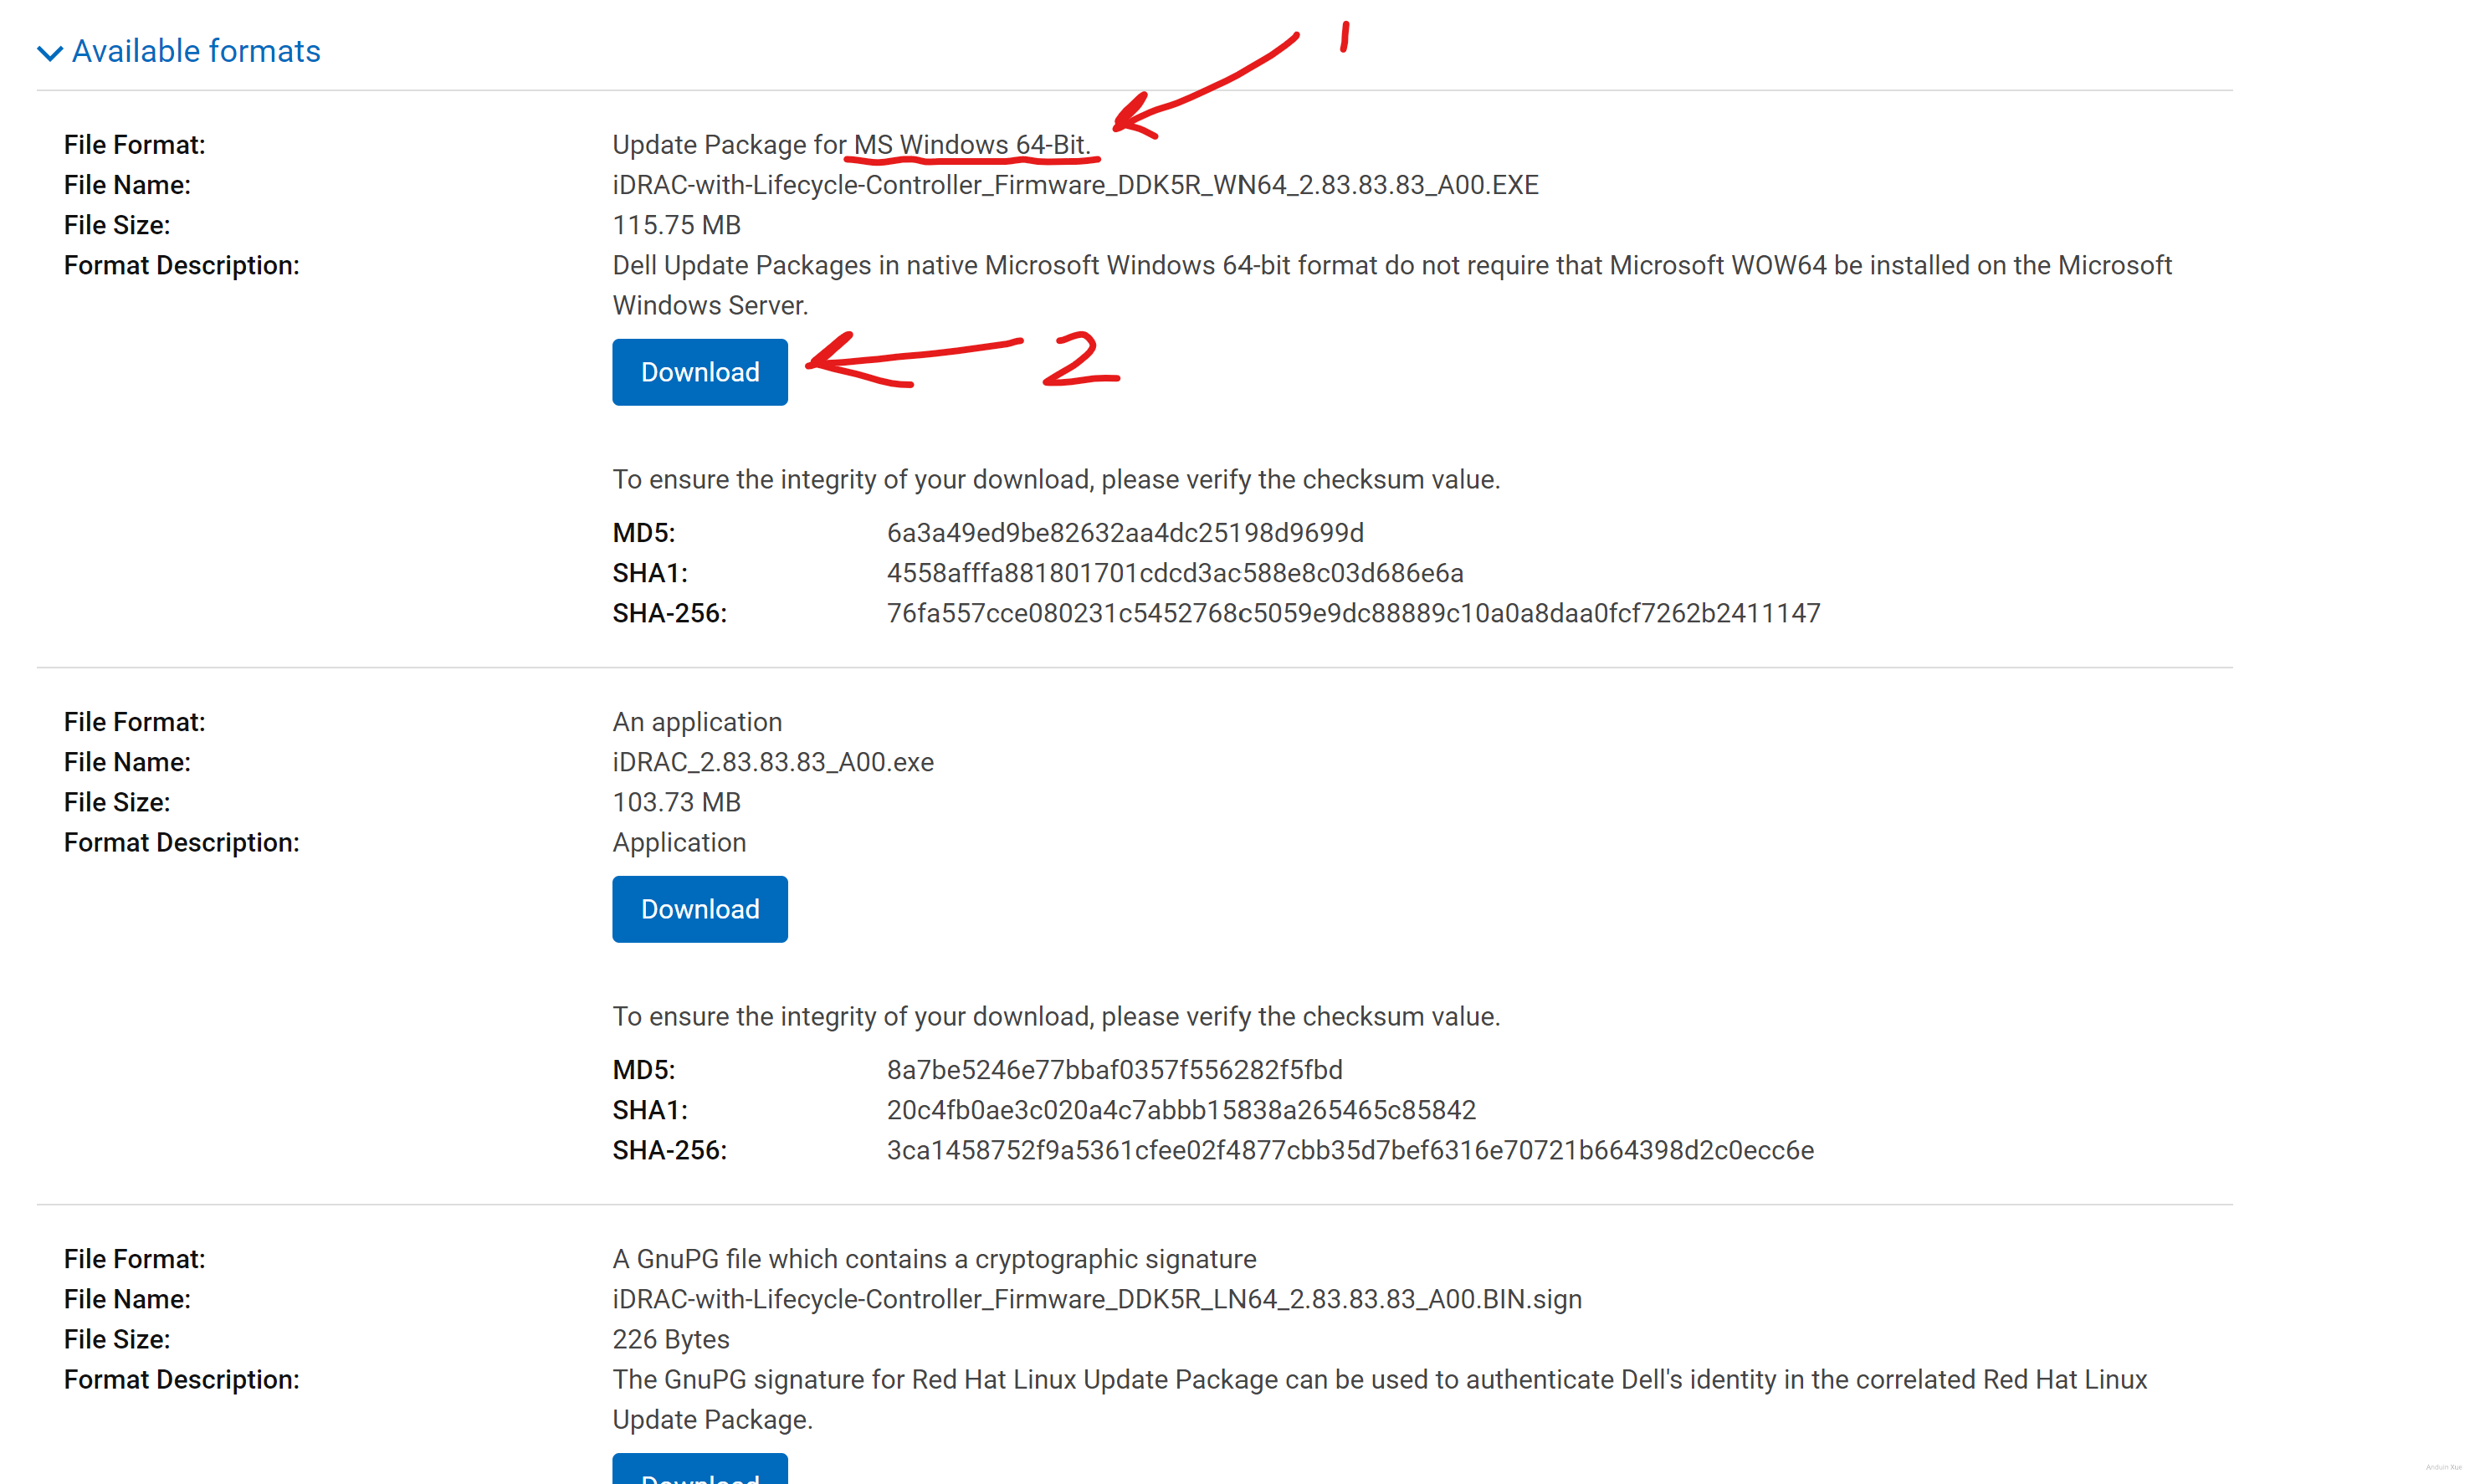
Extract it with 7zip.

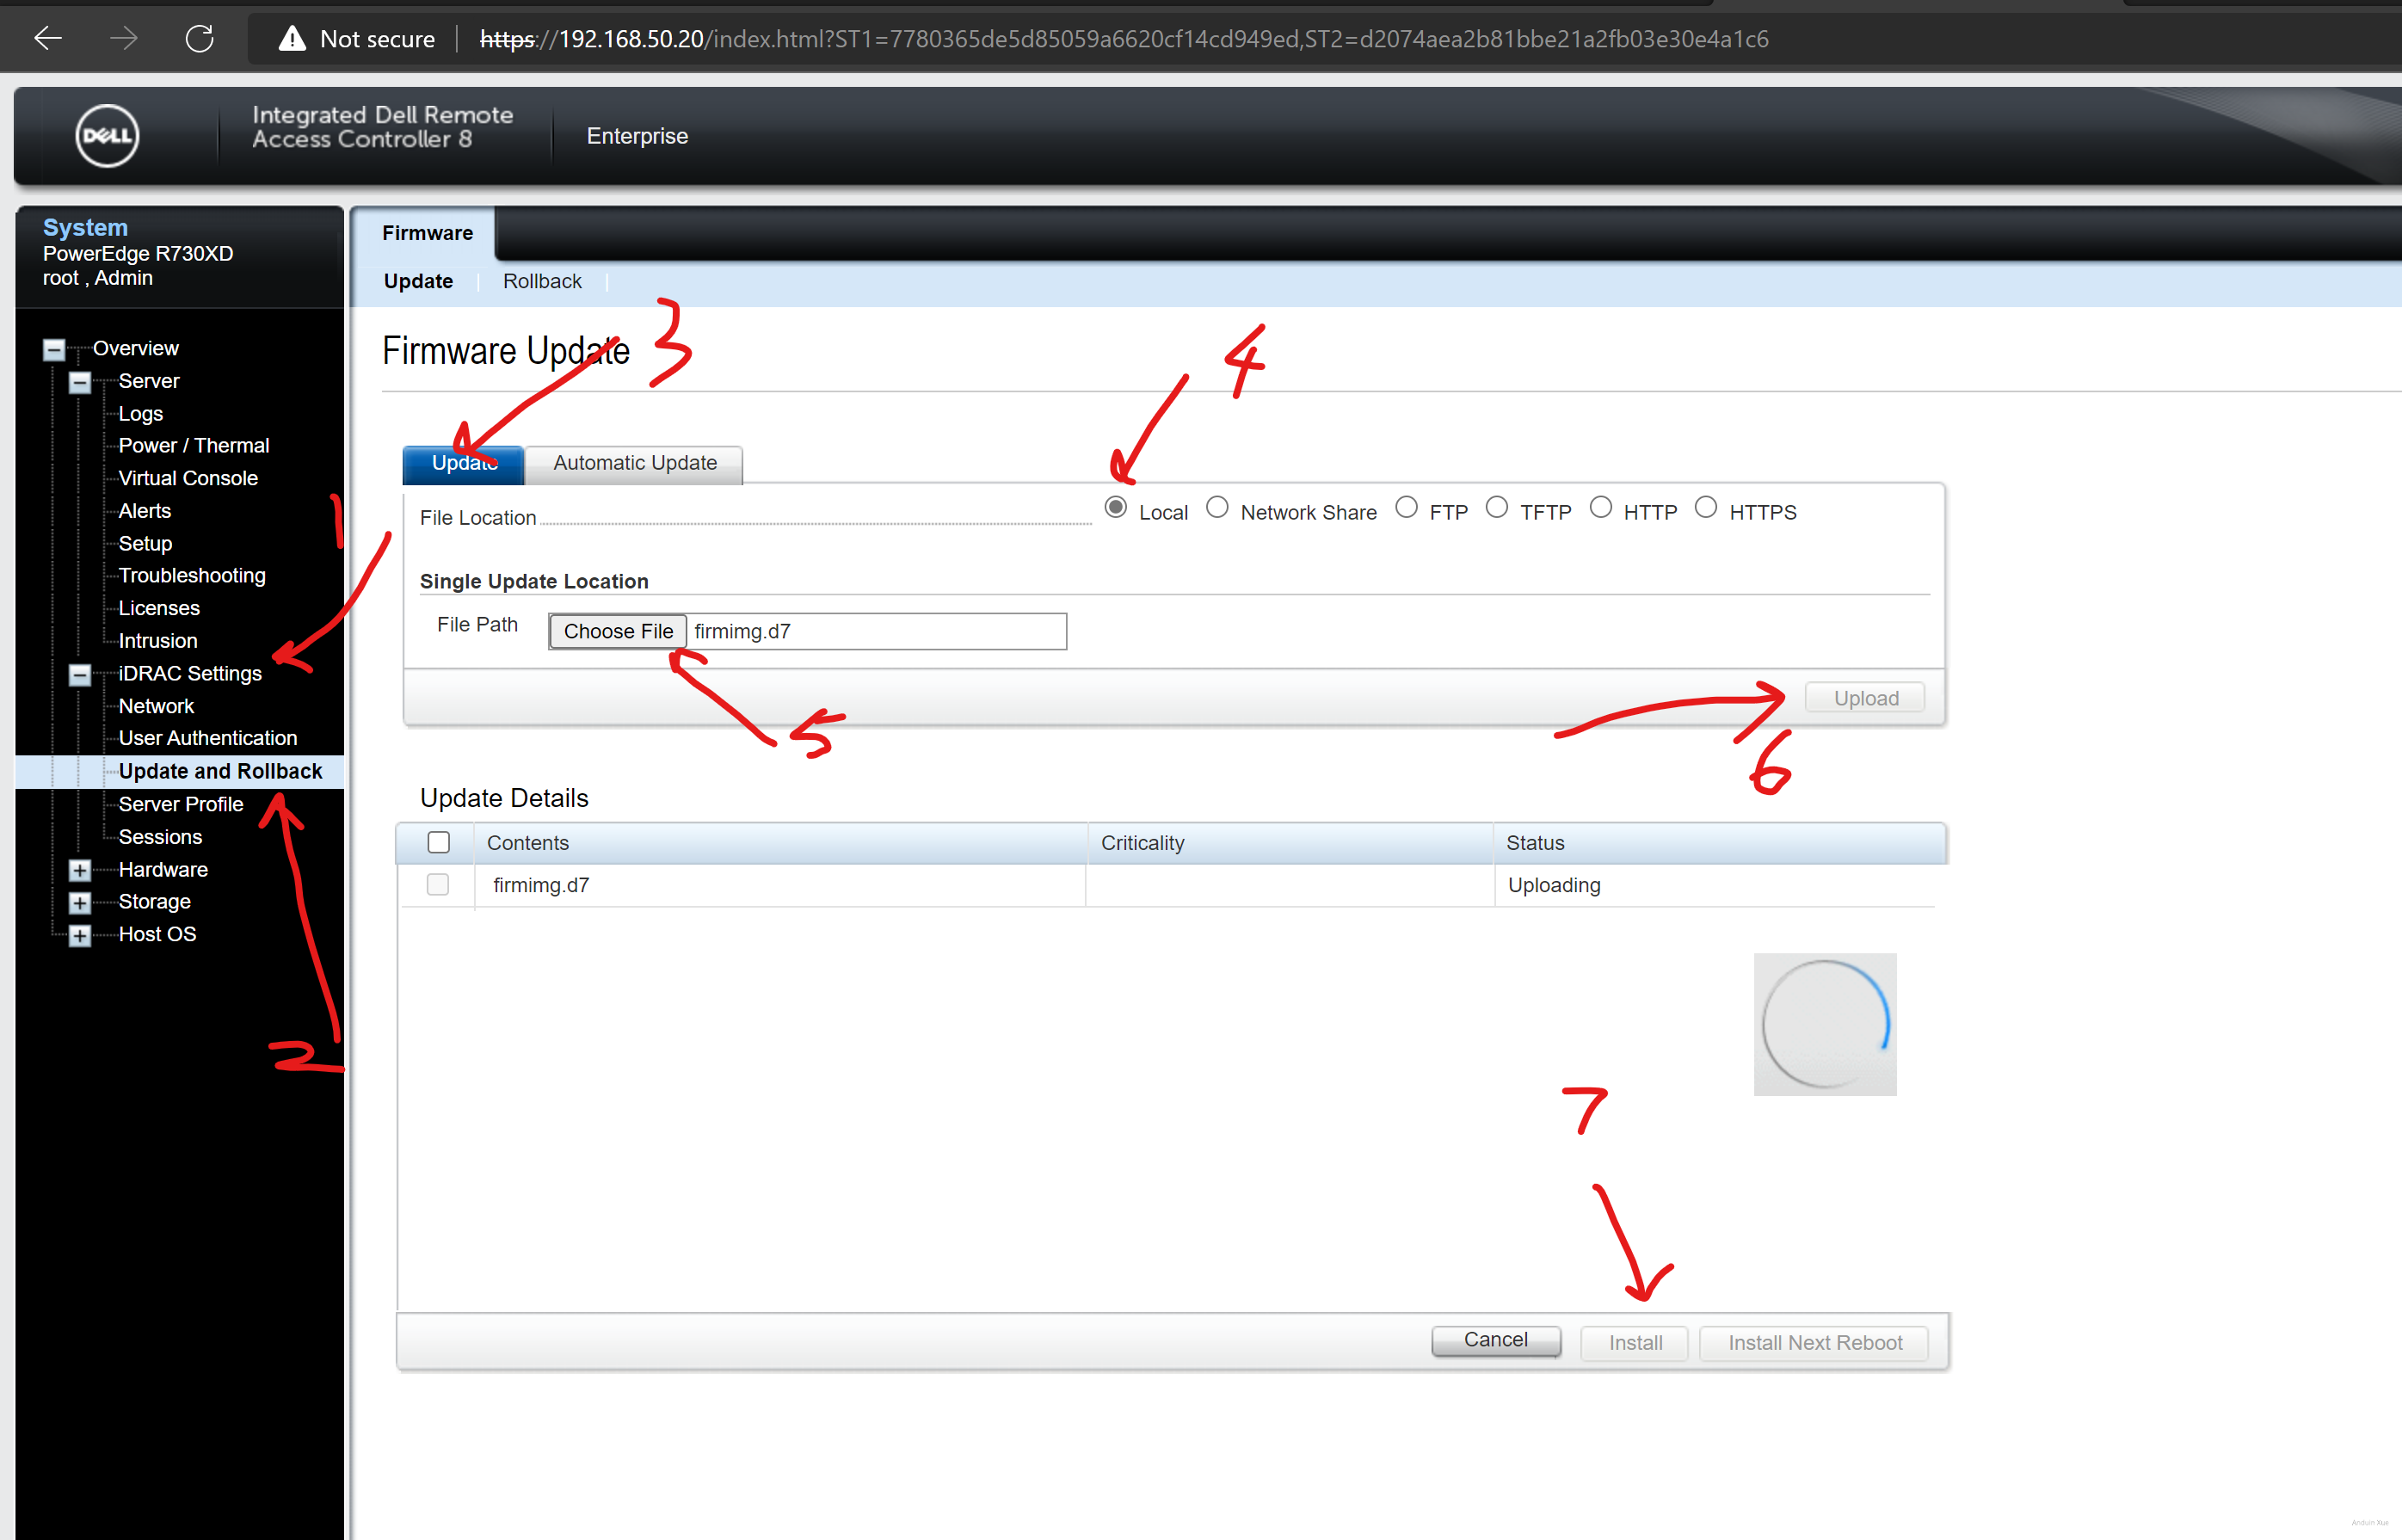
And upload the firming.d7 file to the iDRAC portal.
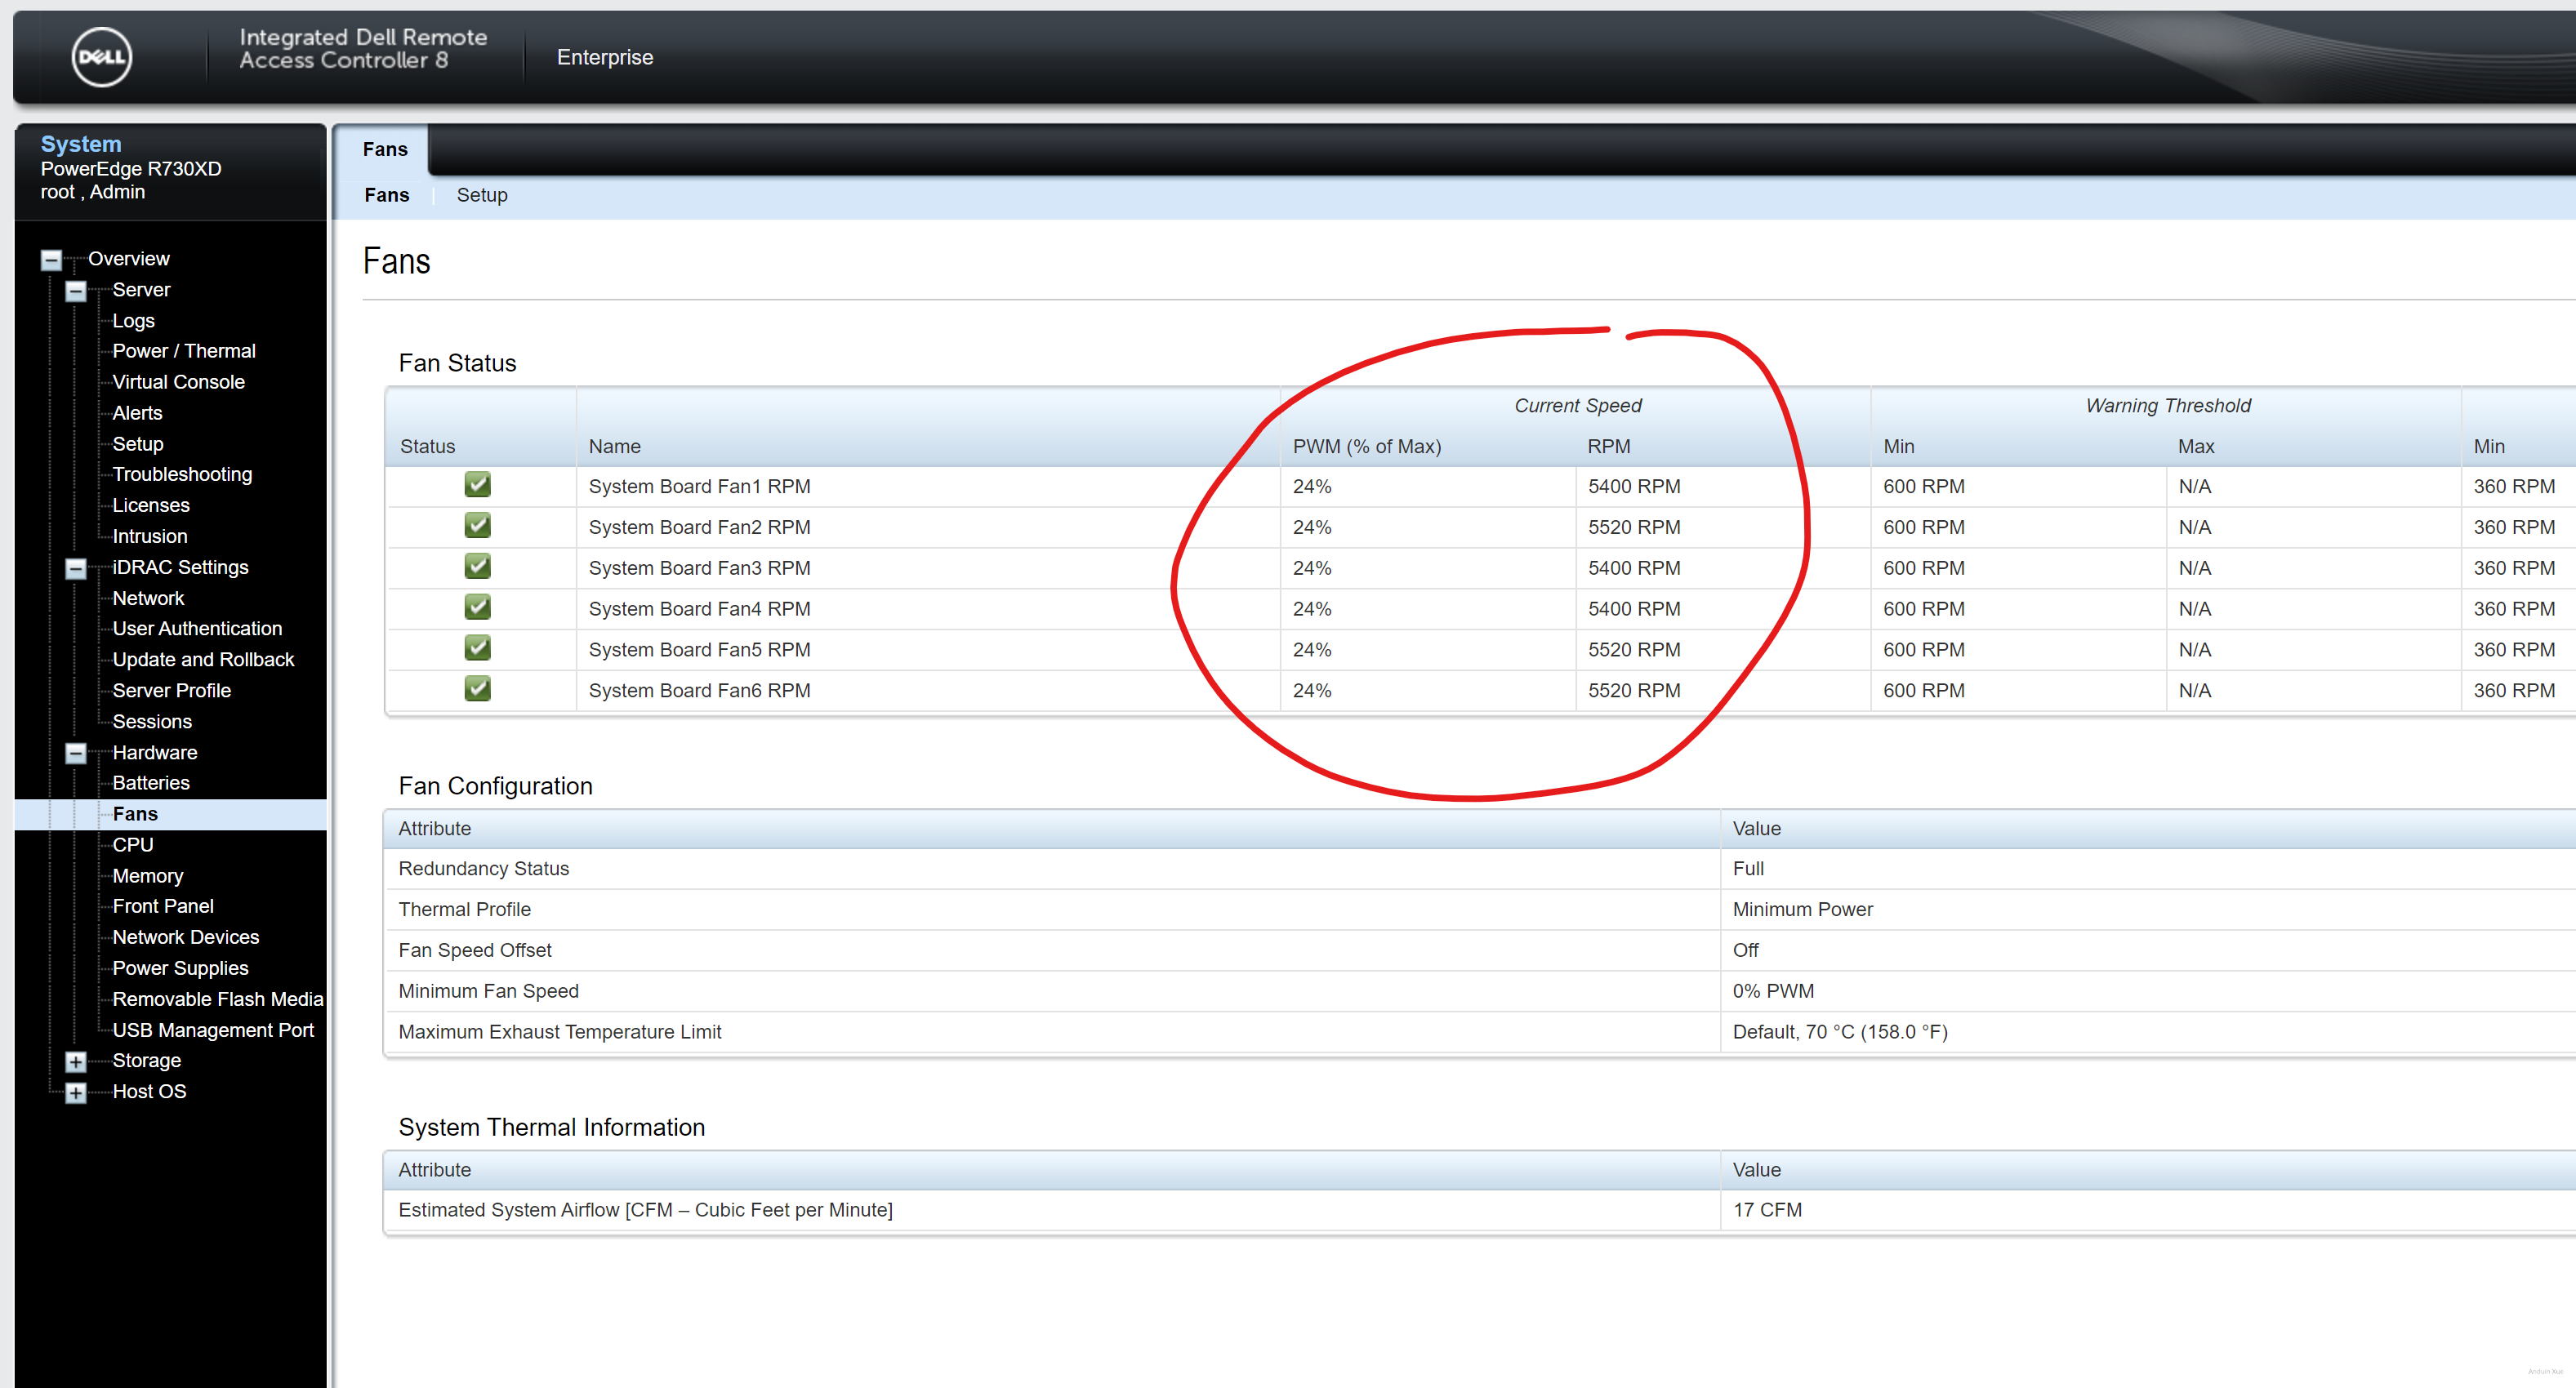
Step 2.2 Fix fan issue
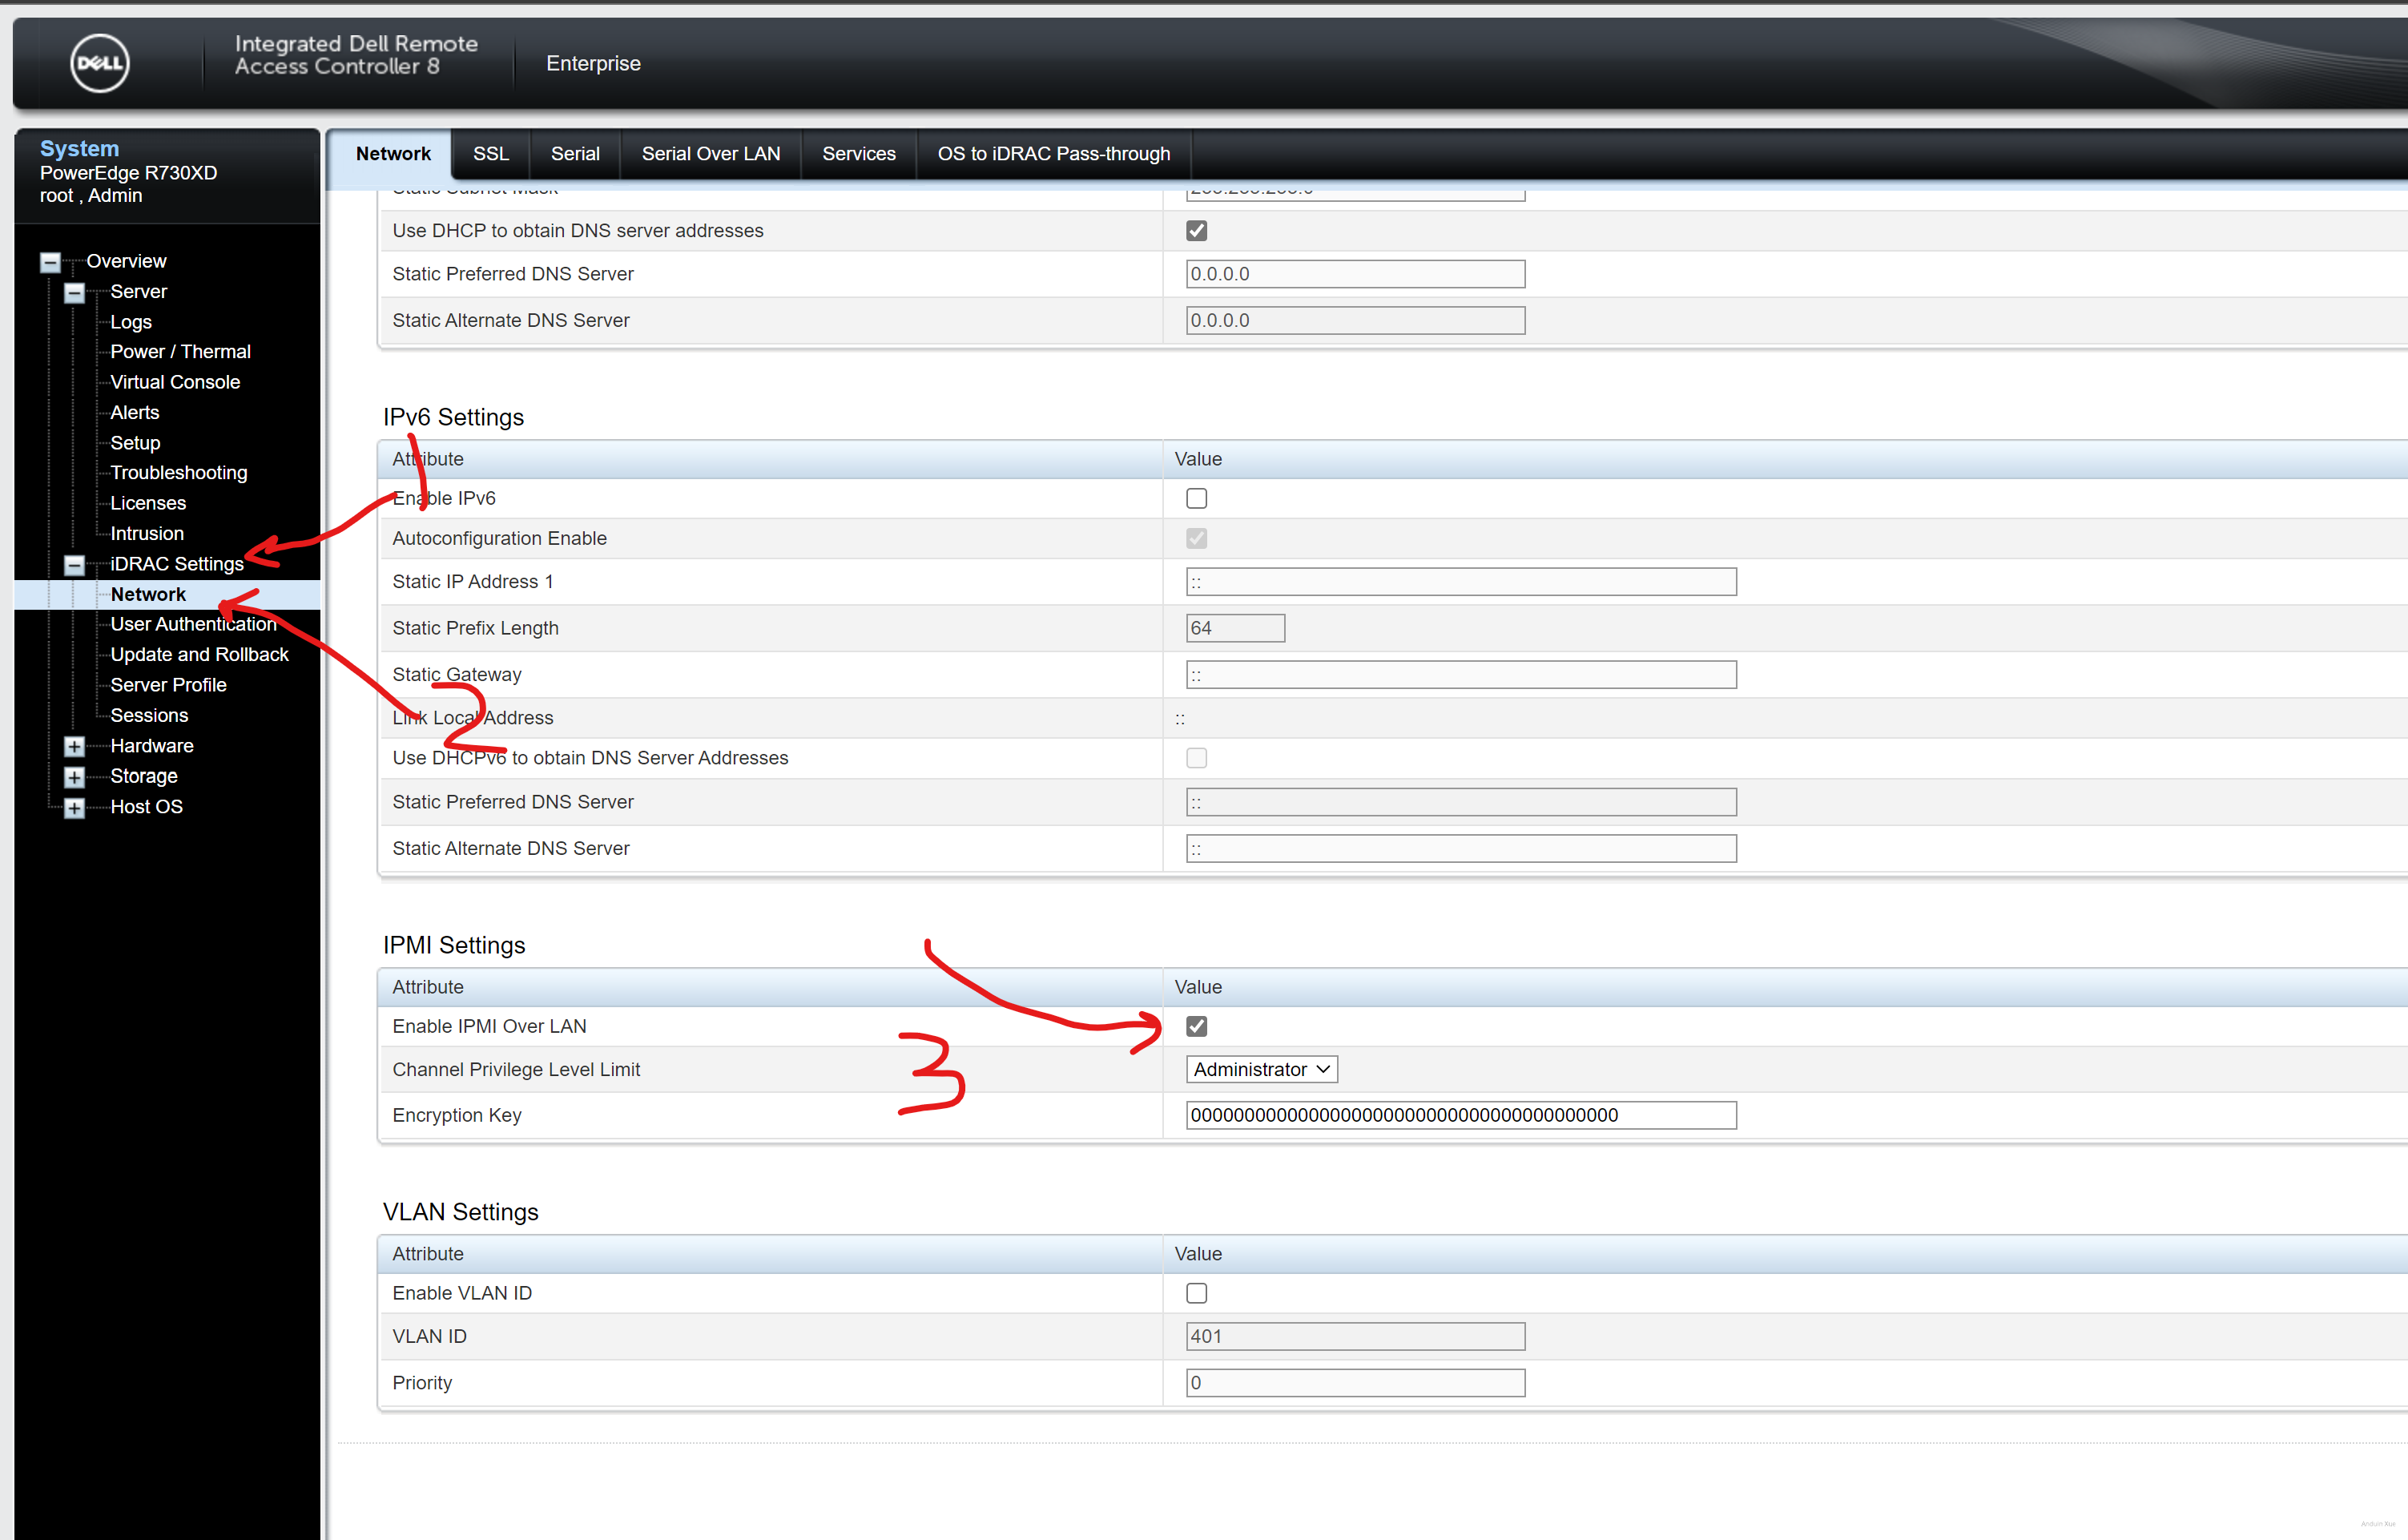
Enable IPMI over lan
Make sure this is enabled:
Download IPMI tools
For Windows, download it here.
After downloading, install it and add the extracted path to system environment variable PATH.
For Linux, try:
sudo apt install ipmitool
You can try to run it after installing:
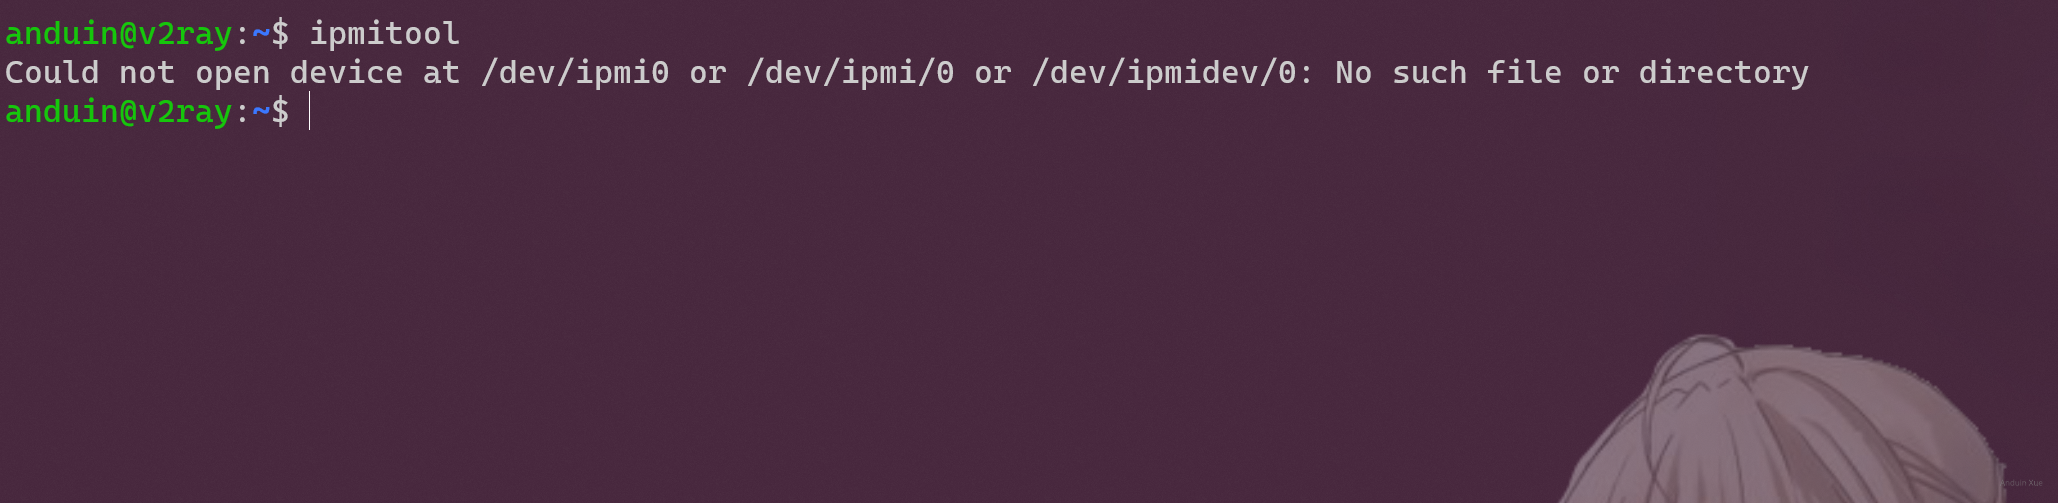
Fix your server
Here,
-Hfollows the host name.192.168.50.20as example.-Ufollows the user name.rootas example.-Pfollows the password.calvinas example.
Change those values to your own. And run:
ipmitool -I lanplus -H 192.168.50.20 -U root -P calvin raw 0x30 0xce 0x00 0x16 0x05 0x00 0x00 0x00 0x05 0x00 0x01 0x00 0x00
This will disablet the third-party PCIE default cooling response.
After that, your server is fixed. The fans became normal again.
Why that command?
# Query `Dell's Third-Party PCIe card based default system fan response` status
ipmitool raw 0x30 0xce 0x01 0x16 0x05 0x00 0x00 0x00
response like below means Disabled
16 05 00 00 00 05 00 01 00 00
response like below means Enabled
16 05 00 00 00 05 00 00 00 00
To disable it:
0x30 0xce 0x00 0x16 0x05 0x00 0x00 0x00 0x05 0x00 0x00 0x00 0x00
To disable it: (Jets off)
0x30 0xce 0x00 0x16 0x05 0x00 0x00 0x00 0x05 0x00 0x01 0x00 0x00
Manual fan control?
Yes you can do manual fan control.
To enable that:
192.168.18.7 raw 0x30 0x30 0x01 0x00
The speed is a hex number, from 00 to 64. You may need a hex converter.
https://www.rapidtables.com/convert/number/hex-to-decimal.html
64is100%50is80%00is0%.
For example, to set fan speed to 80%,
0x30 0x30 0x02 0xff 0x50
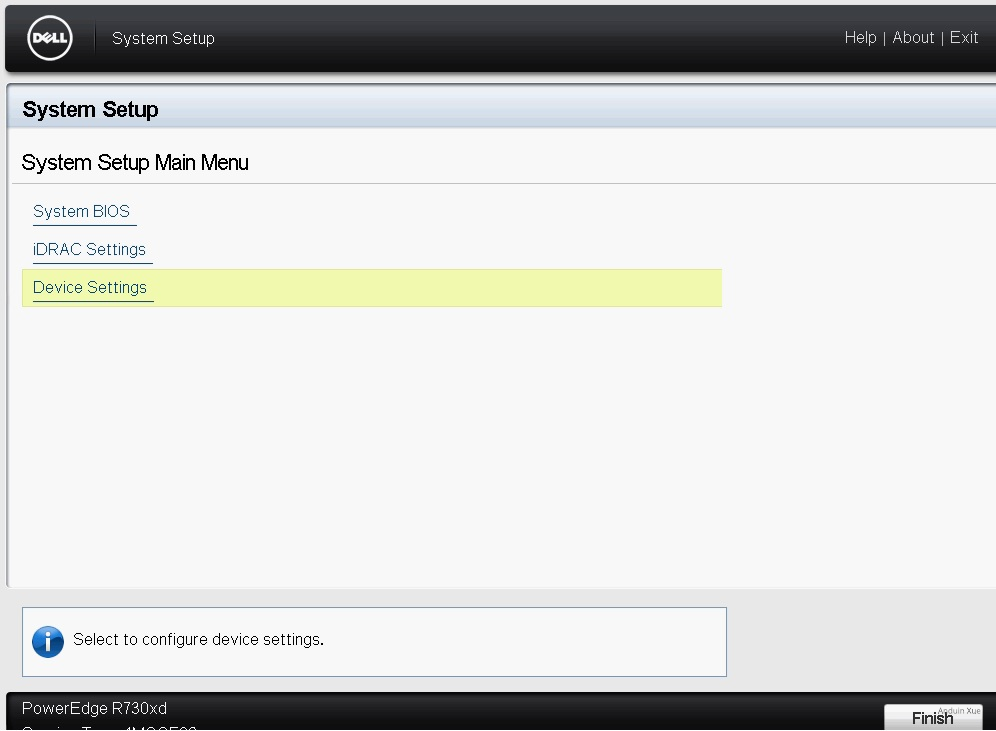
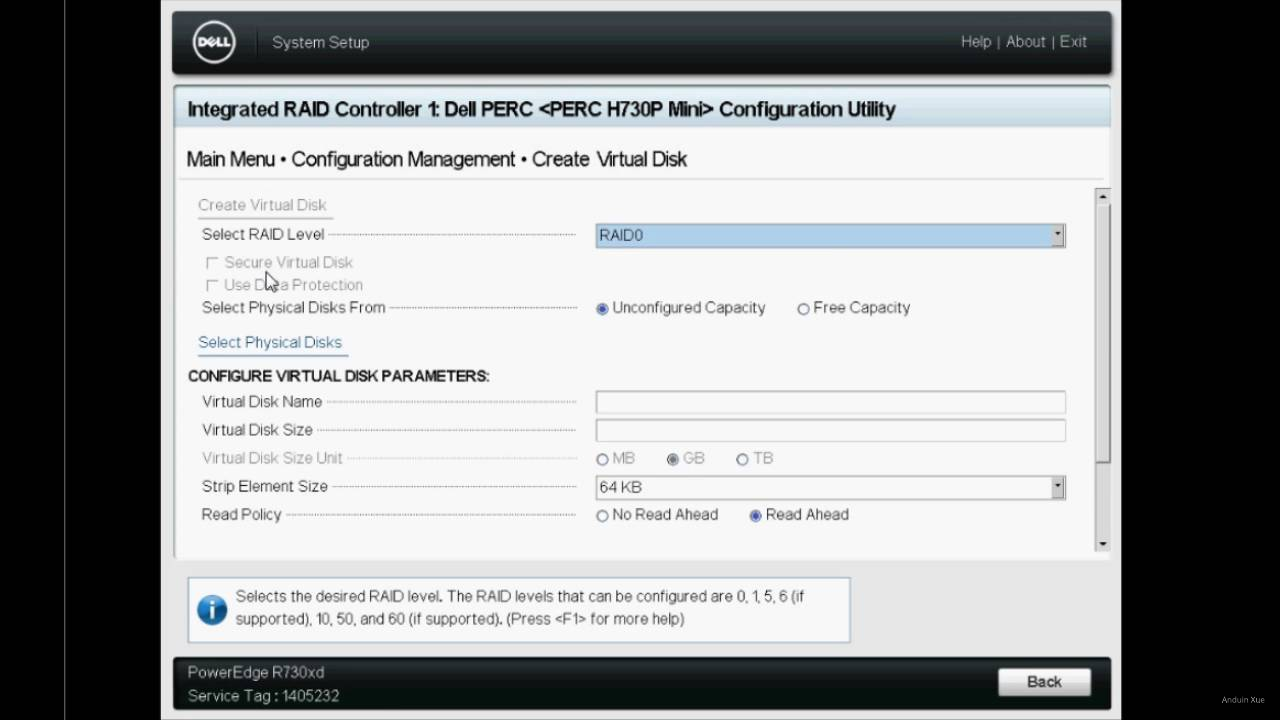
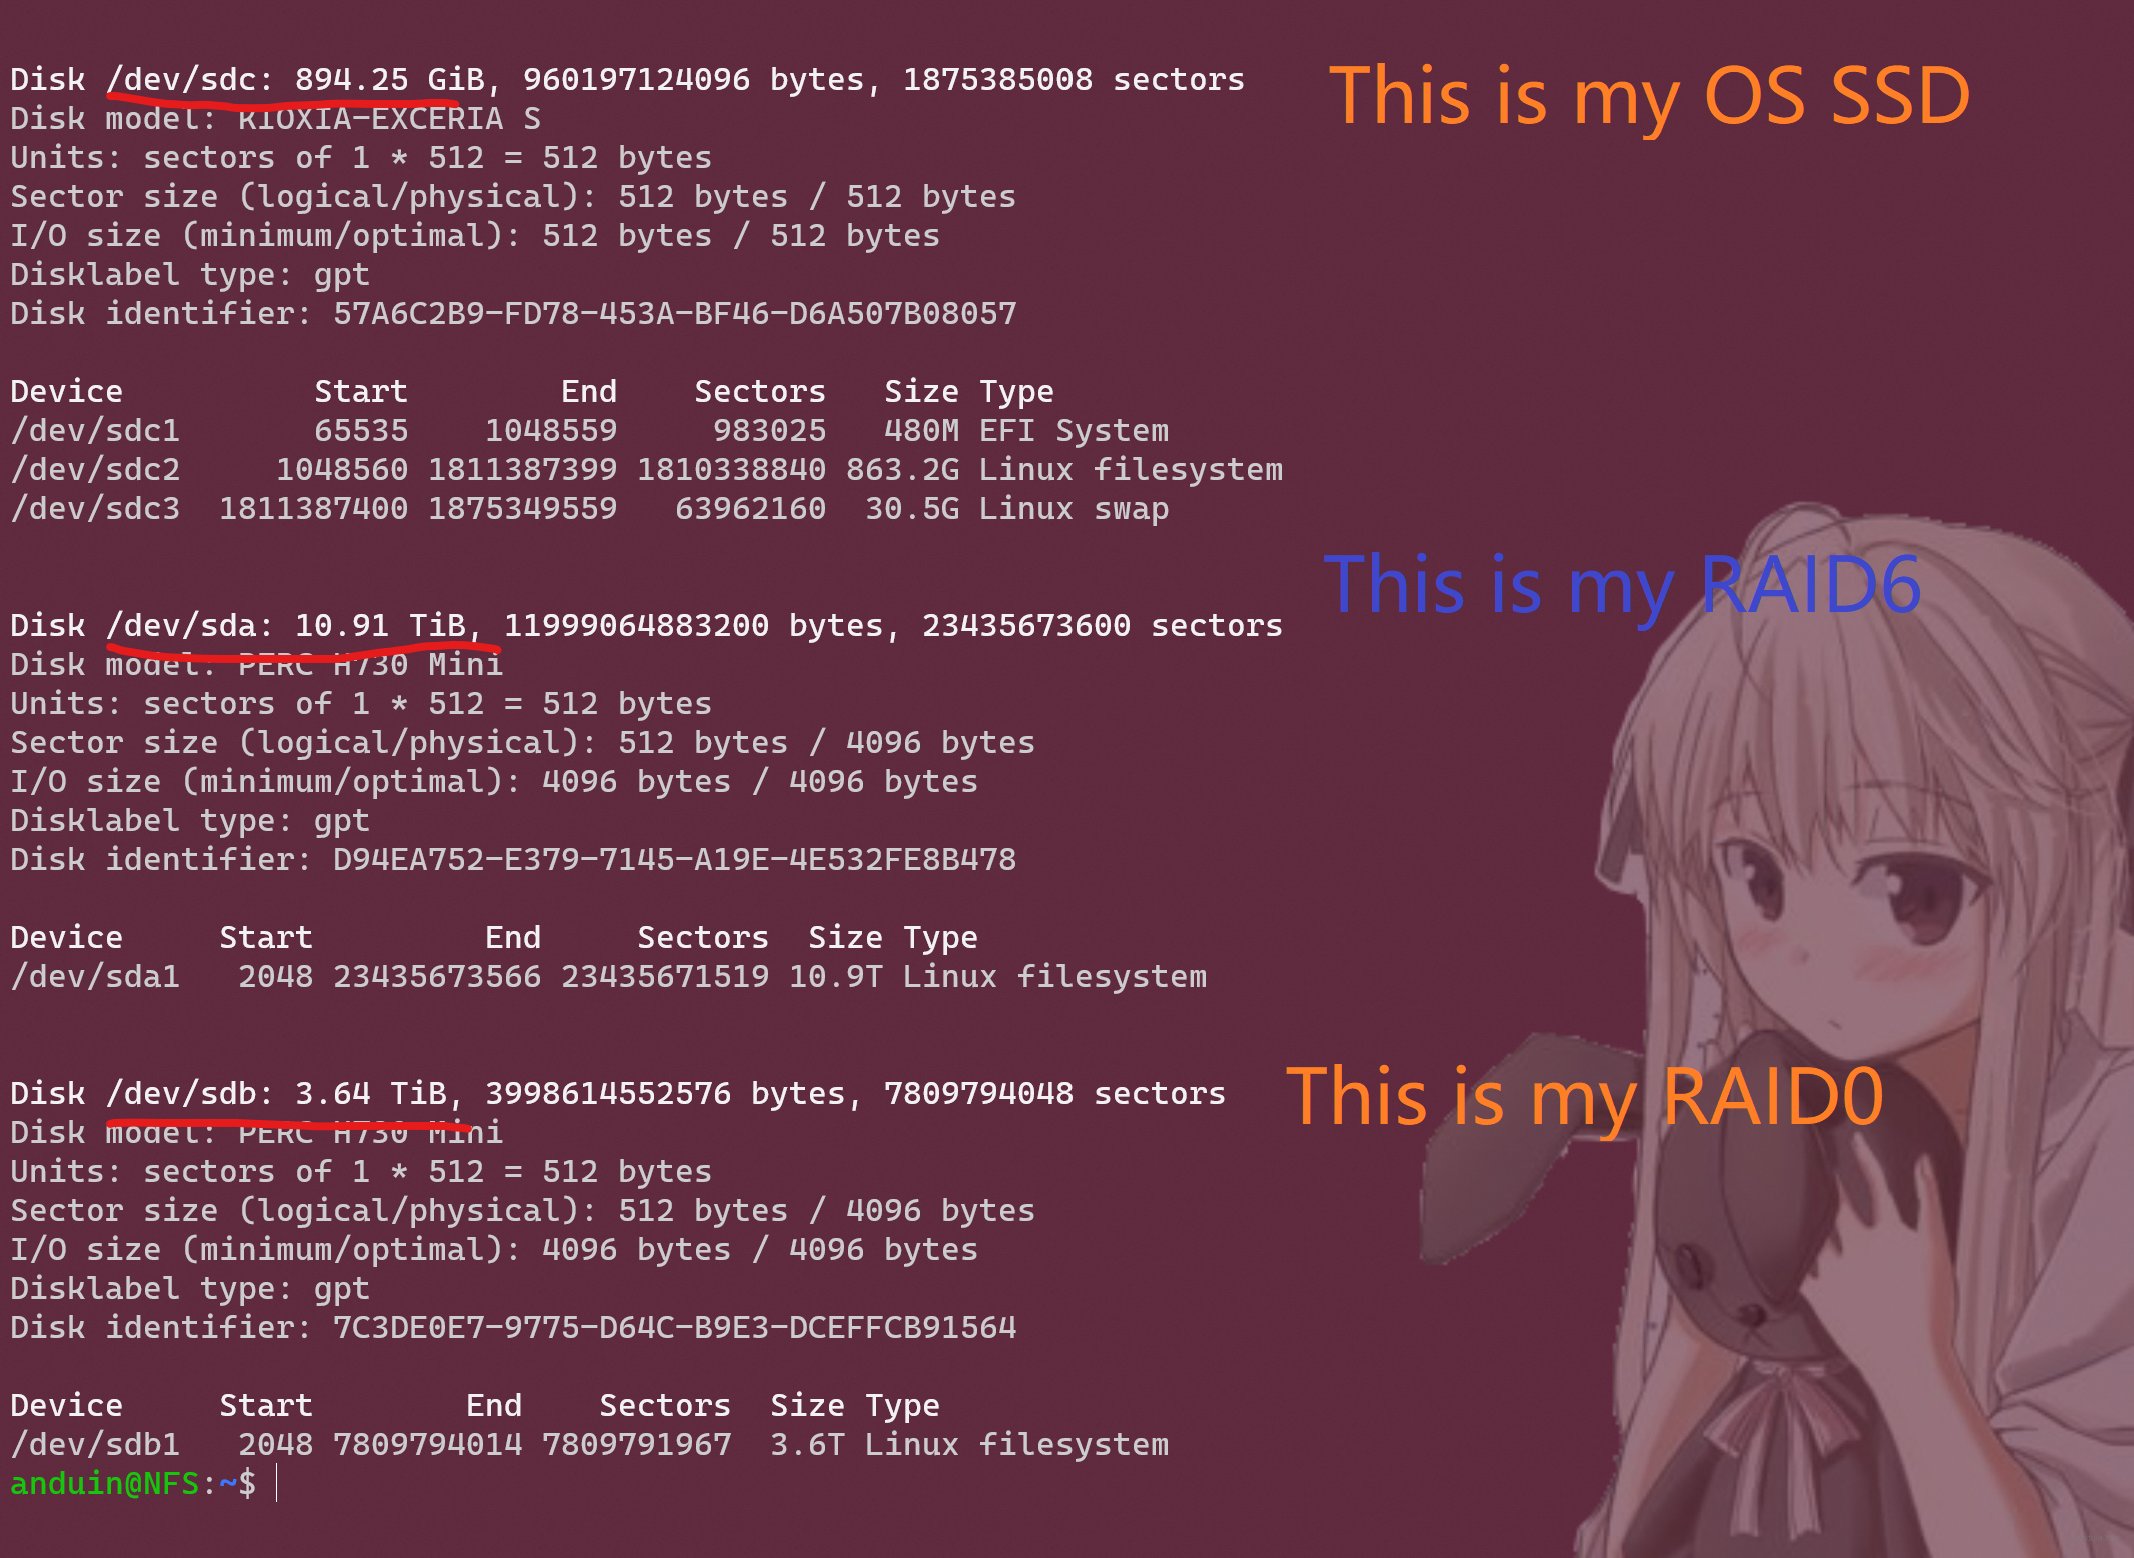
Step 3 - Configure RAID 6
After setting up your fan and iDRAC, you can setup your RAID now.
It is suggested to configure a RAID 6 array because it's safe.
You need to open the terminal of your server. Reboot it, and press F2 to enter RAID settings.
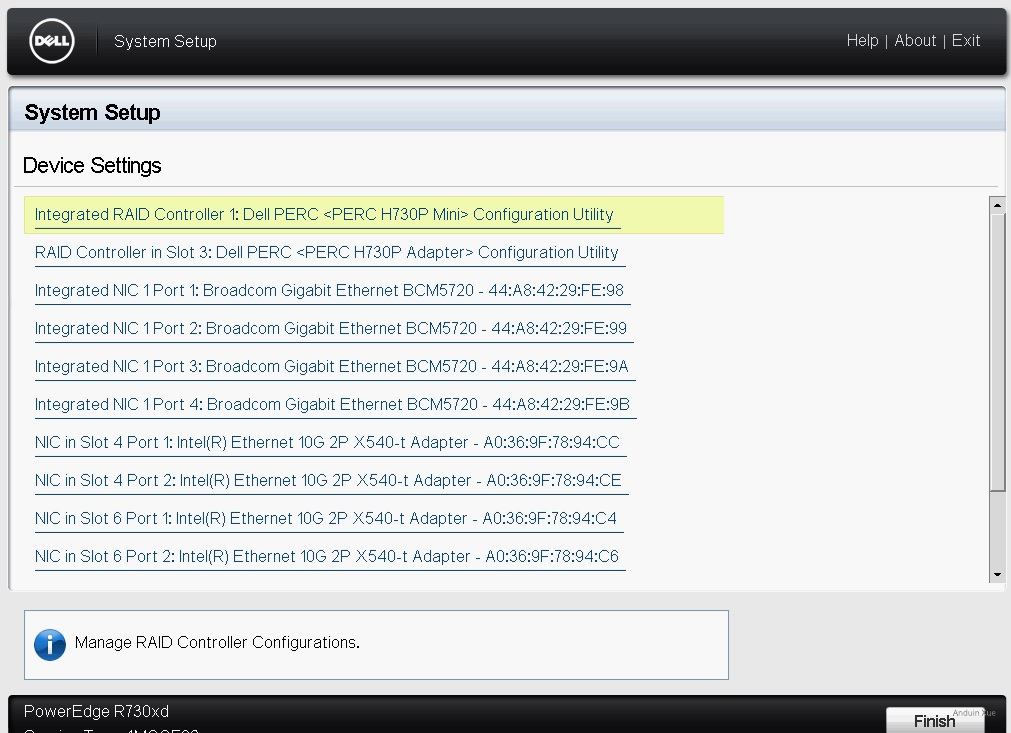
You need to create a new virtual disk. Select related physical disks and raid mode and then initialize the disk.
Step 4 - Install Debian
Step 4.1 Download and burn Debian installer
Now download Debian OS ISO file.
You can download it here.
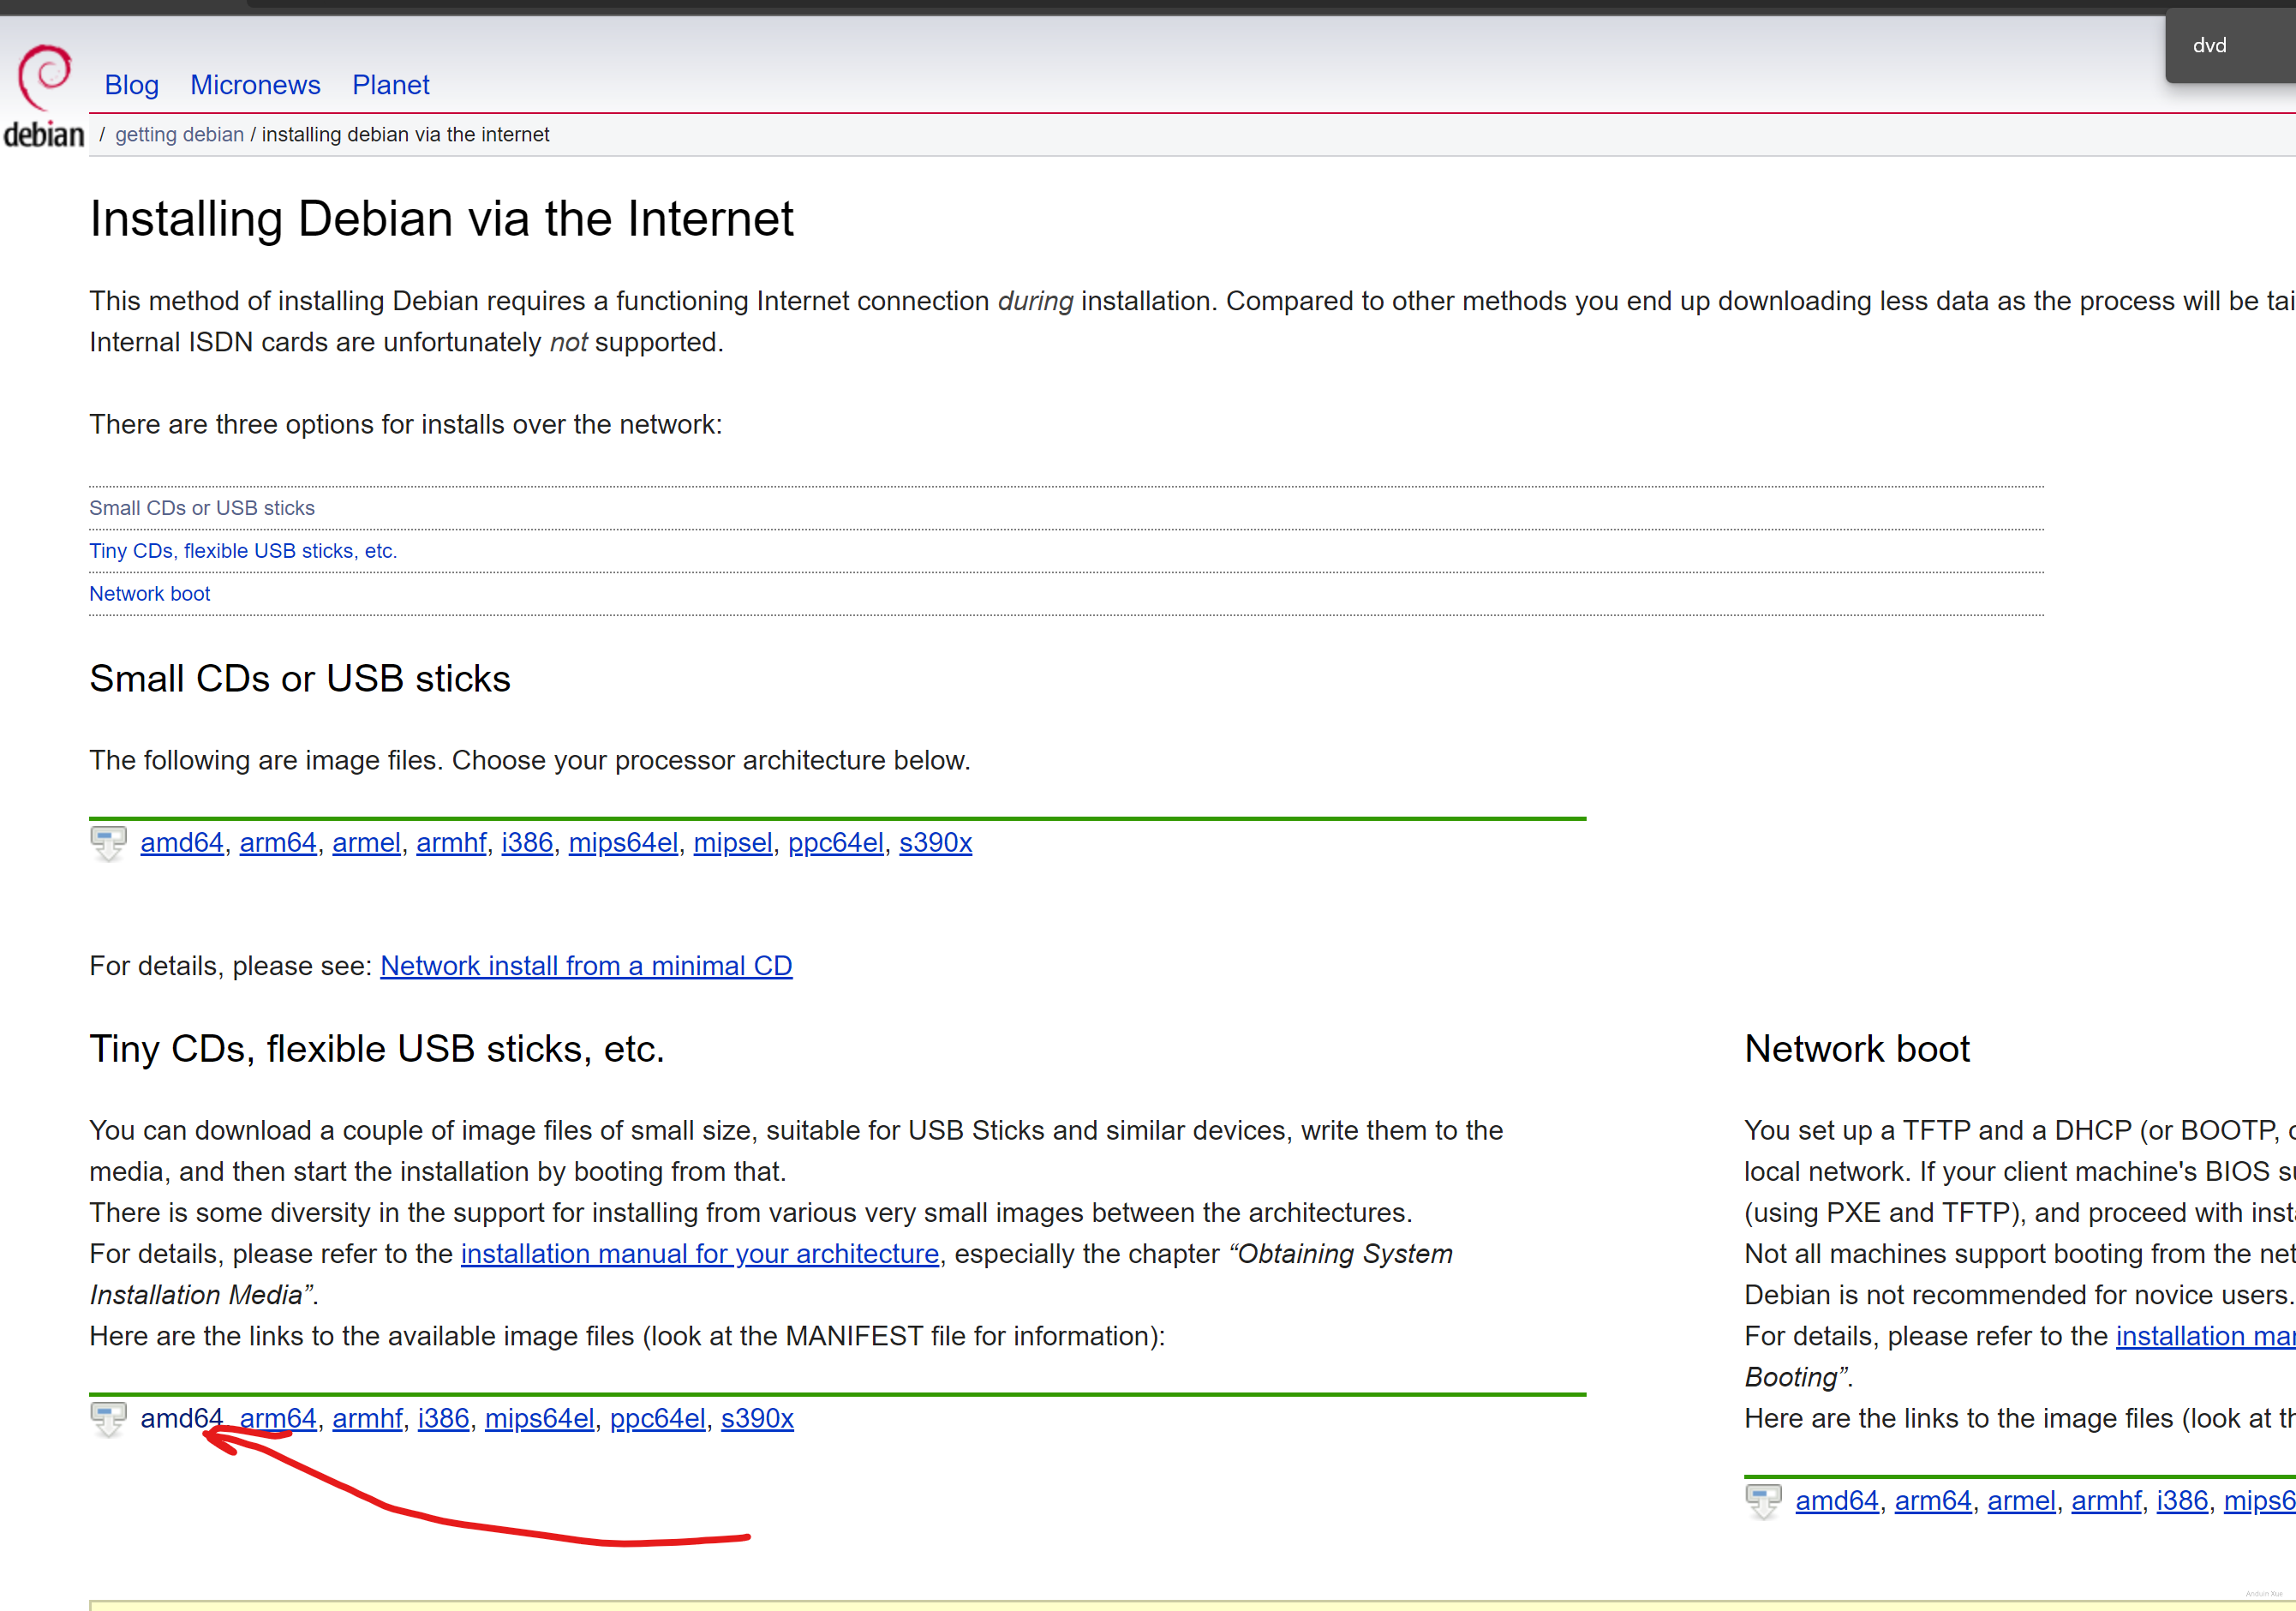
I'm using Rufus on Windows to burn that iso to a USB stick.
Make sure you select DD mode when burning the USB stick!
Step 4.2 Install the Debian OS.
Now you can install the Debian OS.
Just install the USB stick to your server and boot.
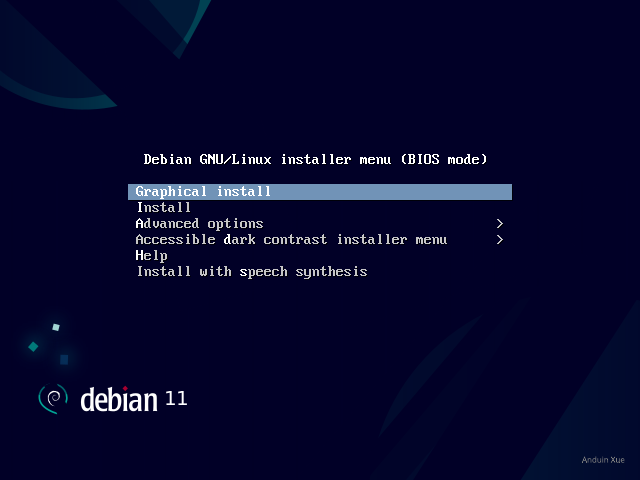
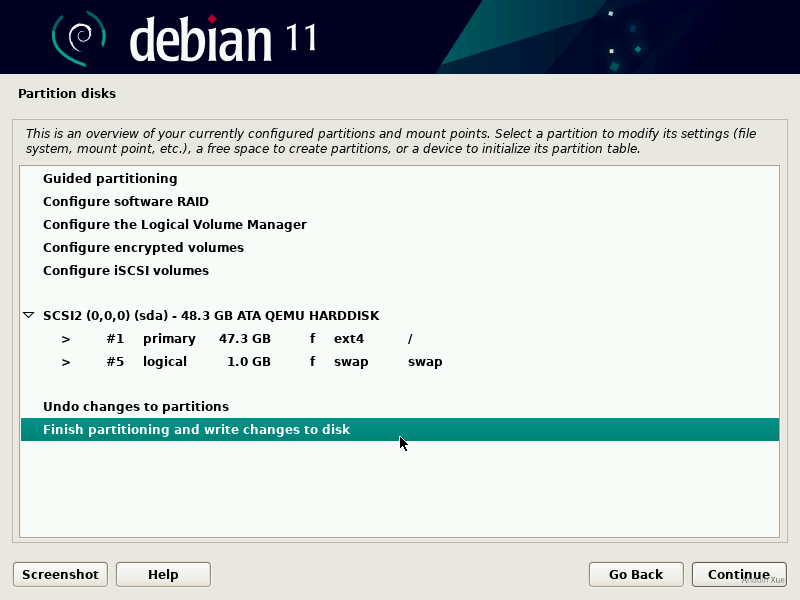
Follow the instructions to finish installing Debian as OS.

And note this: Do NOT install your OS to your NVME!!! It won't boot!
Do install the OS to the SATA SSD!
After installing the OS, you need to configure the authentication for best practice.
You can follow the instructions here if you are not familiar with Linux.
What need to do after you get a new Linux?
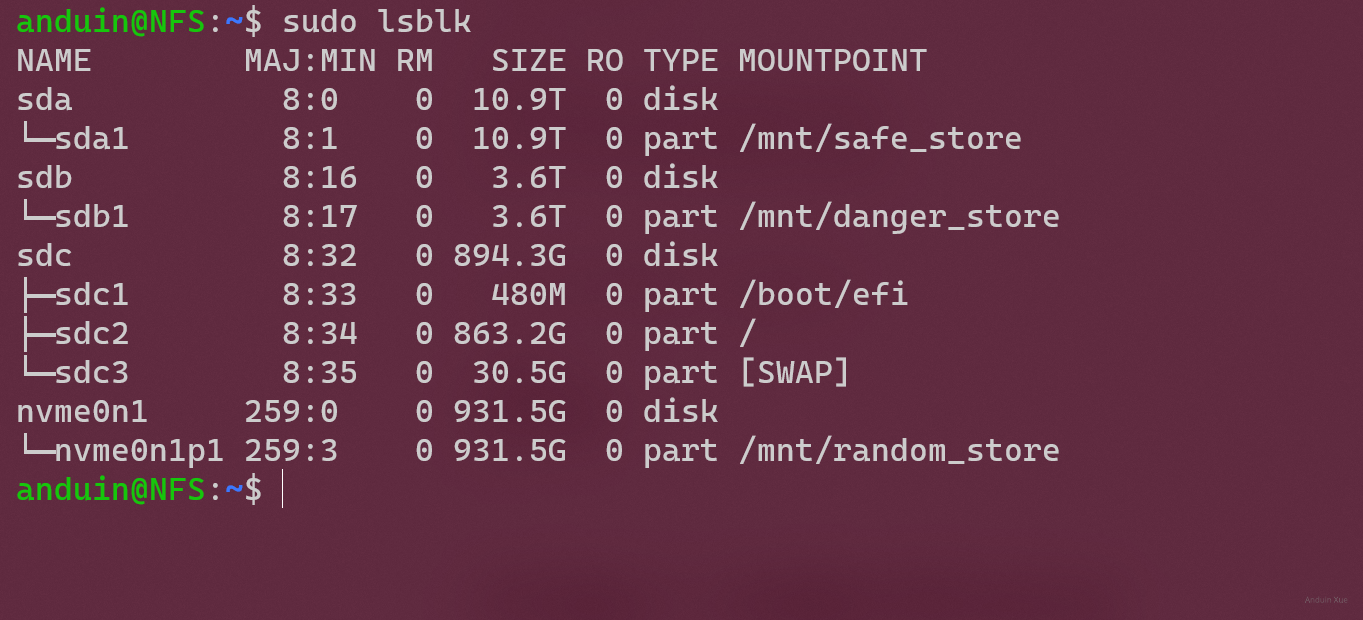
Step 5 - Mount disks
Run command sudo fdisk -l to locate the disk:
sudo fdisk -l
Now we can create a new partition. I'm using sda as an exmaple in it.
sudo fdisk /dev/sda
Tips:
- n – Create partition
- p – print partition table
- g - reset as GPT partition table
- d – delete a partition
- q – exit without saving the changes
- w – write the changes and exit.
After creating, we can format it.
mkfs.ext4 /dev/sda1
After formatting, you need to get it's UUID.
sudo blkid | grep UUID=
Output will be like:

Copy the PARTITION's UUID after UUID, not the PARTUUID!
For example: 3238a745-7026-47c2-82a3-e48a4d31556b.
Now we need to mount that. For example, to mount disk 3238a745-7026-47c2-82a3-e48a4d31556b to /mnt/random_store.
First, edit /etc/fstab file:
sudo vim /etc/fstab
Add this line:
UUID=3238a745-7026-47c2-82a3-e48a4d31556b /mnt/random_store ext4 defaults,noatime,nofail 0 0
So it will be like:

Try to mount it:
sudo mkdir /mnt/random_store
sudo mount /mnt/random_store
You can verify the mappings:
sudo lsblk
Step 6 - Enable NFS Server
Step 6.1 Install NFS Server
sudo apt update
sudo apt install nfs-kernel-server -y
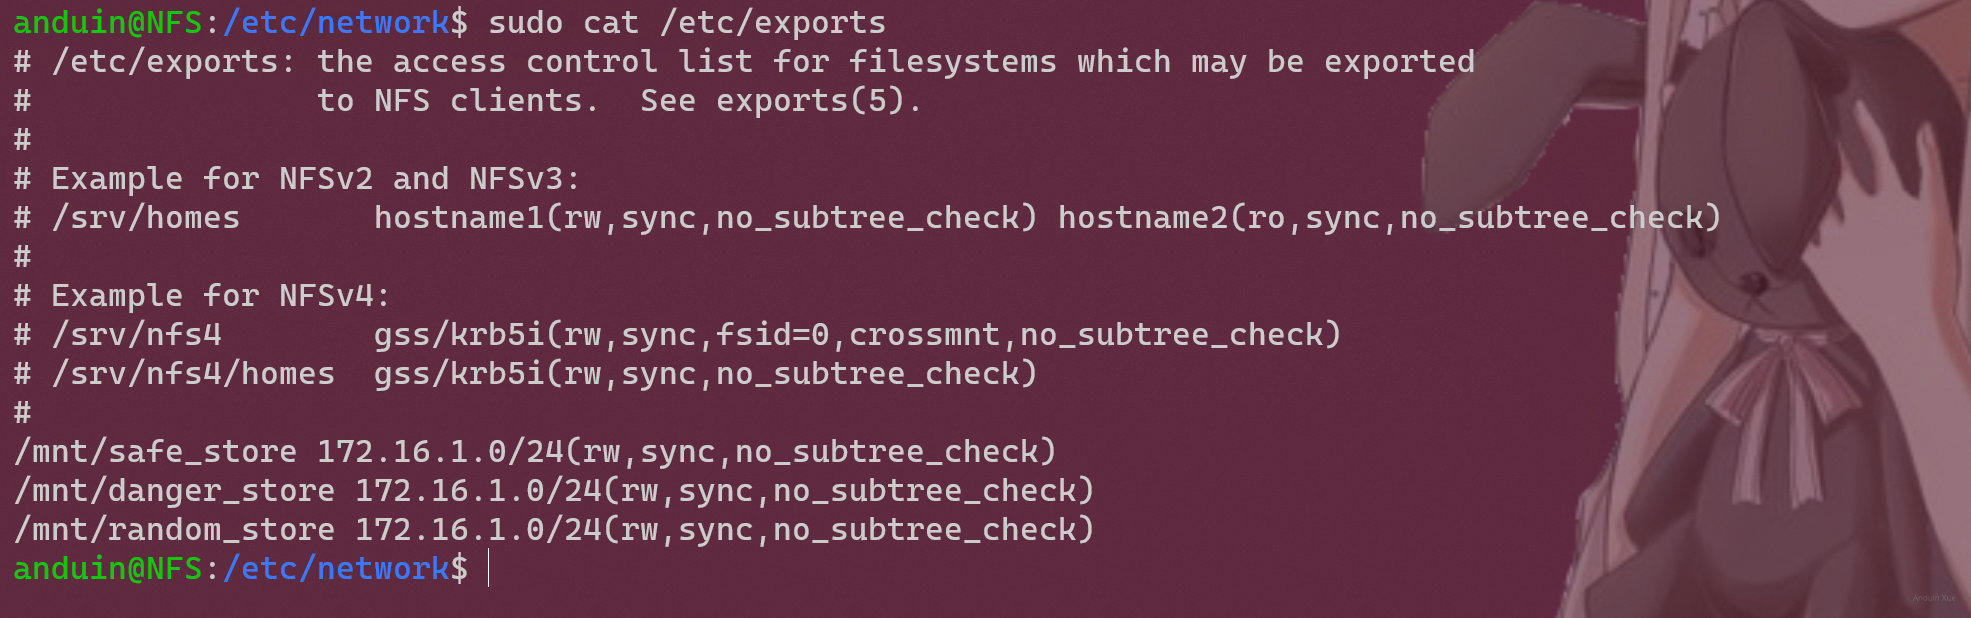
Step 6.2 Expose an NFS path.
For example, we want to expose /mnt/nfs_share as an NFS path.
sudo mkdir -p /mnt/nfs_share
sudo chown -R nobody:nogroup /mnt/nfs_share/
sudo chmod 777 /mnt/nfs_share/
And edit the configuration:
sudo vim /etc/exports
Add this:
/mnt/nfs_share 172.16.1.0/24(rw,sync,no_subtree_check)
The 172.16.1.0/24 is the subnet which allows to connect to this server. This is important, to set it as the network which your ESXI to mount it!!
Finally:
sudo exportfs -a
sudo systemctl restart nfs-kernel-server
If you have ufw enabled, don't forget to expose 2049 port.
Step 7 - Configure network
Step 7.1 - Connect between your NFS server and your ESXI server
Make the connection between your NFS server and your ESXI.
As shown the Storage network in the picture.
Why do I need to install an additional DHCP server?
Because I don't want my VM's traffic to mix with storage's traffic. While I can do this, it will slow down performance.
I use fiber to connect the ESXI host directly to the storage server. This gives the best performance.
However, I have multiple ESXI hosts. So I need to connect each one.
For ease of management, I can bridge multiple fiber optic sockets into a subnet, and enable the DHCP server in the subnet.
Step 7.1 Bridge all your fiber ports
sudo apt install bridge-utils
To view all connected network adapters:
ifconfig
Now bridge all fiber ports.
ip link add name bridge0 type bridge
ip link set dev bridge0 up
ip link set dev enp130s0f0 master bridge0
ip link set dev enp130s0f1 master bridge0
ip link set dev enp5s0f0 master bridge0
ip link set dev enp5s0f1 master bridge0
Don't forget to assign an IP to your bridge:
sudo ip addr add 172.16.1.1/24 brd + dev bridge0
You can enable Jumbo frames here:
sudo ip link set enp5s0f0 mtu 9000
sudo ip link set enp5s0f1 mtu 9000
sudo ip link set enp130s0f0 mtu 9000
 sudo ip link set enp130s0f1 mtu 9000 # All interfaces...
sudo ip link set bridge0 mtu 9000
sudo ip link show | grep mtu
Step 7.2 Start DHCP server
First, install your DHCP server.
sudo apt install isc-dhcp-server
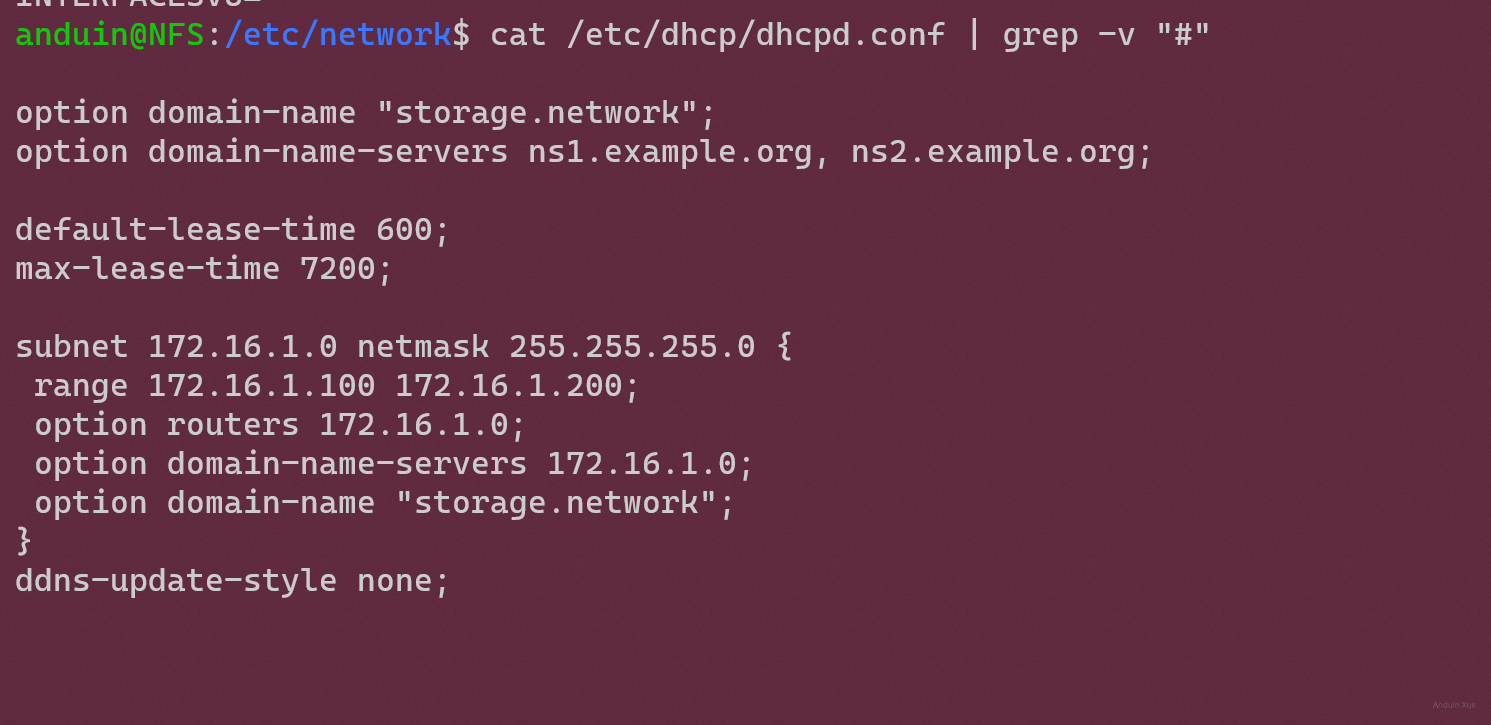
Now edit the configuration:
sudo vim /etc/dhcp/dhcpd.conf
My configuration is:
option domain-name "storage.network";
option domain-name-servers ns1.example.org, ns2.example.org;

default-lease-time 600;
max-lease-time 7200;

subnet 172.16.1.0 netmask 255.255.255.0 {
 range 172.16.1.100 172.16.1.200;                   # My ESXIs.
 option routers 172.16.1.0;                              # A fake router.
 option domain-name-servers 172.16.1.0;      # A fake DNS
 option domain-name "storage.network";
}
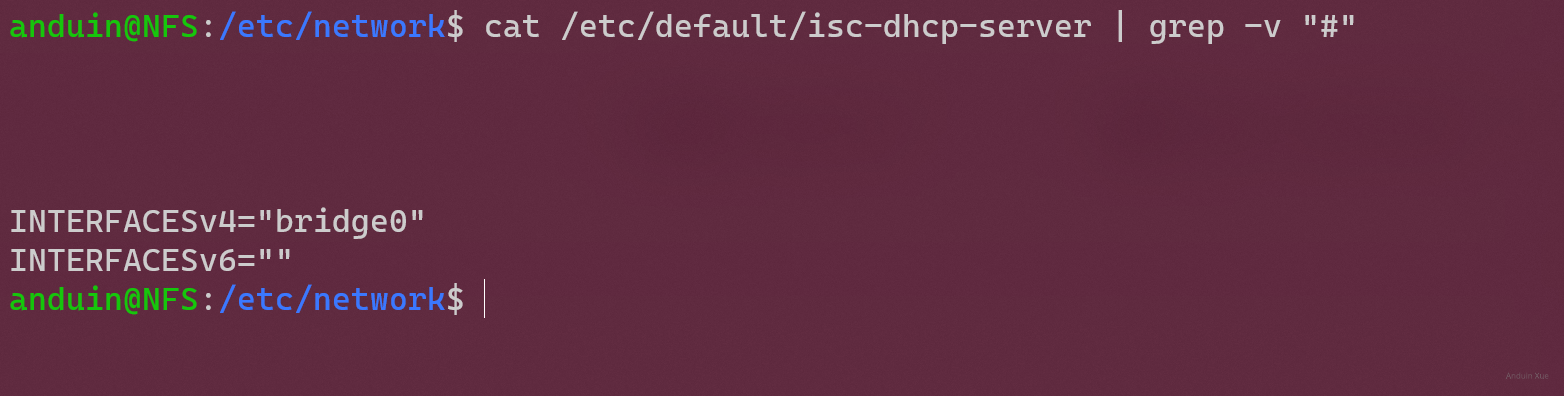
Finally you need to make sure your DHCP server doesn't ruin your management network.
Make the DHCP server only listen to the bridge:
sudo vim /etc/default/isc-dhcp-server
Edit the content as to your bridge:
INTERFACESv4="bridge0"
INTERFACESv6=""
Don't forget to restart the DHCP service.
sudo systemctl restart isc-dhcp-server.service
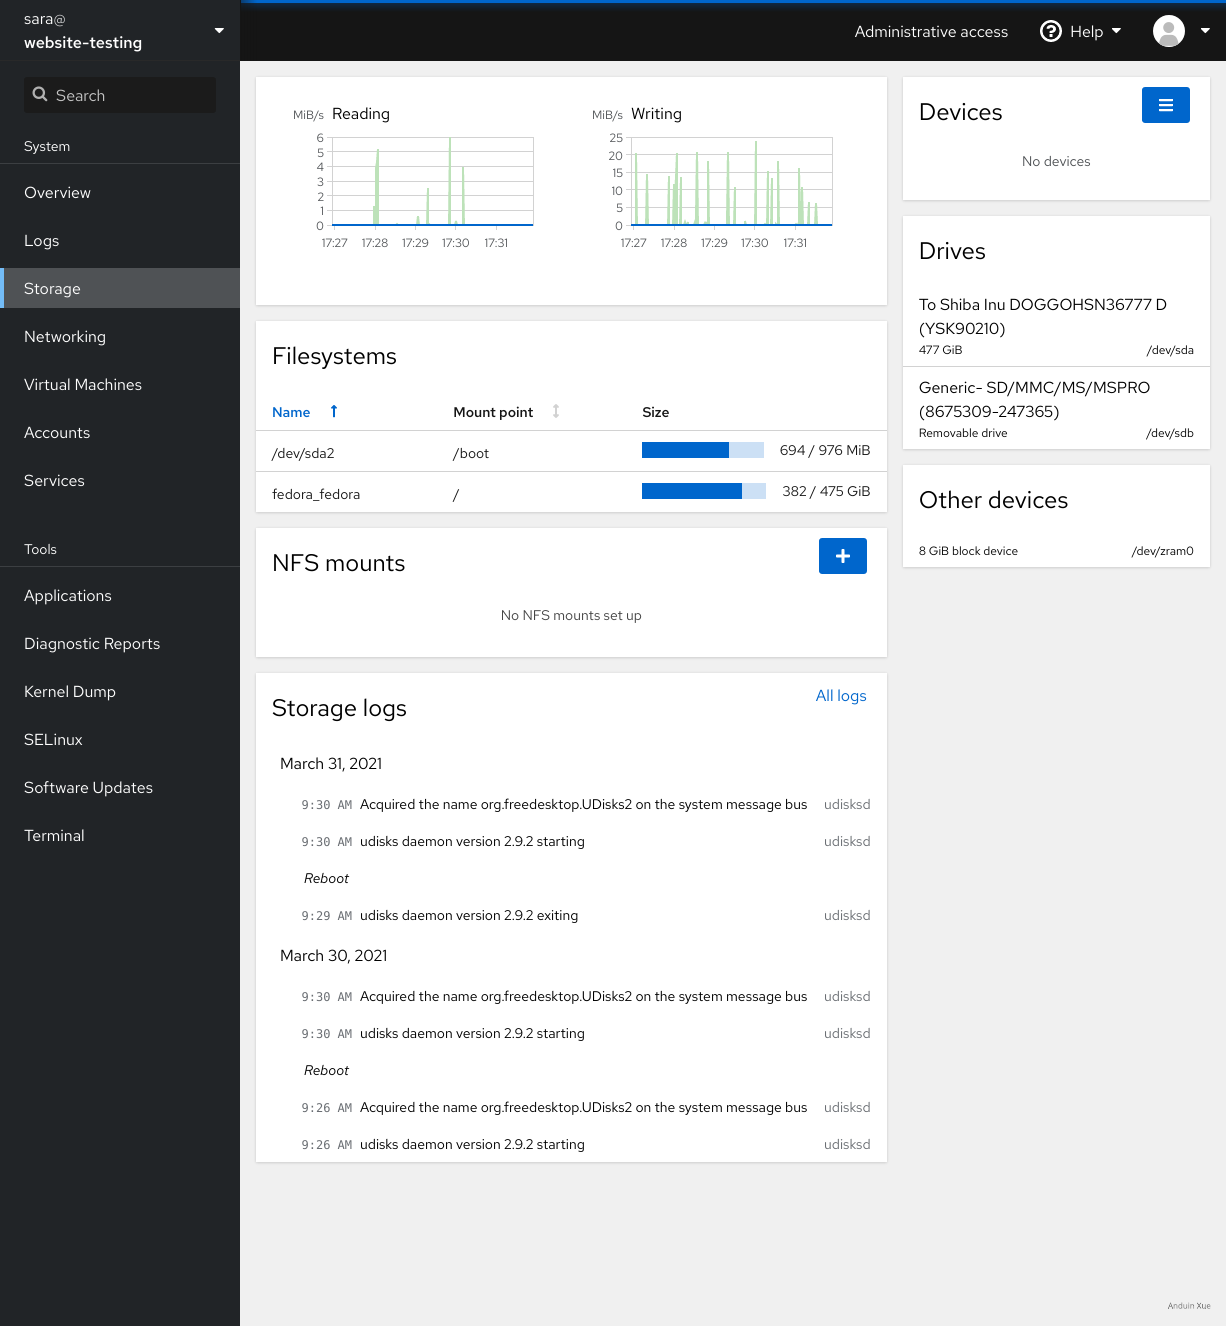
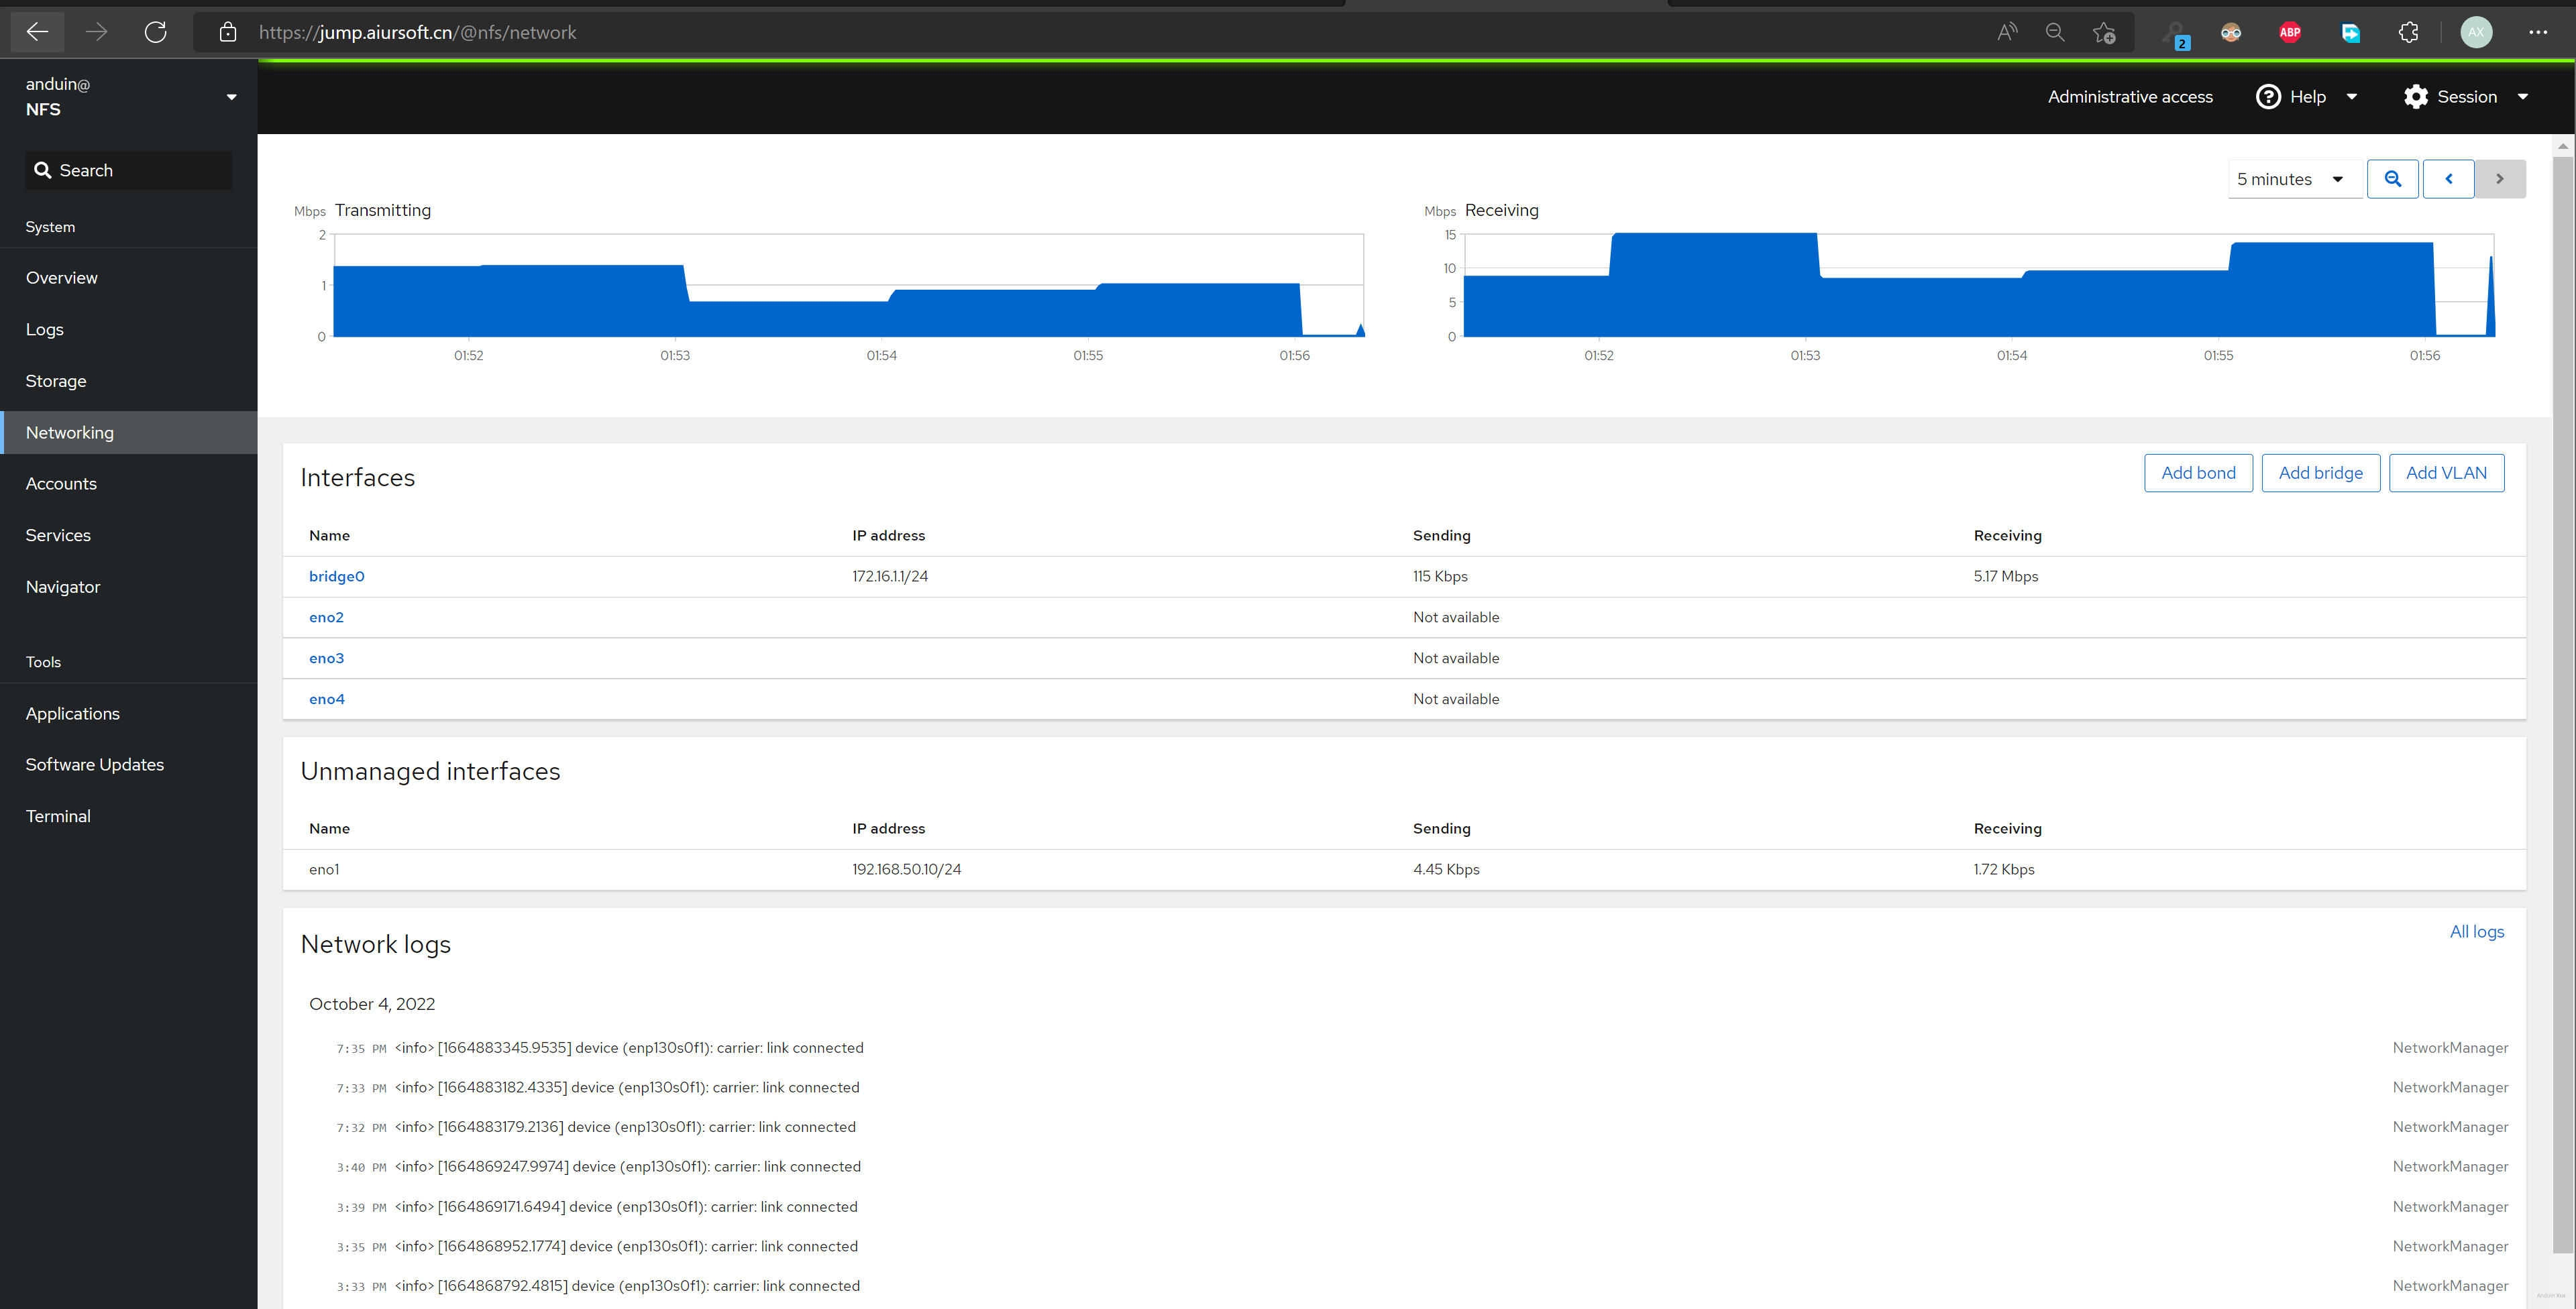
Step 8 - Install cockpit for monitoring
Cockpit is a web portal helps you monitoring your server status. Installing it is simple.
Step 8.1 - Install cockpit
Run:
sudo apt install cockpit -y
Step 8.2 - Configure Authentication
Ensure you have a user instead of root is in the sudo group.
Please follow the instructions from: Best practice for authentication
Step 8.3 - Install navigator plugin
sudo apt install -y jq
latestUrl=$(curl https://api.github.com/repos/45Drives/cockpit-navigator/releases/latest | jq -r '(.assets[] | select(.browser_download_url | contains(".deb"))).browser_download_url')
echo "Latest download url is $latestUrl"
wget -O /home/anduin/install.deb $latestUrl
sudo dpkg -i /home/anduin/install.deb
rm /home/anduin/install.deb
Step 8.4 - Try cockpit on your browser!
Open browser, open: https://host:9090. Ignore cert issues.
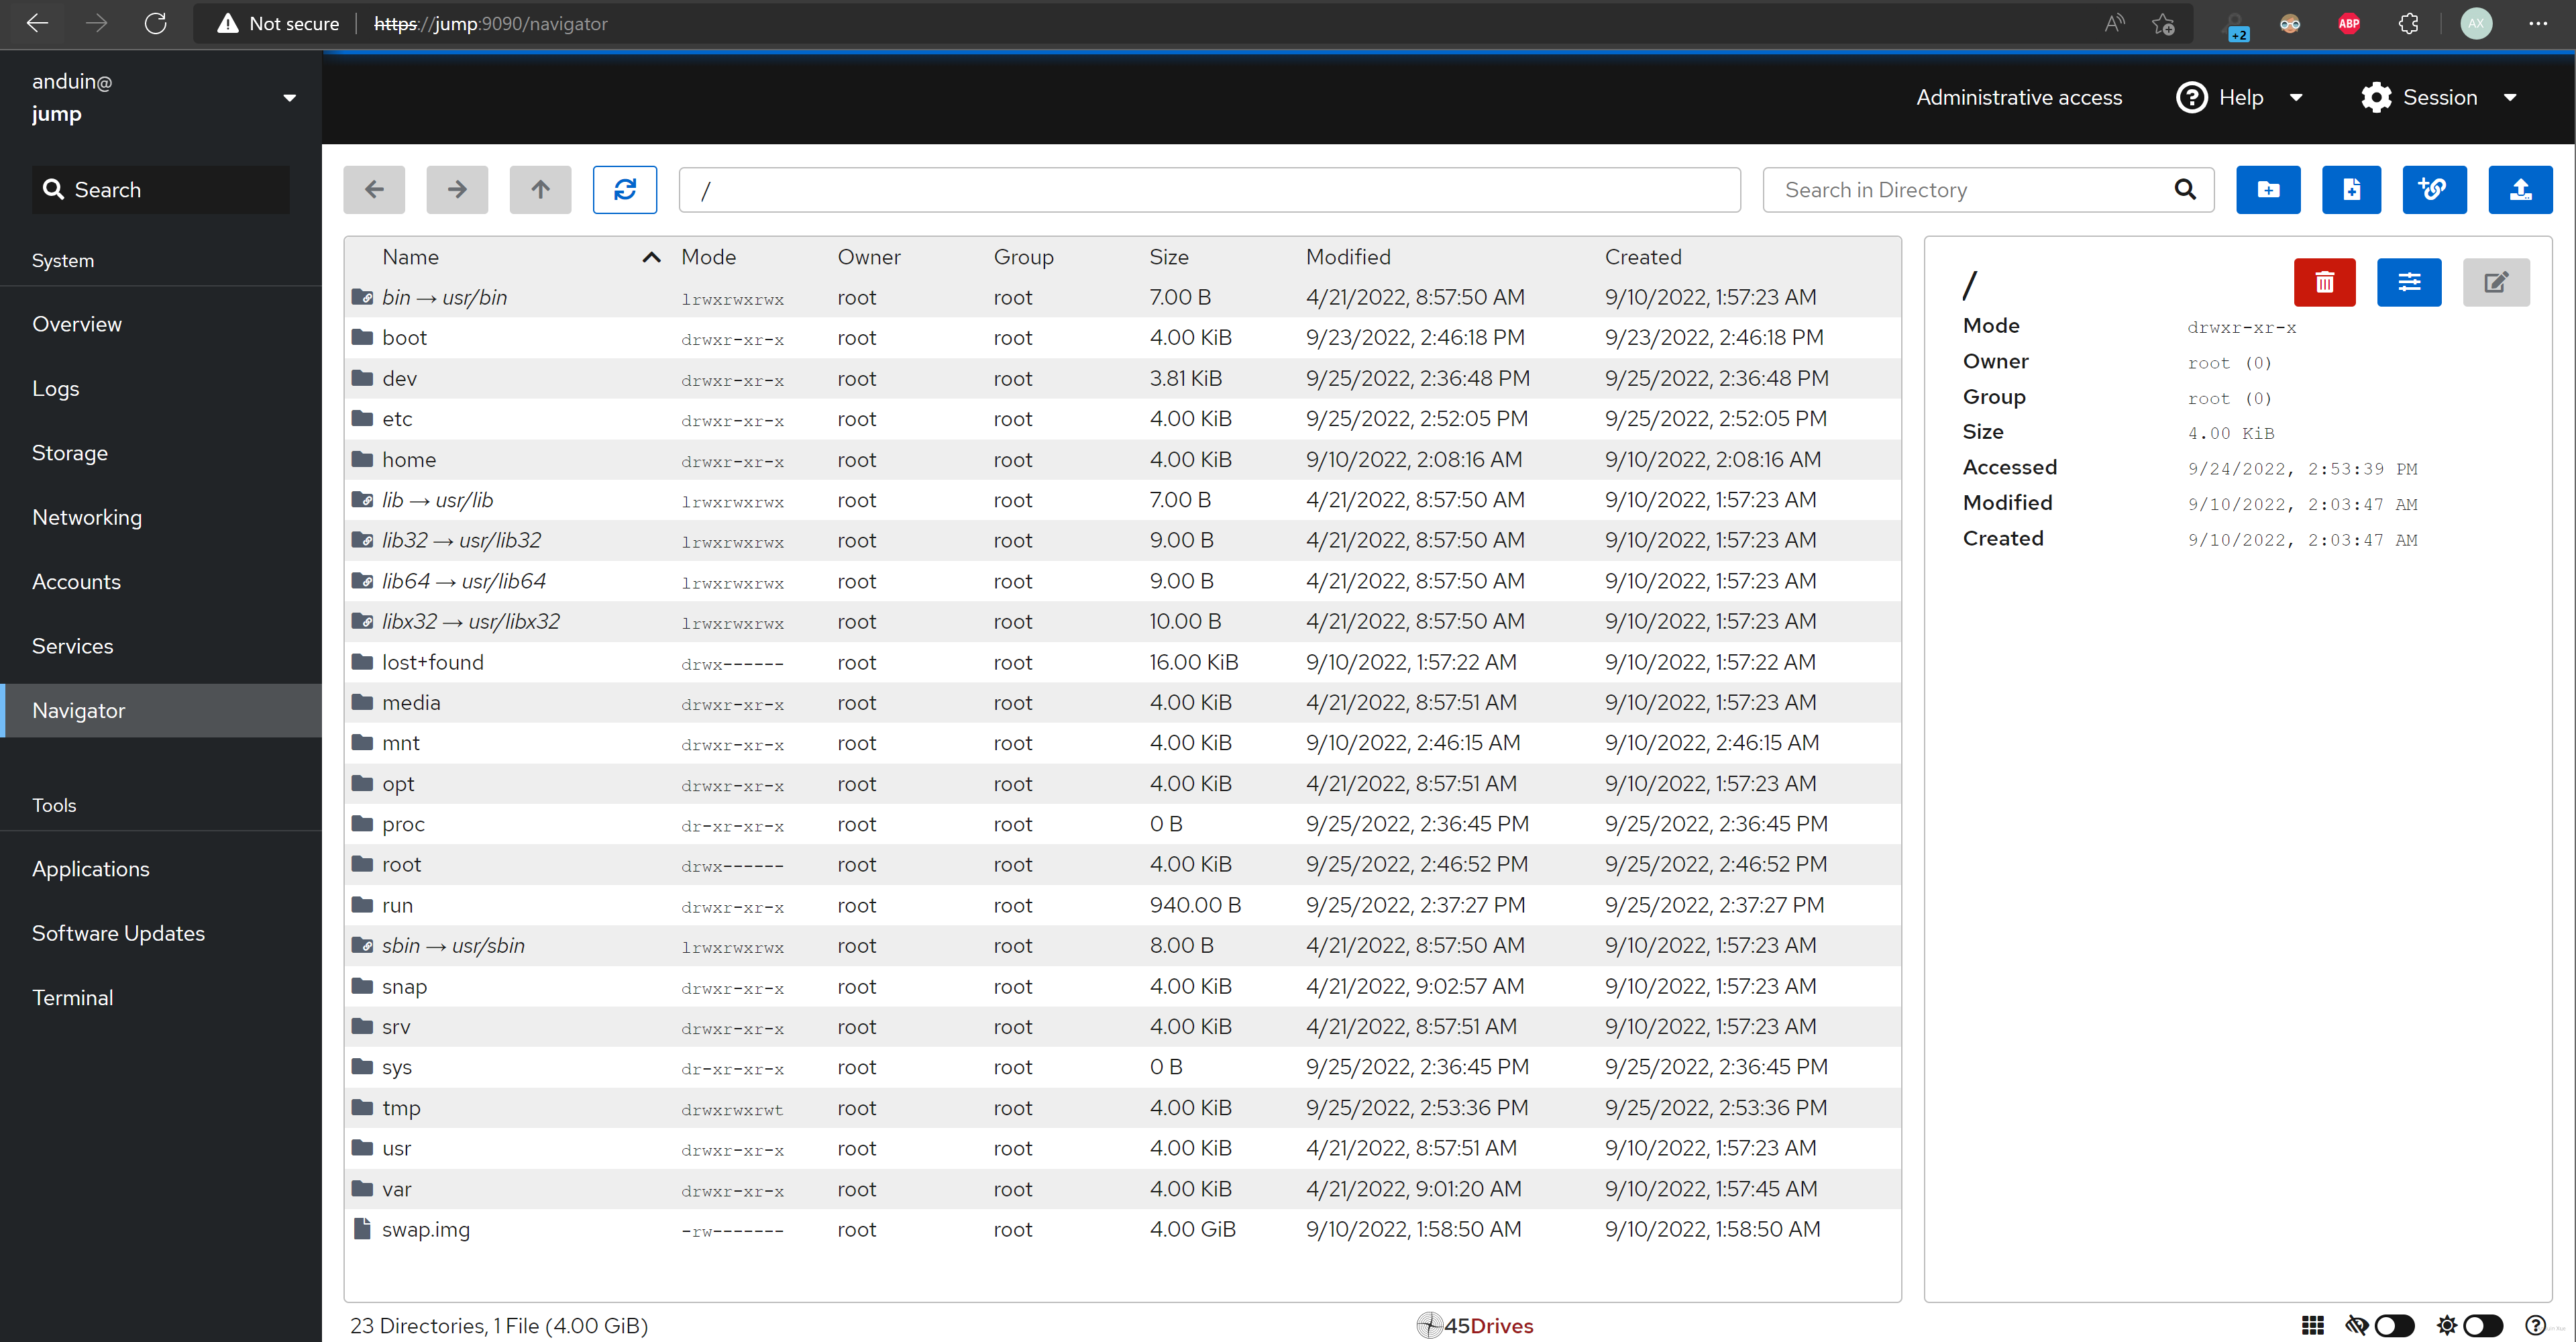
Don't forget, we are using cockpit to monitor our network and disk usage.
Step 9 - Mount the server to Vsphere
Step 9.1 Prepare your host to mount NFS storage
First, log in your ESXI host.
Add a new virtual switch. Select the fiber interface as uplink.
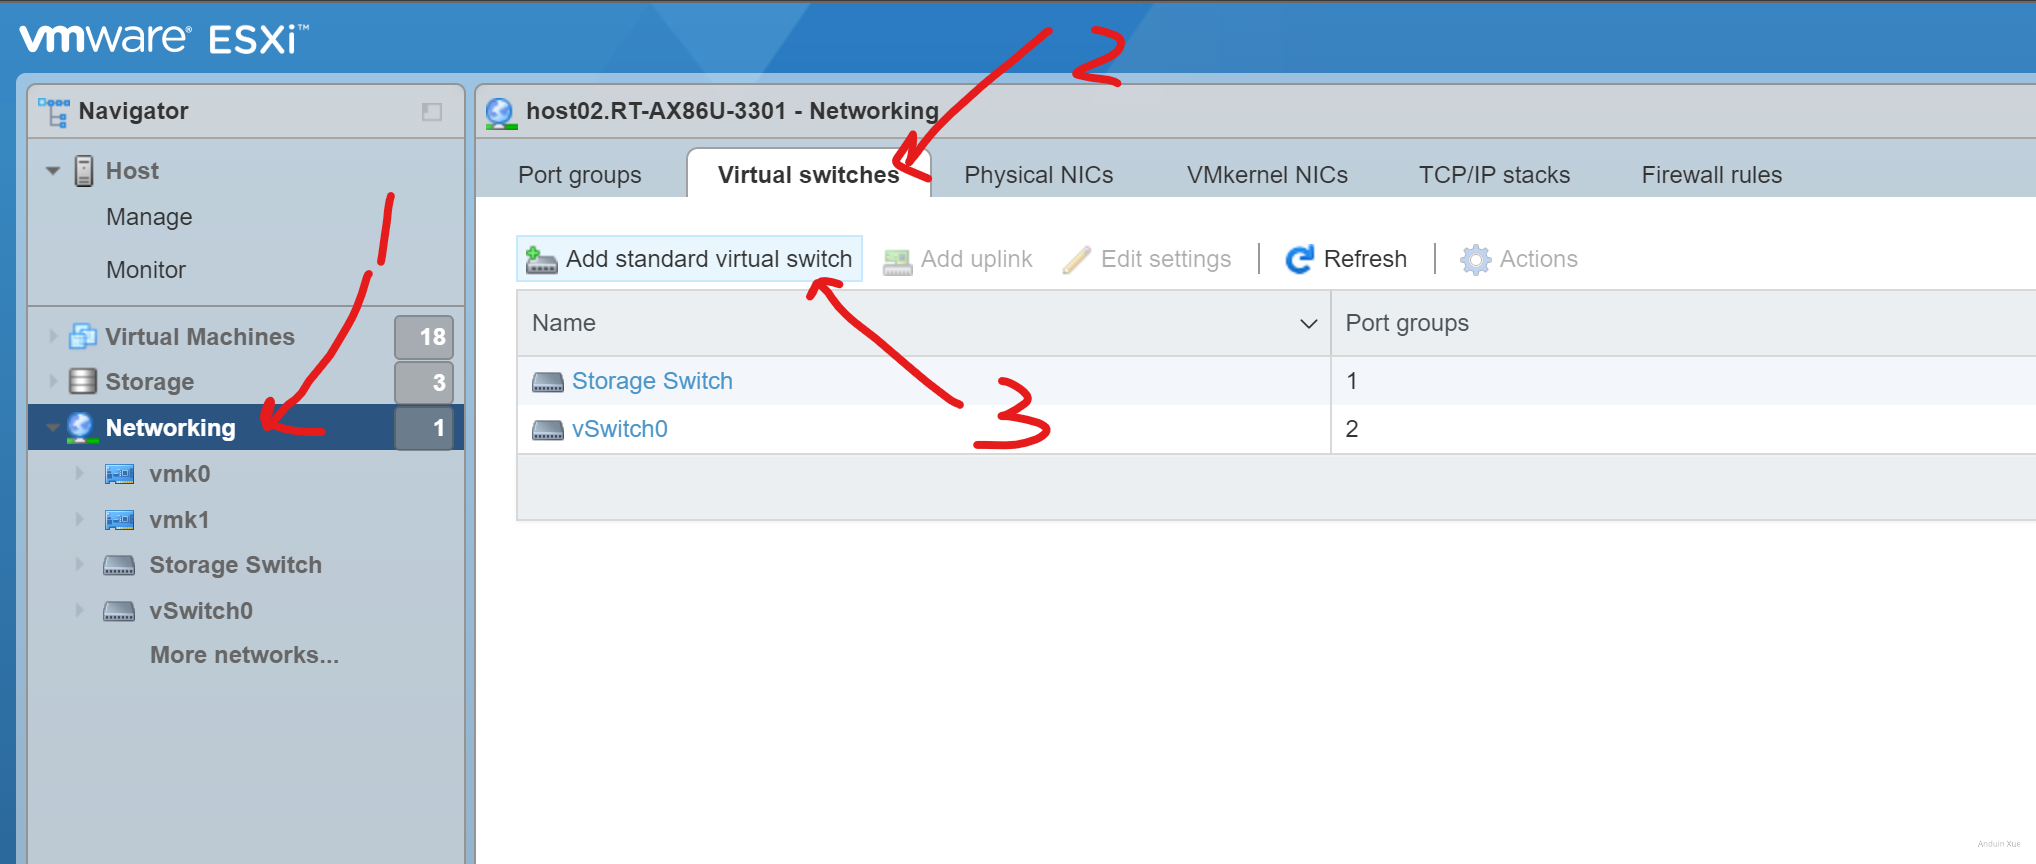
Name it, select link and save.
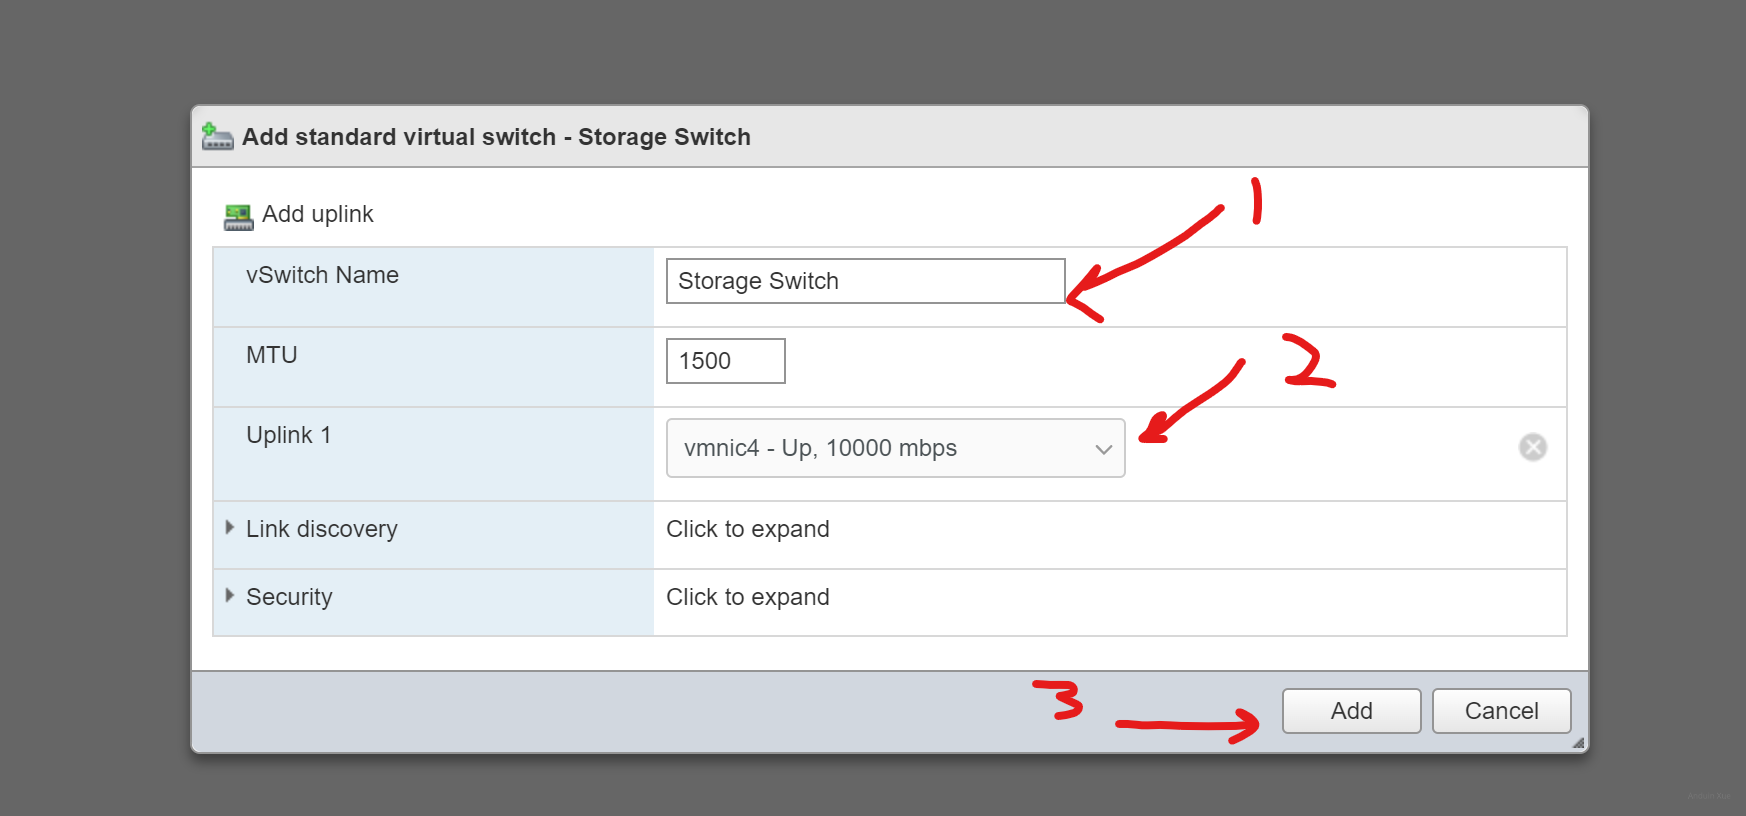
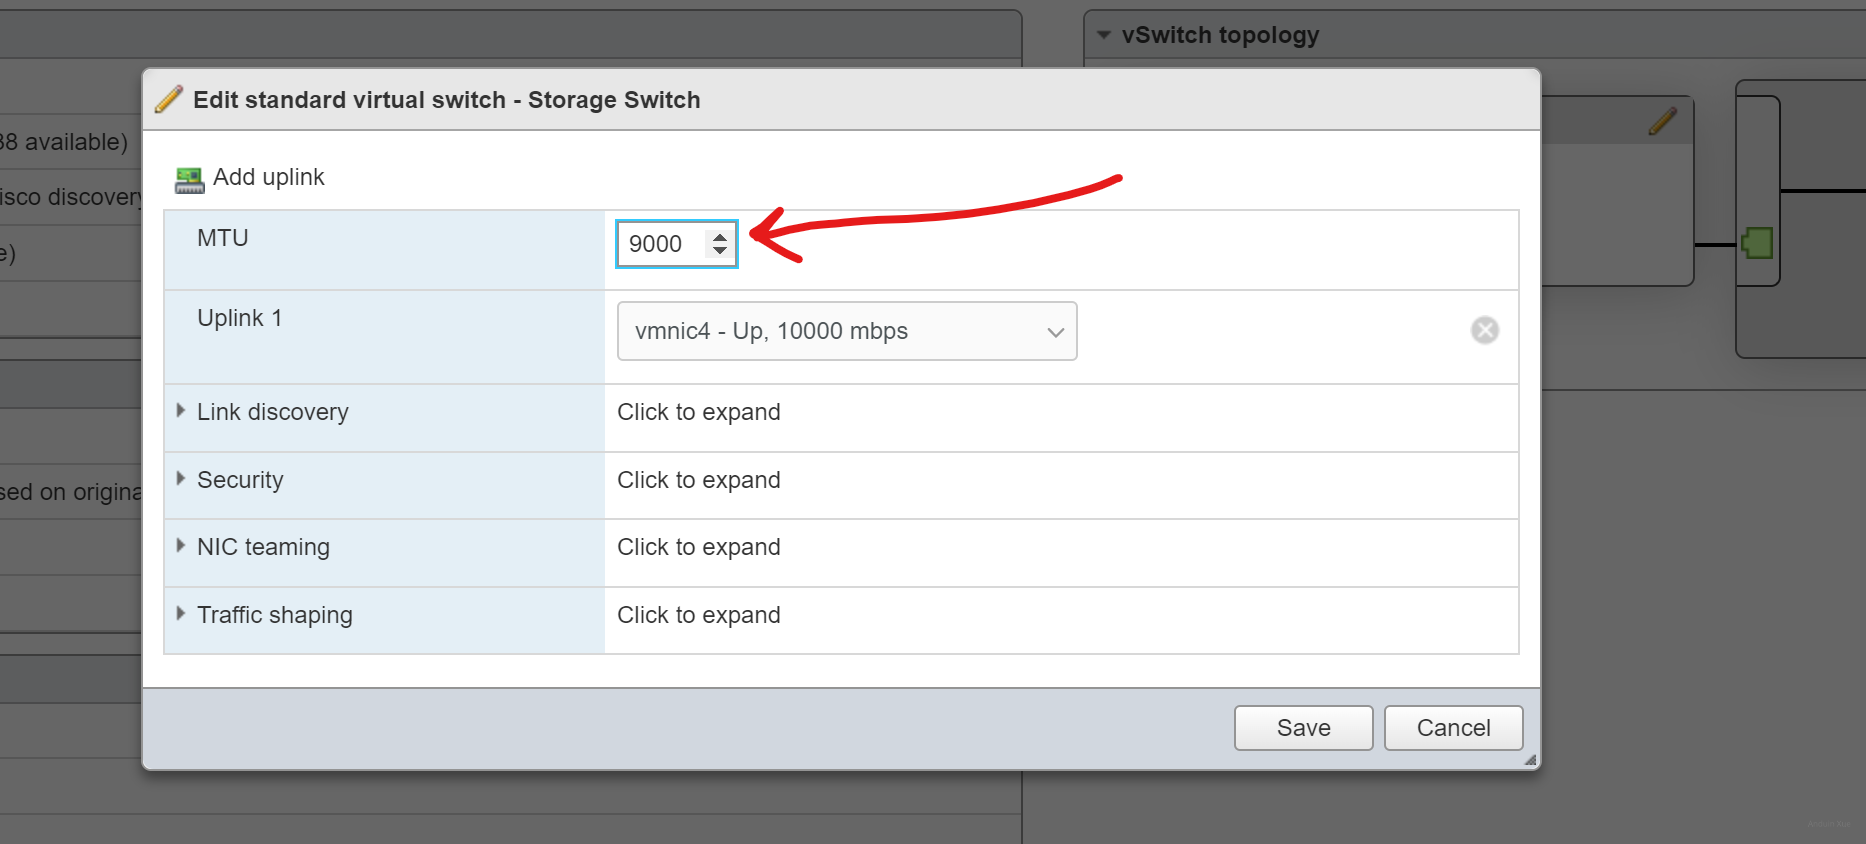
If you want to enable Jumbo frames, set MTU to 9000:
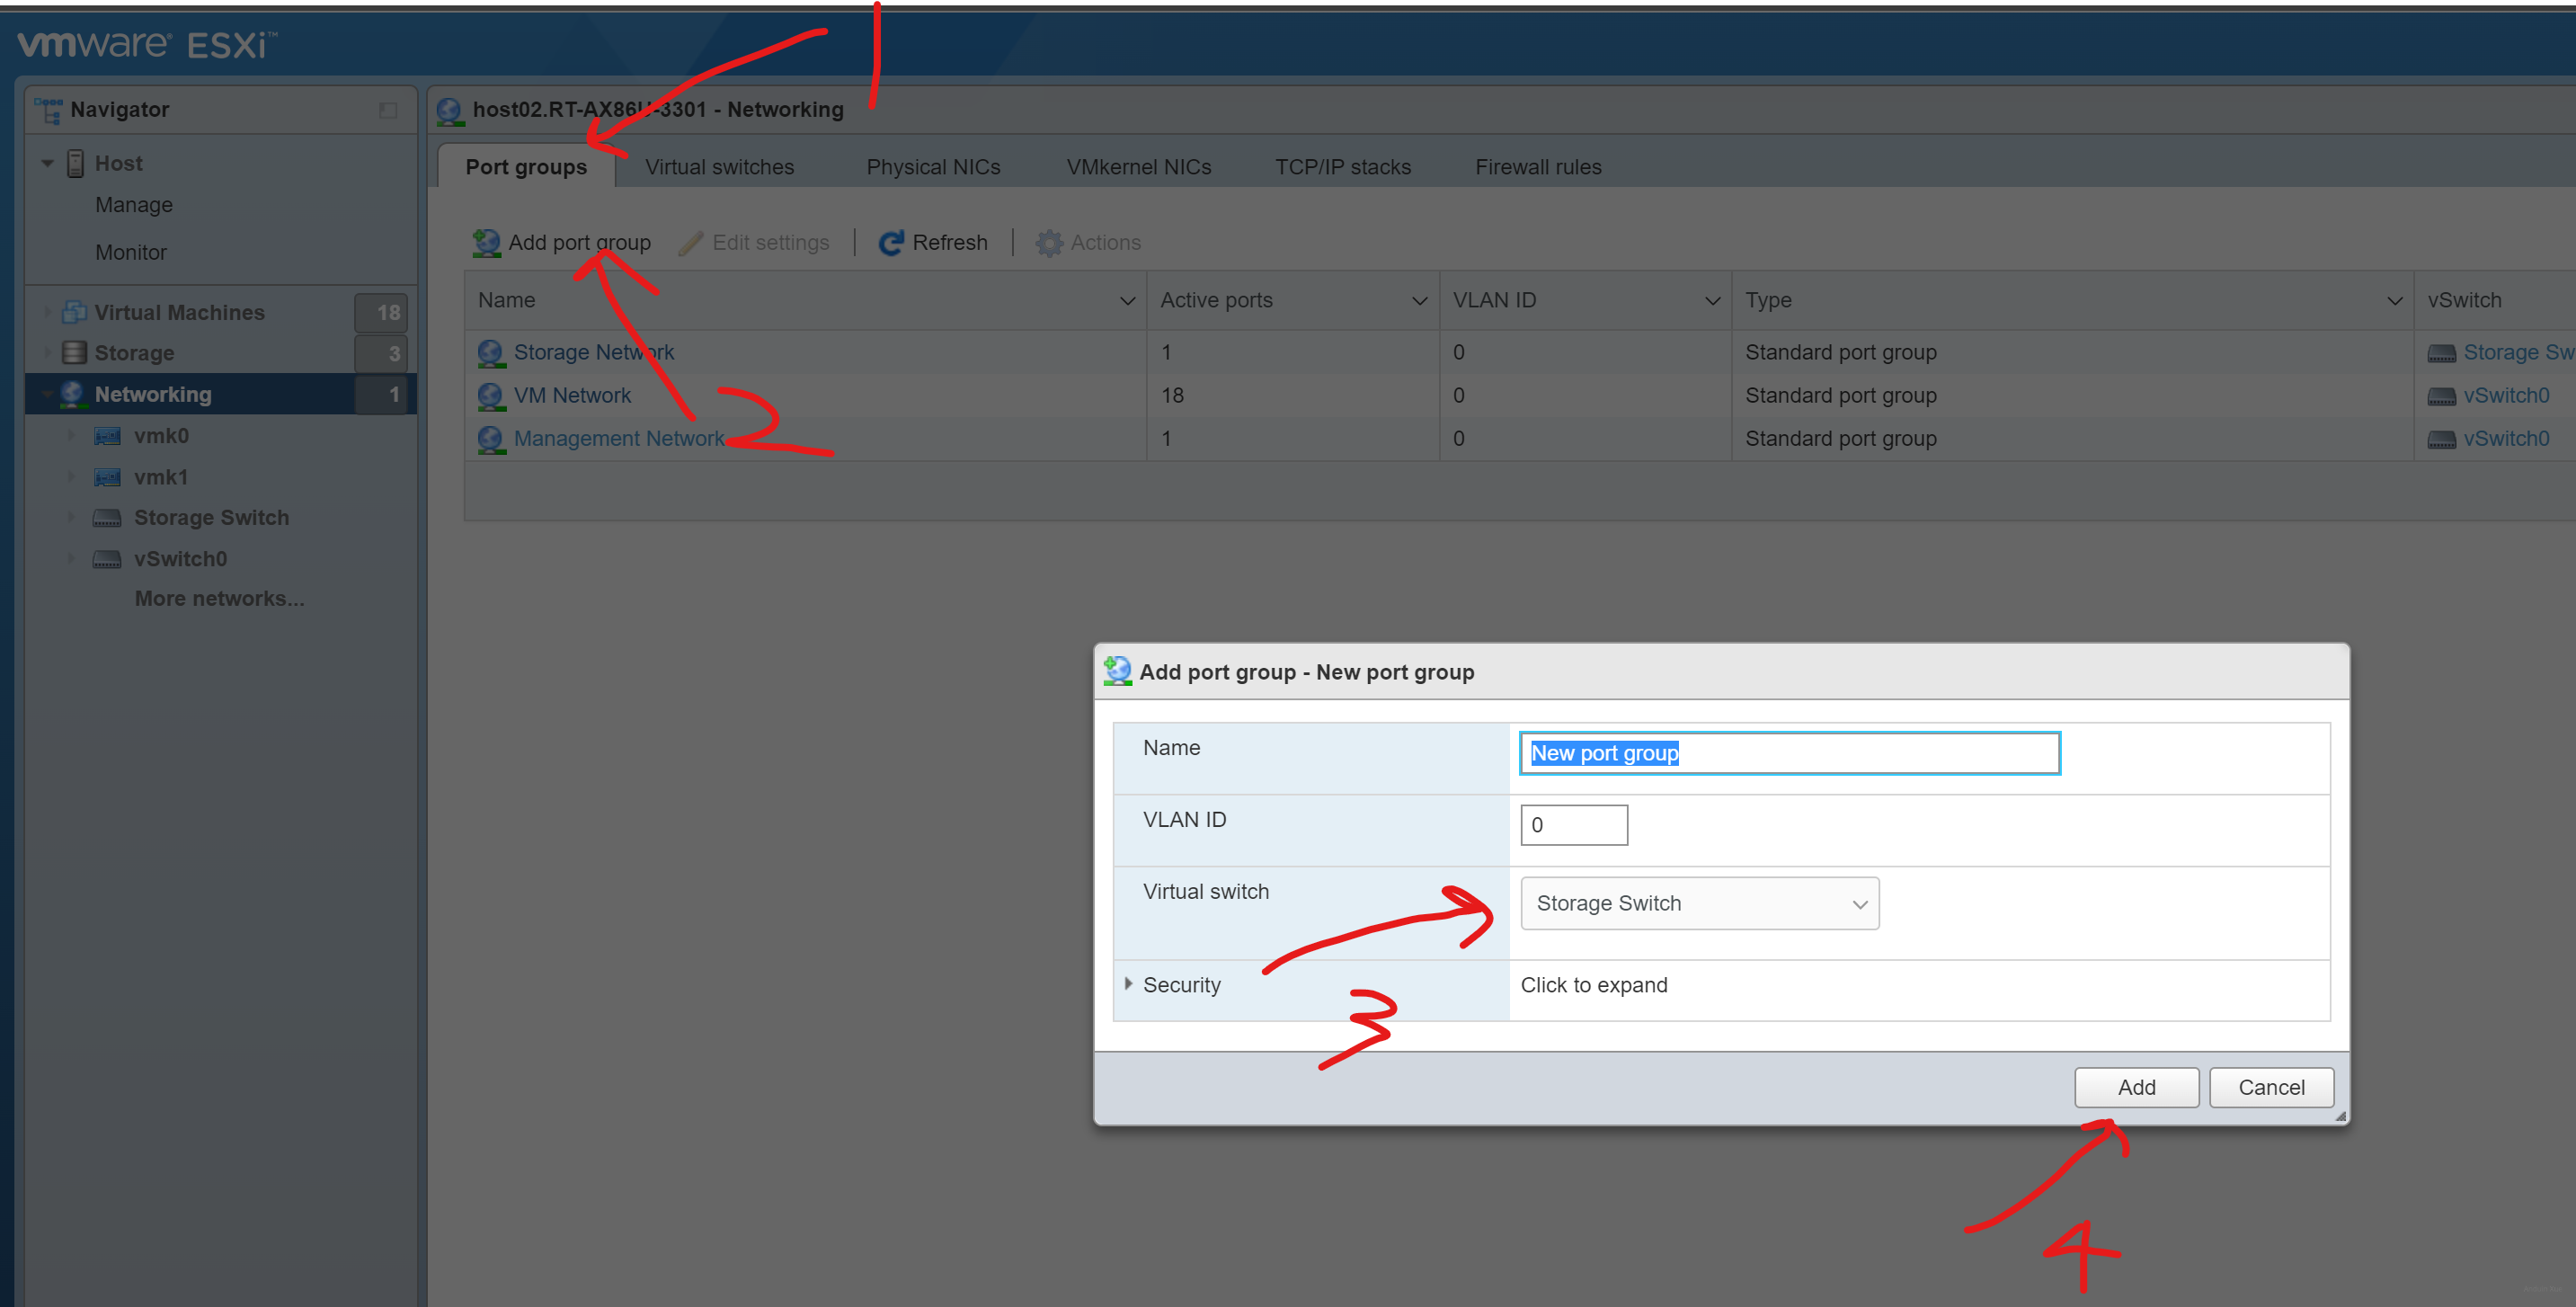
Then add a new port group. Select the related storage virtual switch Storage switch.
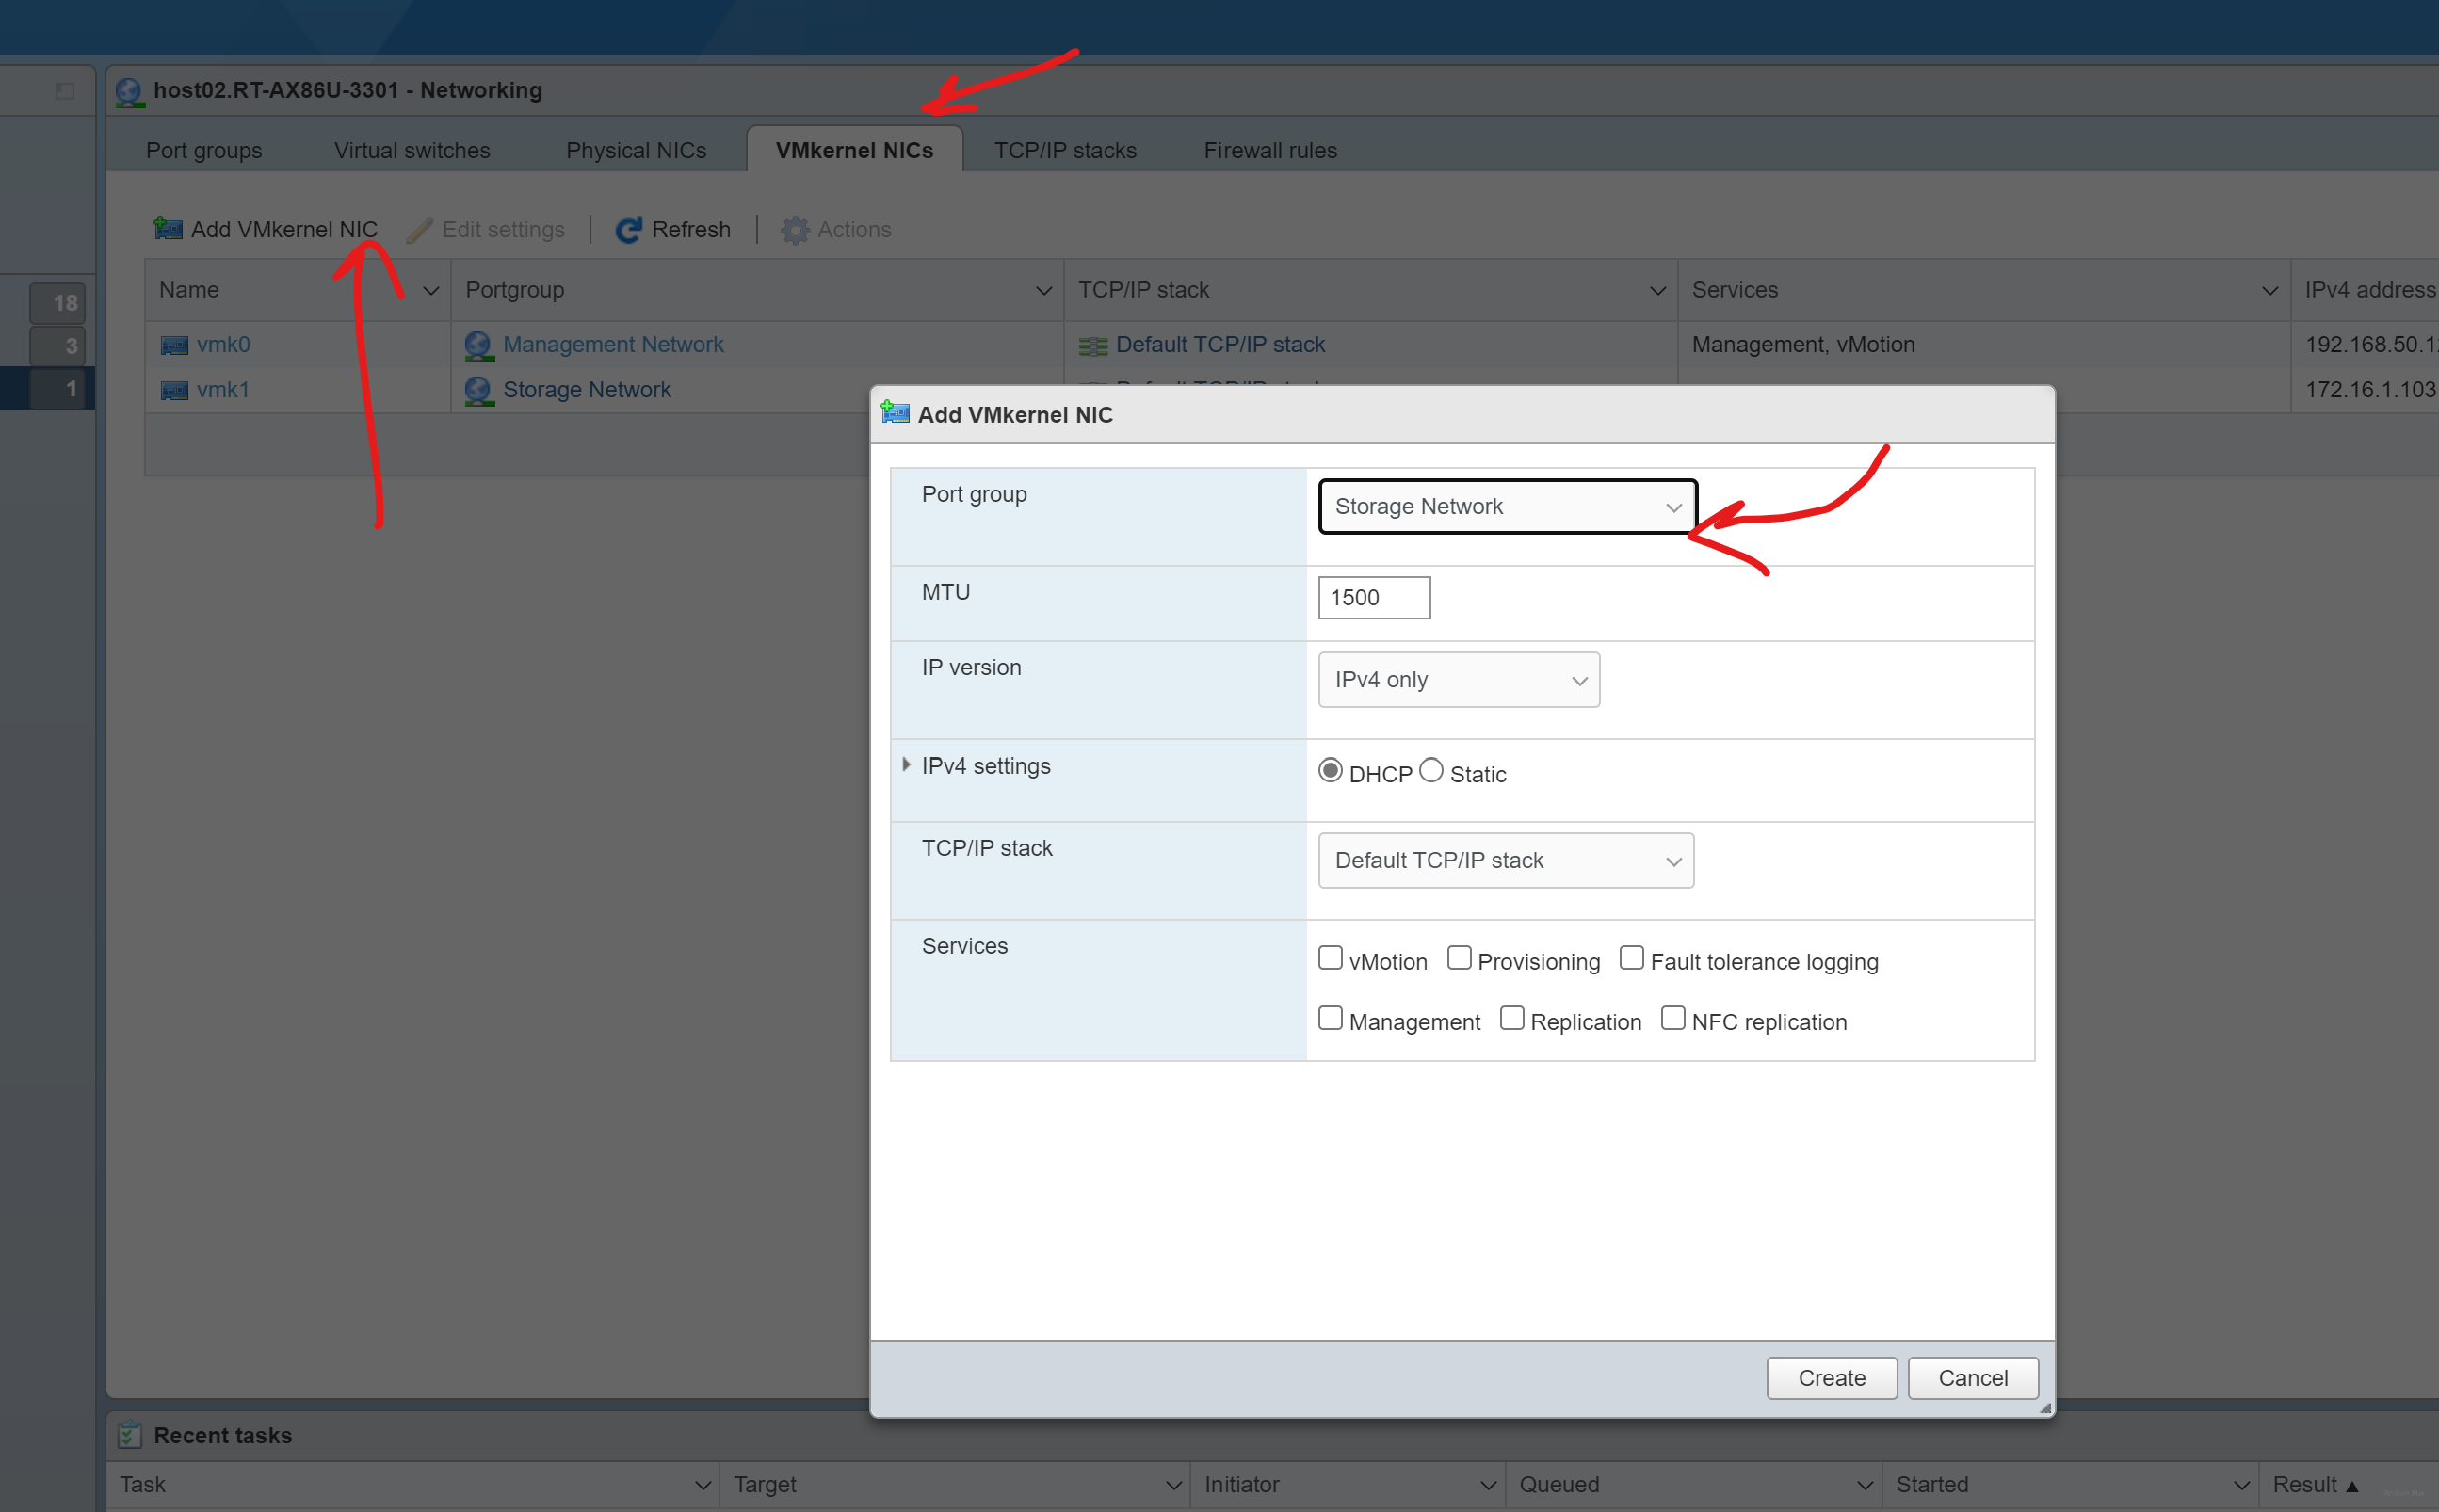
Finally, add a new VMkernel NIC. Select the Storage network.
Step 9.2 Mount the NFS storage
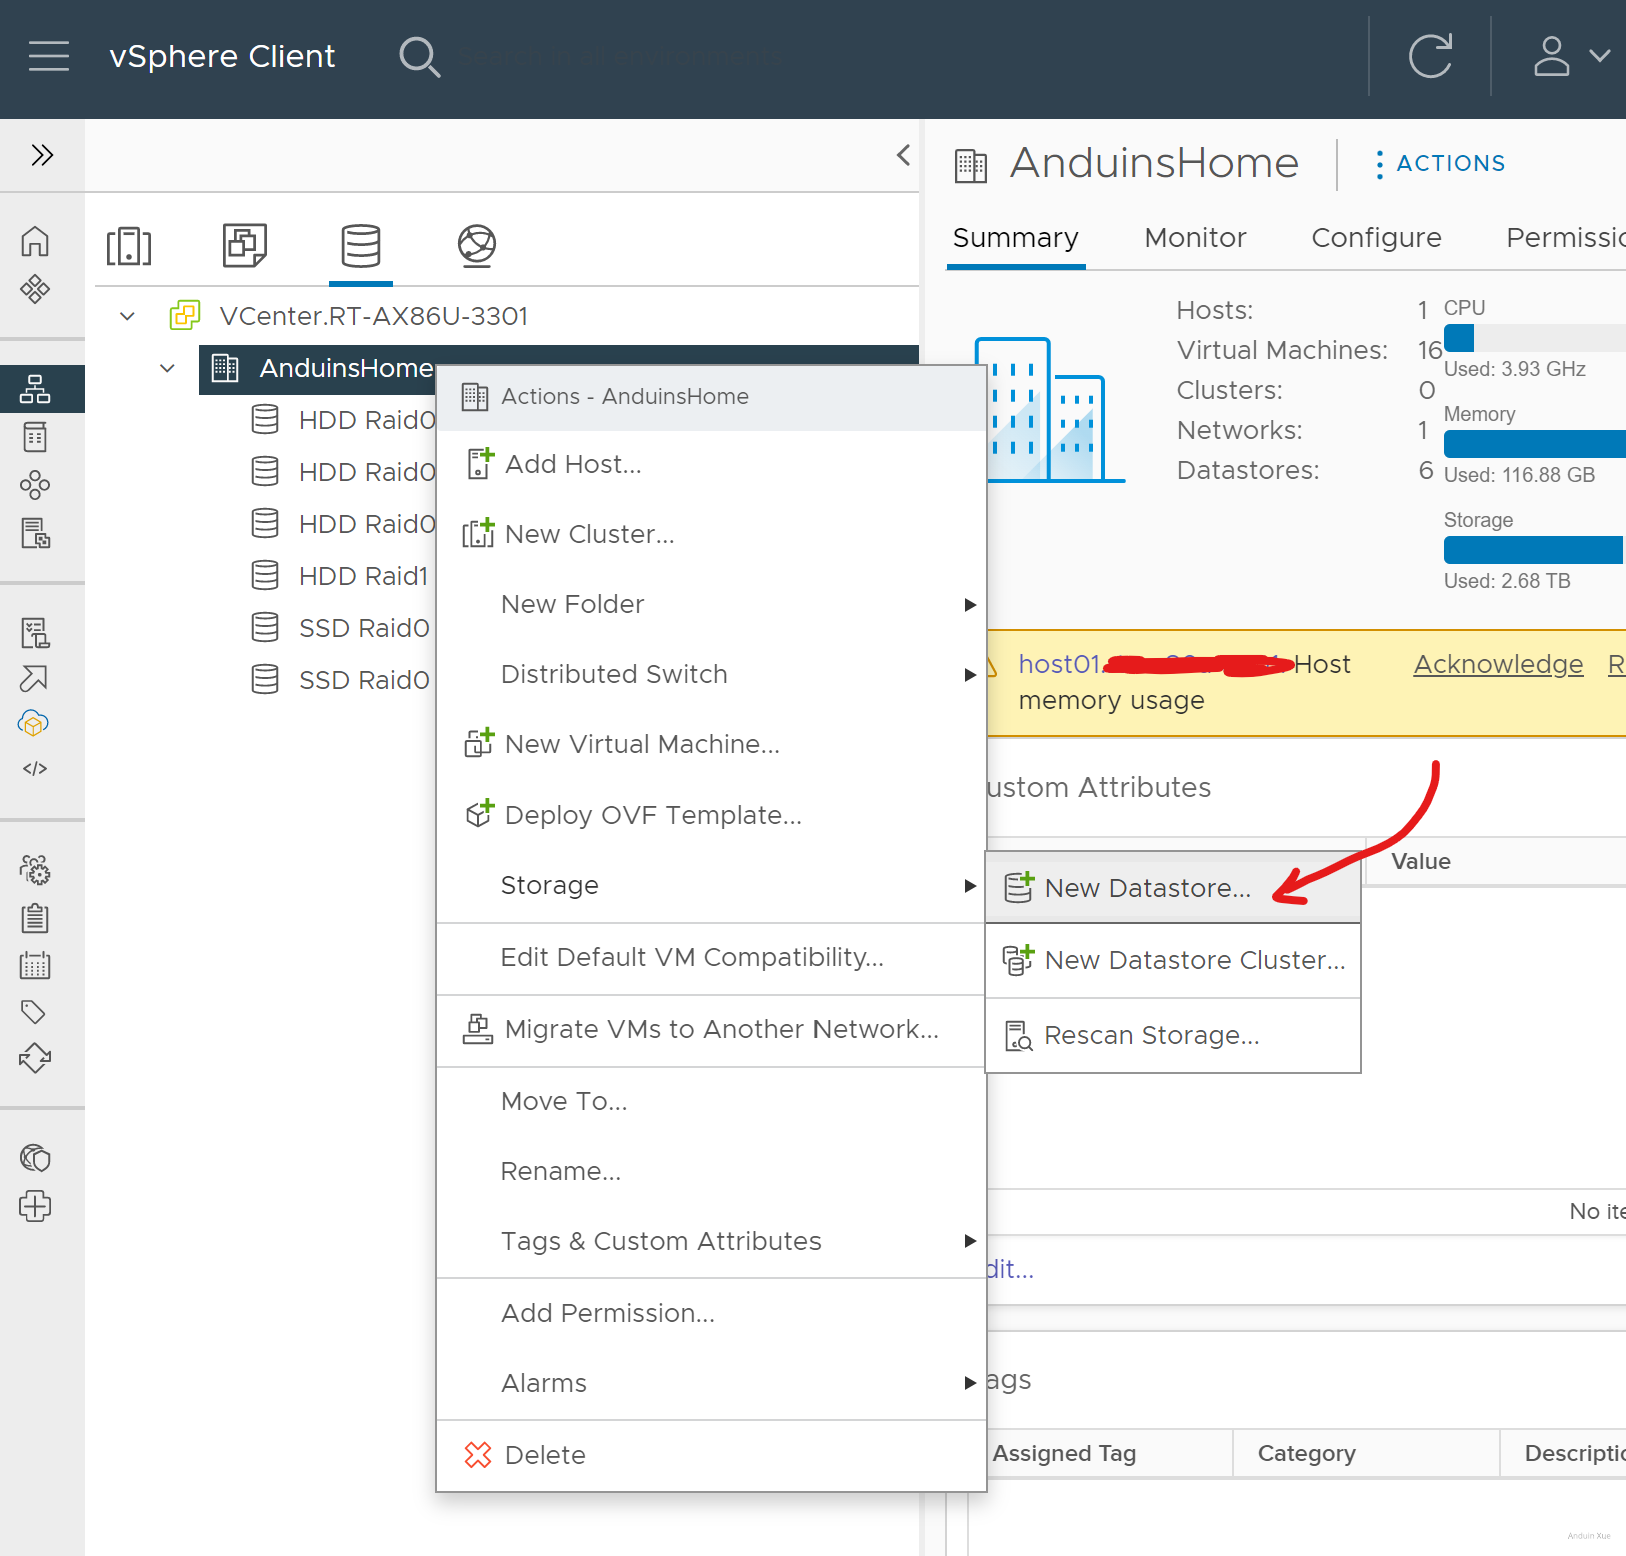
Go to your VCenter server. Select adding new store.
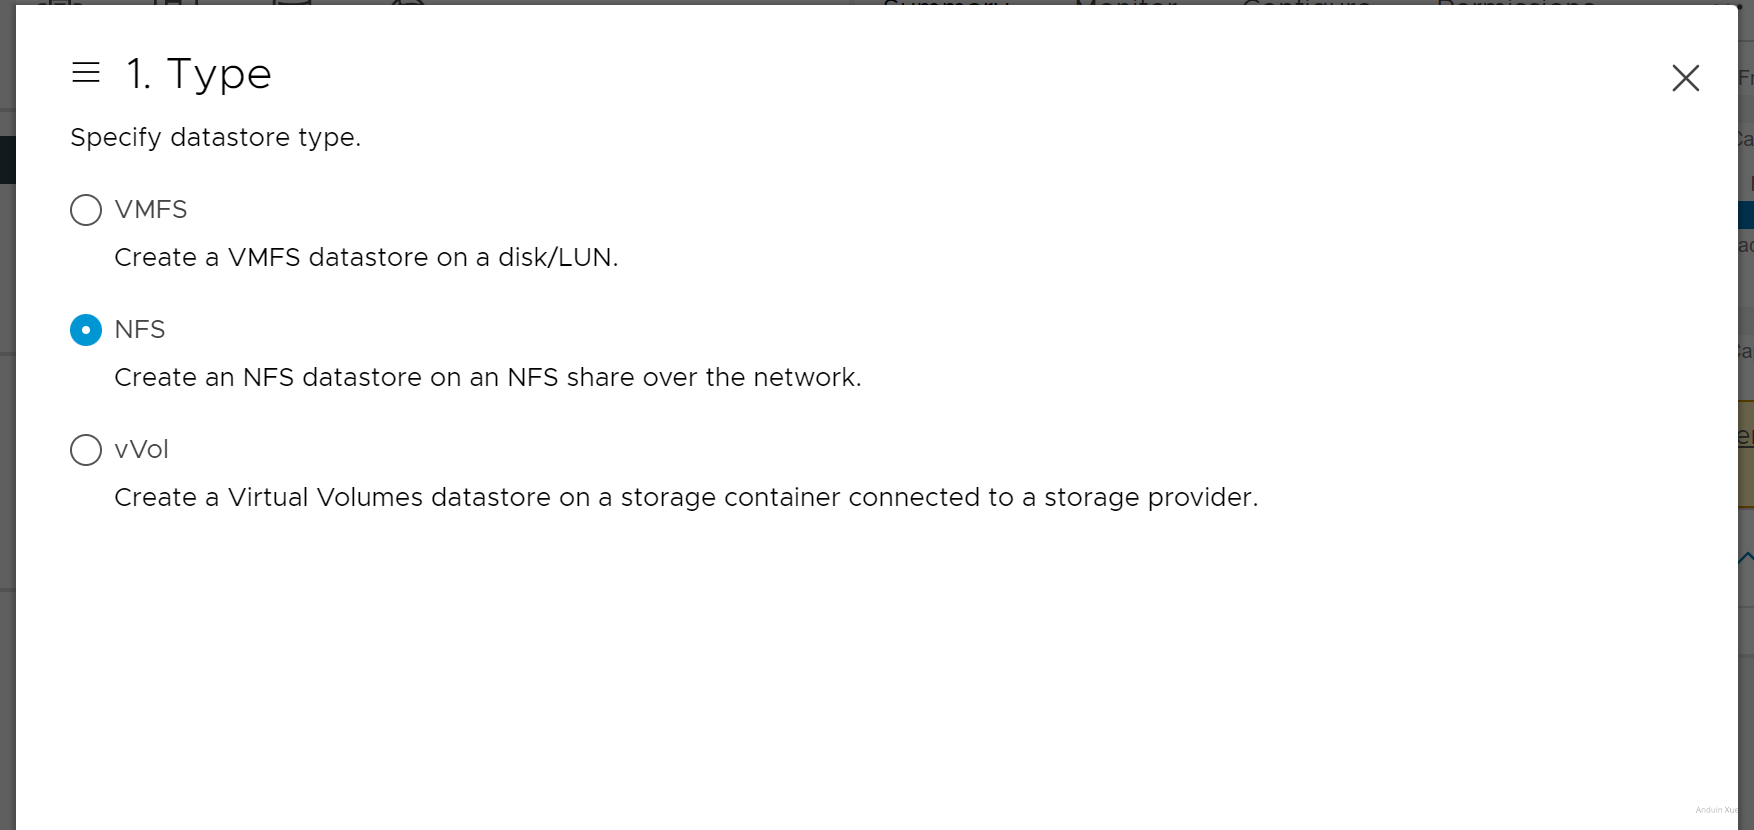
Select type.
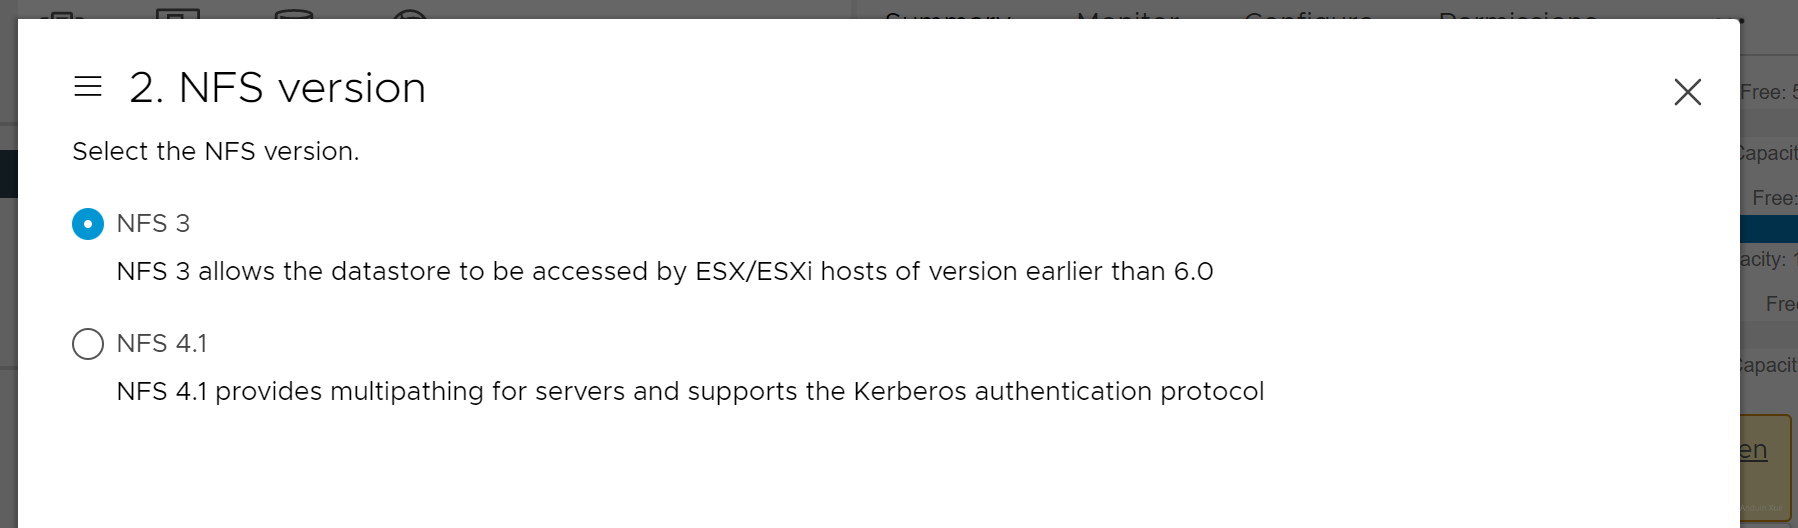
Select version.
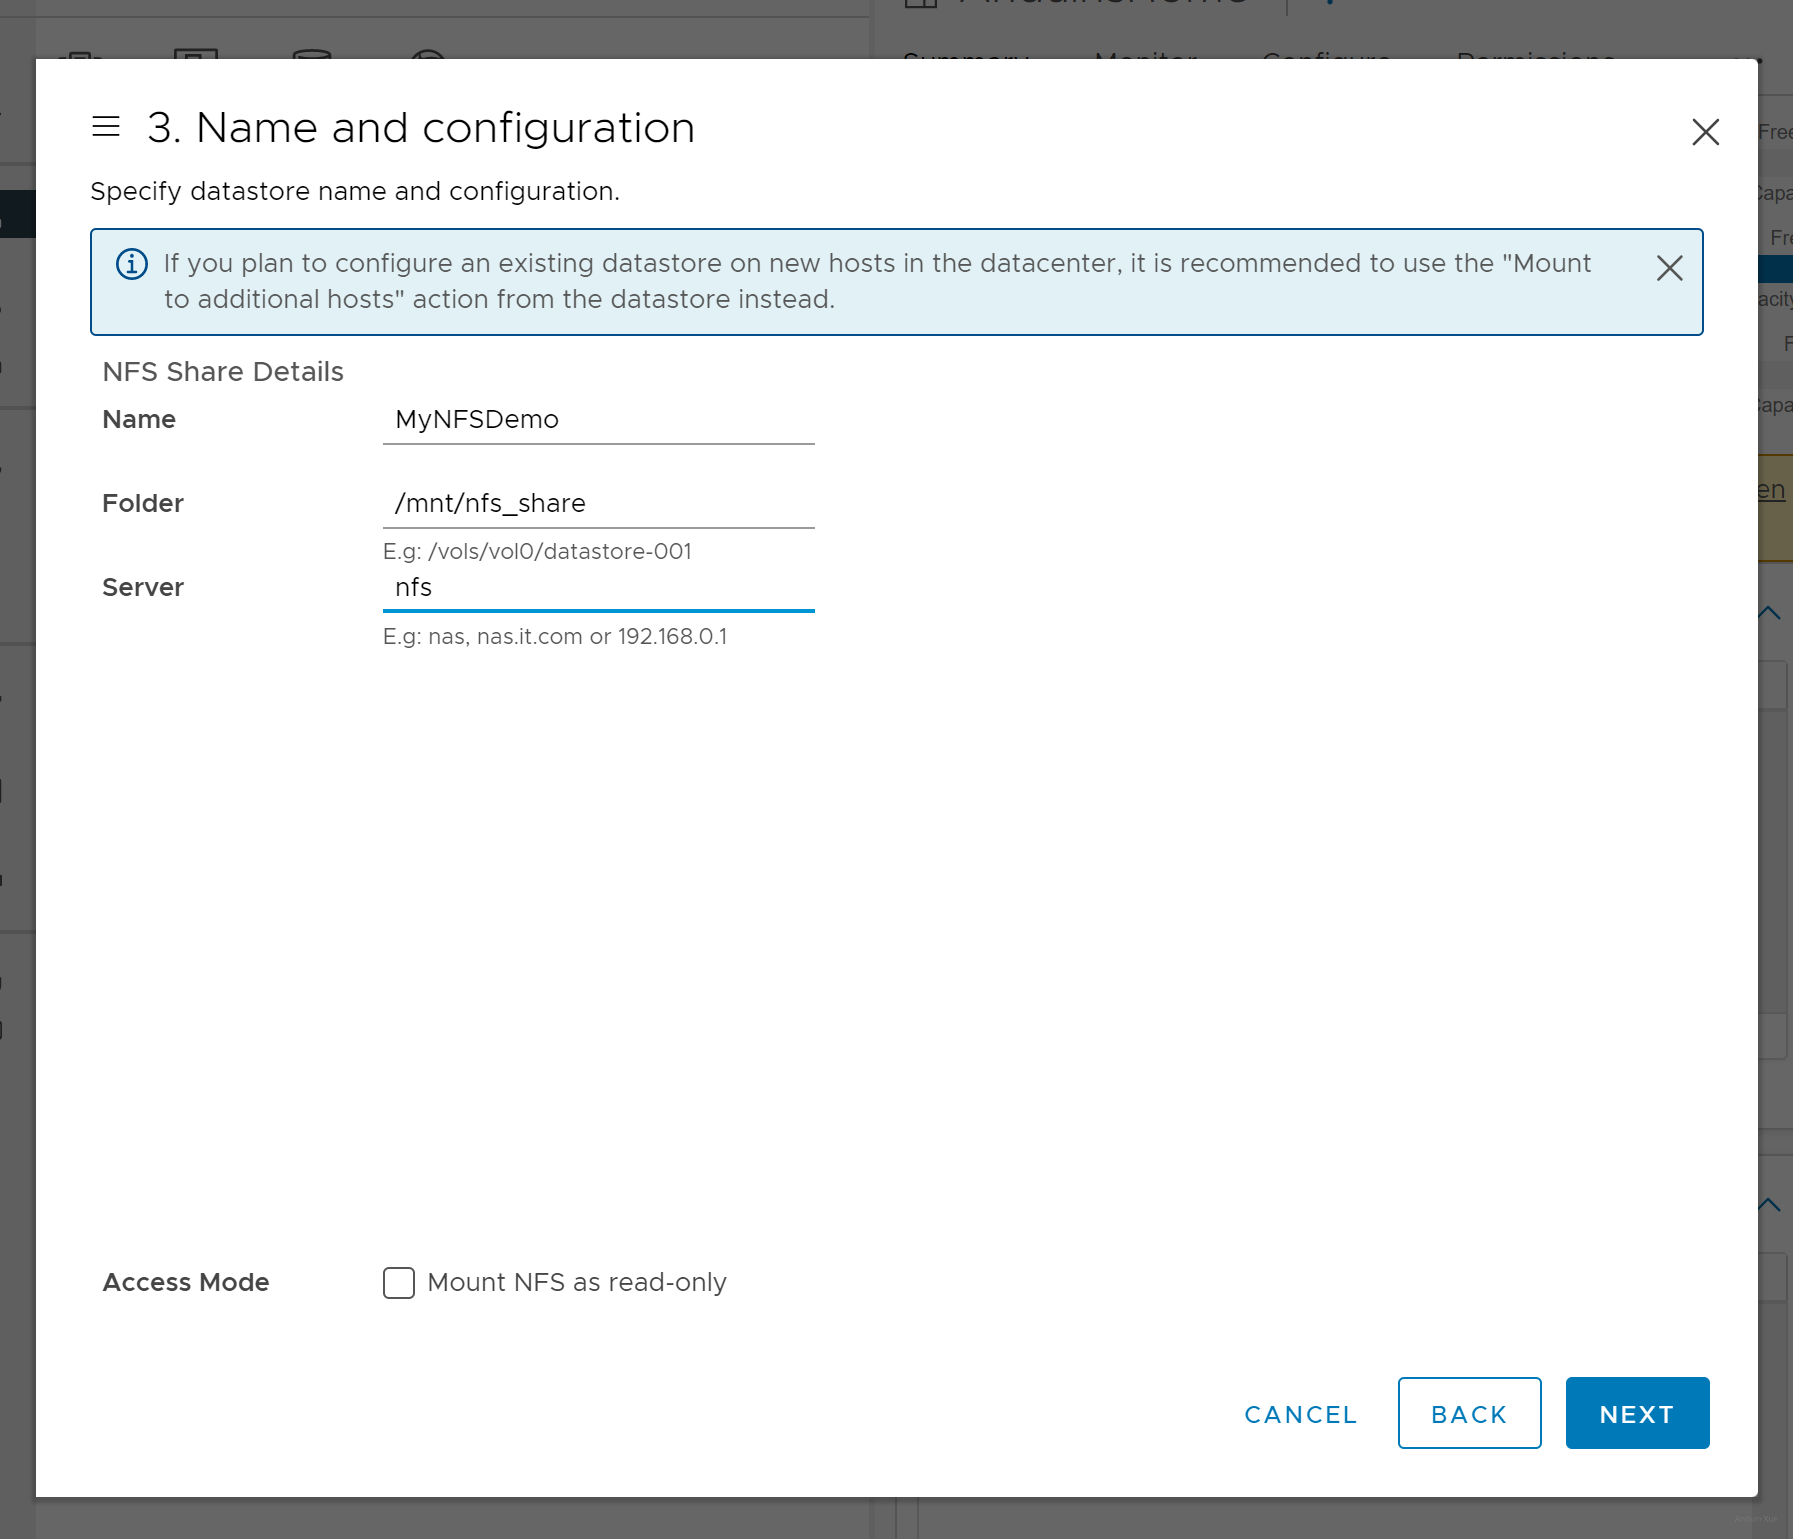
Enter server details:
And finally works!
Step 10 - Benchmark your performance!
Of course CrystalDiskBench!
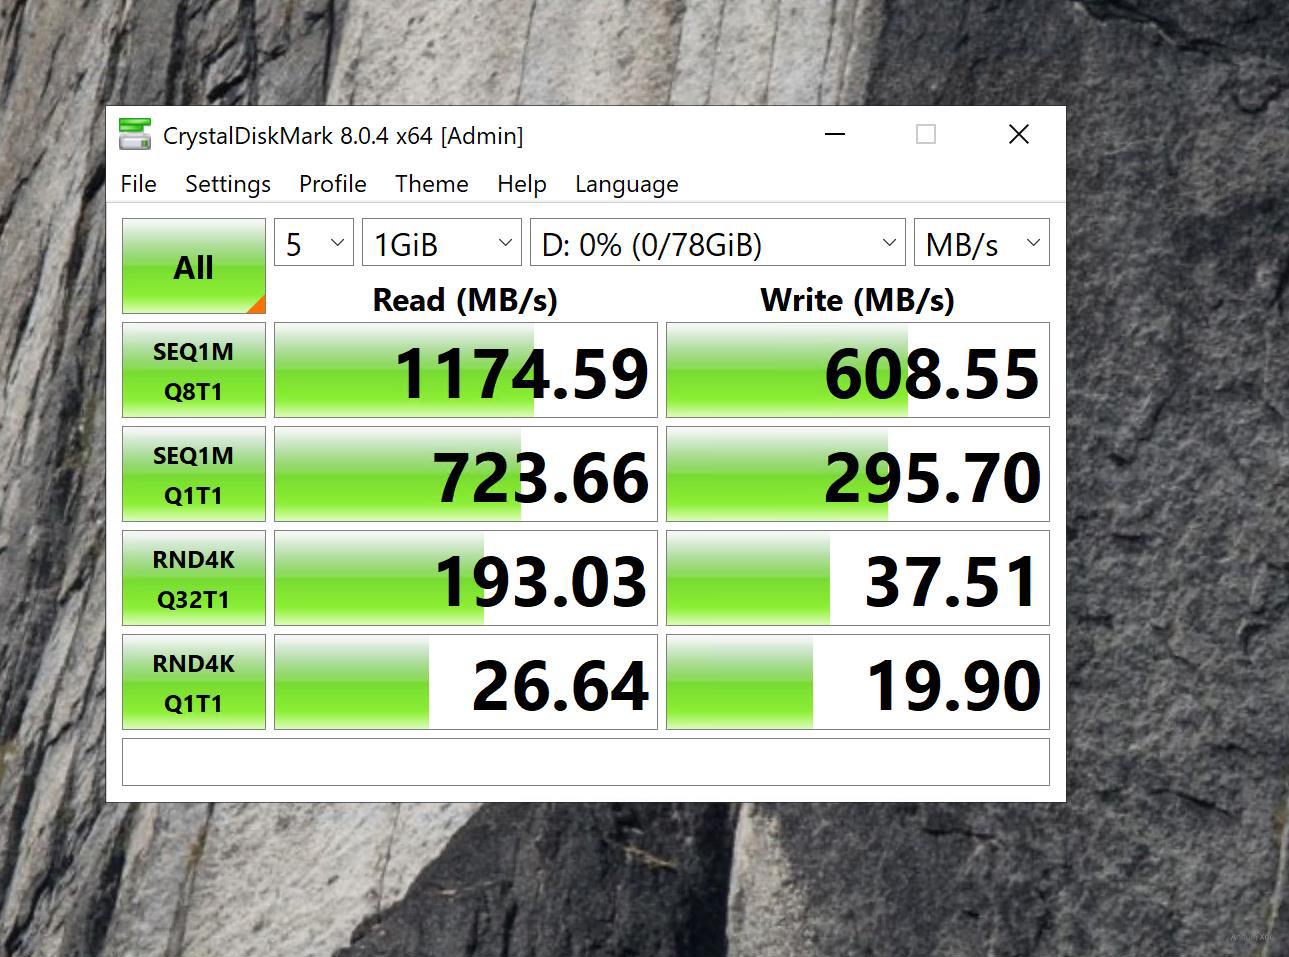
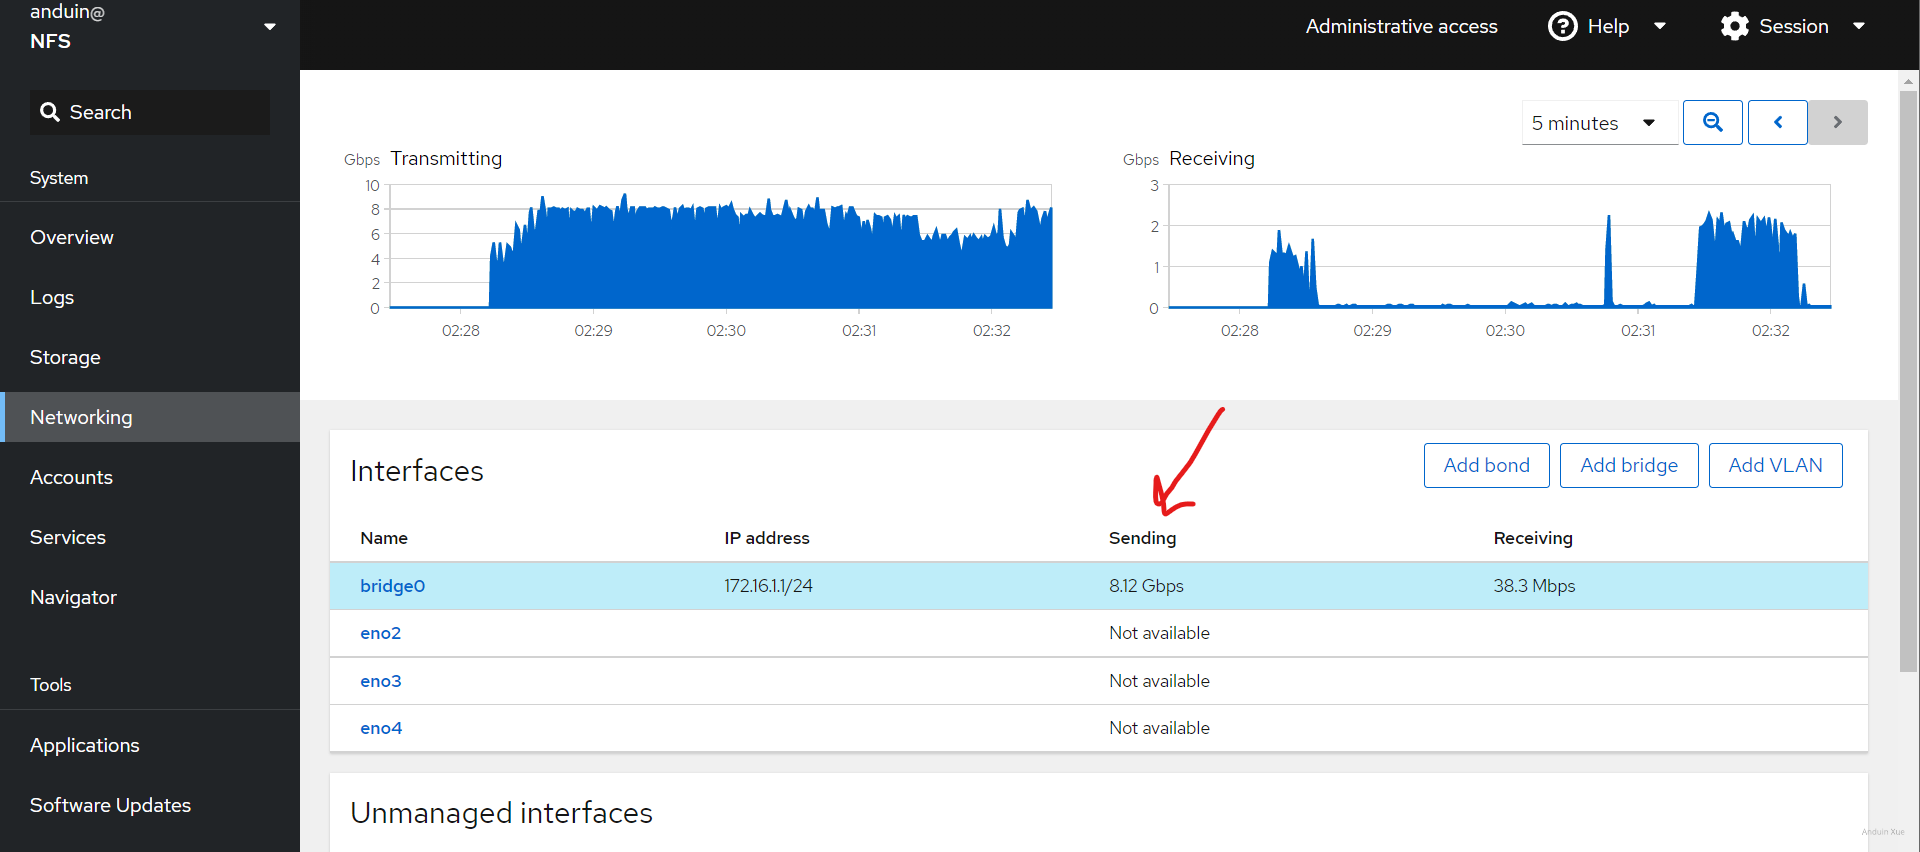
Don't forget to keep an eye on your network usage and disk usage!
10Gbps network should have max speed around 1200MB/s.
文章中关于网络桥接的部分提到通过临时命令配置IP和MTU,但未提及如何将这些设置持久化。例如,使用
ip addr和ip link设置的参数在系统重启后会失效,可能需要通过修改网络配置文件(如/etc/network/interfaces)或使用Netplan来实现长期生效。此外,桥接多个物理接口时,是否考虑了链路聚合(如LACP)以提升冗余和带宽利用率?相比桥接,LACP在负载均衡和故障切换方面可能更具优势,但需要交换机端的配合。如果交换机不支持LACP,桥接是否仍是最佳选择?在DHCP服务器配置中,作者选择了虚拟的网关和DNS地址(
172.16.1.0),这可能导致ESXI主机尝试通过该地址进行路由或DNS解析,但实际网络中并无对应服务。虽然这种配置对DHCP分配IP本身可能有效,但是否可能引发后续的网络通信问题?例如,当ESXI主机尝试访问网关或DNS服务器时,若这些地址不可达,是否会影响存储网络的稳定性?建议明确此类配置的潜在风险,并考虑是否需要在存储子网中部署实际的网关或DNS服务,或通过防火墙规则将相关流量拦截。关于Cockpit插件的安装,直接从GitHub下载.deb包可能存在版本兼容性或依赖问题。例如,
cockpit-navigator插件是否针对特定版本的Cockpit进行了测试?是否有推荐的安装方式(如通过官方仓库或PPA)以确保安全性?此外,插件是否需要额外的权限或配置才能正常工作?作者是否建议定期检查插件更新以避免安全漏洞?在性能测试部分,除了CrystalDiskBench,是否考虑过使用更贴近实际应用场景的测试工具?例如,通过
fio模拟随机读写负载,或使用iozone测试不同I/O模式下的性能表现。此外,网络性能测试中是否测量了实际的吞吐量是否达到预期(如10Gbps对应约1250MB/s)?如果未达到,可能需要检查MTU配置是否正确,或是否存在网络拥塞/丢包等问题。是否建议在测试时关闭存储服务器的其他服务以减少干扰?最后,文章中提到的RAID 10配置虽然提供了较好的性能和冗余性,但未讨论其存储效率(50%)。如果存储需求较大,是否有考虑结合RAID 6(允许双盘故障)或使用分布式存储方案(如Ceph)来平衡容量和性能?此外,在长期运行中,如何监控RAID健康状态?是否建议定期执行RAID检查或备份策略以防止数据丢失?
这篇文章详细介绍了如何在Linux服务器上搭建NFS存储,并将其挂载到vSphere环境中,最后通过性能测试来评估存储的效能。以下是我对这篇文章的评论:
首先,文章结构清晰,步骤明确,适合希望将NFS存储与vSphere集成的读者。从安装必要的软件、配置网络和Jumbo帧,到设置NFS服务器、使用Cockpit监控资源,再到挂载存储和性能测试,涵盖了整个过程的关键环节。
在实际操作中,有几个点值得特别注意:
防火墙配置:安装完成后,请确保Linux防火墙允许NFS相关端口的流量。可以通过运行
firewall-cmd --permanent --add-service=nfs和重启防火墙来实现。Jumbo帧的优势与注意事项:启用Jumbo帧可以提升网络性能,但需确保整个网络路径(包括交换机和网线)都支持MTU为9000。不一致的MTU设置可能导致数据分片或连接问题。
NFS版本选择:使用最新稳定的NFS版本通常能带来更好的性能和安全性。建议在挂载时指定具体的版本,如
nfs4。vSphere中的网络配置:在添加VMkernel端口时,确保其与对应的虚拟交换机正确绑定,并检查是否启用了正确的VLAN设置(如果需要)。
监控与性能测试工具的扩展性:除了Cockpit和CrystalDiskBench,可以考虑使用更专业的工具如Prometheus、Grafana结合Node Exporter来进行持续监控。对于存储性能测试,fio是一个强大的工具,支持自定义测试场景,适合评估不同负载下的表现。
备份与恢复策略:在生产环境中部署NFS存储前,建议制定完善的备份和灾难恢复计划,确保数据安全性和业务连续性。
此外,在性能测试阶段,可以同时监控服务器的网络、CPU、内存和磁盘使用情况,以全面评估存储系统的瓶颈。这有助于优化配置,比如调整读写缓存策略或升级硬件资源。
总的来说,这篇文章为读者提供了一个实用且详细的操作指南,但在实际应用中建议结合自身的业务需求,进行深入测试和优化,确保存储解决方案的高效与稳定。希望这些补充信息能帮助读者更好地理解和实施NFS存储在vSphere环境中的配置与管理!
This blog post provides a comprehensive guide on how to install an NFS ESXI storage server, covering everything from configuring the NFS server to setting up network connections and monitoring the server with Cockpit. The author also includes helpful images throughout the article, which makes it easier for readers to follow along.
The core concept of this blog post is to enable users to create their own NFS ESXI storage server and optimize its performance by separating VM traffic from storage traffic. The author also highlights the importance of using fiber connections for improved speed and performance.
One of the major strengths of this post is its step-by-step approach and detailed explanations. The author takes the time to explain each step, making it easy for readers to follow along and understand the process. Additionally, the use of images throughout the post helps to visualize the process and makes it more engaging for readers.
However, there are a few areas where the blog post could be improved. For instance, the author could provide more context on why someone might want to set up an NFS ESXI storage server in the first place and the benefits it offers. This would help readers understand the value of following this guide.
Additionally, there are instances where the author uses technical terms without providing an explanation. For example, the term "Jumbo frames" is mentioned but not explained. Providing a brief explanation for such terms would make the content more accessible to readers who may not be familiar with them.
Lastly, the author could consider providing a summary at the end of the post to recap the key points and steps involved in setting up an NFS ESXI storage server. This would be helpful for readers who want a quick overview of the process before diving into the detailed steps.
In conclusion, this blog post offers a thorough and well-structured guide on setting up an NFS ESXI storage server. The author's attention to detail and use of images make it easy for readers to follow along. To further improve the post, the author could consider providing more context on the benefits of setting up an NFS ESXI storage server, explaining technical terms, and adding a summary at the end.
anduin nb