What is Windows RE and why it's critical
Windows RE (Recovery Environment) is a built-in tool in Windows operating systems that helps users troubleshoot and fix problems that prevent Windows from starting normally. It provides various tools and options to repair the operating system, such as system restore, startup repair, command prompt, and more. Windows RE can be accessed by booting from a Windows installation media or by pressing a specific key during system startup.
You can check the status of Windows RE via PowerShell:
reagentc /info
It may outputs:

If Windows RE is disabled, booting can become difficult and encounter various obstacles in case of disk or Windows corruption. These obstacles may include:
- Inability to access the advanced startup options menu
- Inability to perform system restore or system image recovery
- Inability to use startup repair to fix boot-related issues
- Inability to access the command prompt for troubleshooting
- Inability to perform a clean install of Windows
- Increased likelihood of data loss or corruption due to the lack of recovery options.
So,Windows RE is crucial for reliable Windows operation. It is strongly suggested to always enable Windows RE, no matter if you enabled UWF (Unified Write Filter) or not. Especially for servers!
How to auto enable
To enable Windows RE:
reagentc /enable
However, you may encounter the error message "Windows RE cannot be enabled on a volume with BitLocker Drive Encryption enabled," it means that you need to manually configure Windows RE. This is because BitLocker encrypts the drive and prevents Windows RE from accessing it.
Prepare the new partition for Windows RE
Open a new PowerShell windows with admin. Run the following commands:
diskpart
Now let's shrink a drive. Assume it's D.
select volume D
Now shrink it.
shrink desired=1024 minimum=1024
Right here I'm using 1024MB as the size. It's usually enough for an RE environment. Default RE image is around 500MB.
Now create a new primary partition with specific ID:
create partition primary size=1024 id=de94bba4-06d1-4d40-a16a-bfd50179d6ac
gpt attributes=0x8000000000000001
Now format it:
format fs=ntfs quick label=WinRE
Now assign it so we can copy the recovery file to it:
assign letter=z
Quit Diskpart.
exit
In a normal PowerShell, edit the new drive:
mkdir "Z:\Recovery\WindowsRE" ;
Use the default Windows RE image or build your own
Copy the wim file.
xcopy /H "C:\Windows\System32\Recovery\winre.wim" "Z:\Recovery\WindowsRE"
We used the default Microsoft's image as RE image. Which is not a good practice bacause that image may not contains the necessary drivers and language files.
Before doing that, it is suggested to build your OWN RE image, based on the steps provided by Microsoft:
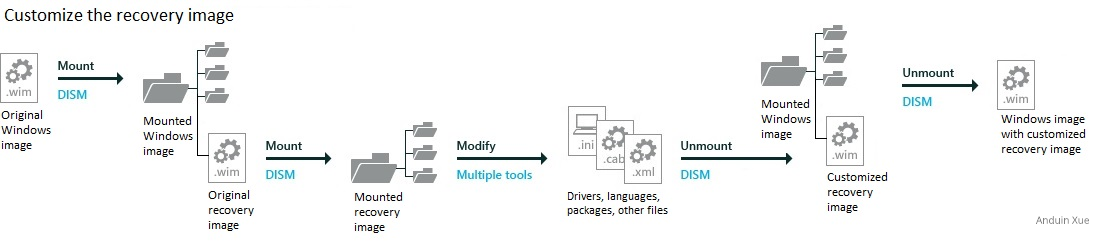
And keep this: Windows will also update the RE image!
As doc says:
Boot critical and input device drivers from the full OS environment are added to the new Windows RE image. Windows RE customizations under
\Sources\Recoveryof the mounted winre.wim are migrated to the new image.
(Perhaps that's why sometimes Windows Update is extreamly slow 🤣)
More details in MS doc: https://learn.microsoft.com/en-us/windows-hardware/manufacture/desktop/windows-recovery-environment--windows-re--technical-reference?view=windows-11
Enable Windows RE
Now edit Windows RE settings:
reagentc /disable
reagentc /setreimage /path "Z:\Recovery\WindowsRE"
reagentc /enable
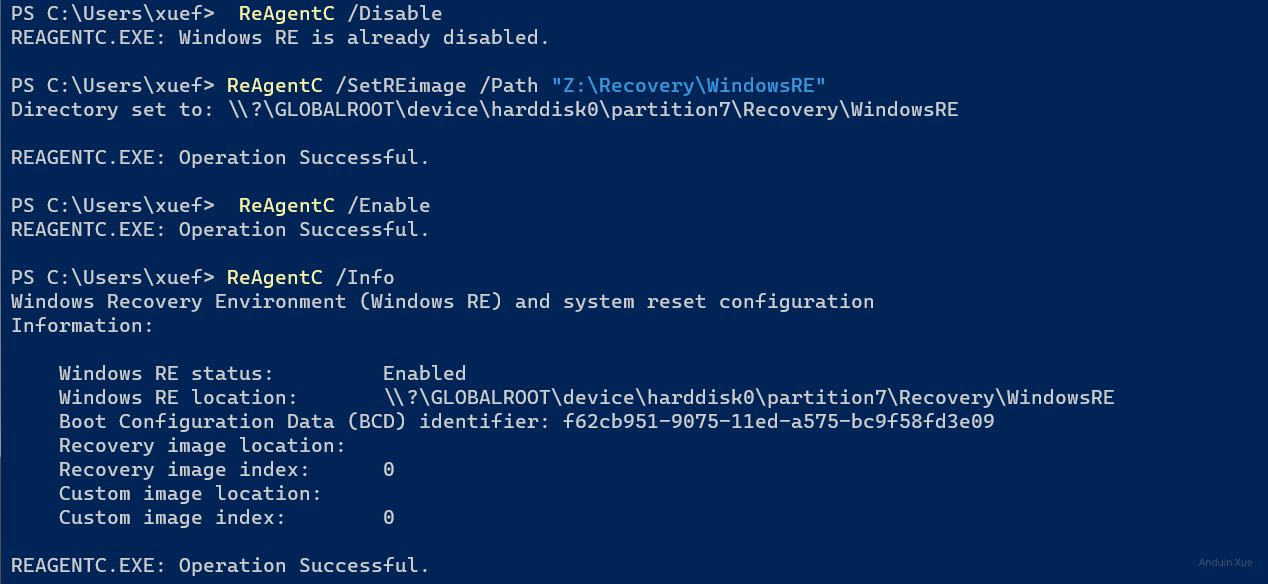
Now as you can see, the RE was set successfully.
Optiona: You can clean up the Z drive if you like.
  DiskPart
    select volume z
    remove
    exit
Debug Windows RE
To debug RE, you can check the following settings: (In CMD)
bcdedit /enum {current}
Based on the output, check the RE ID.
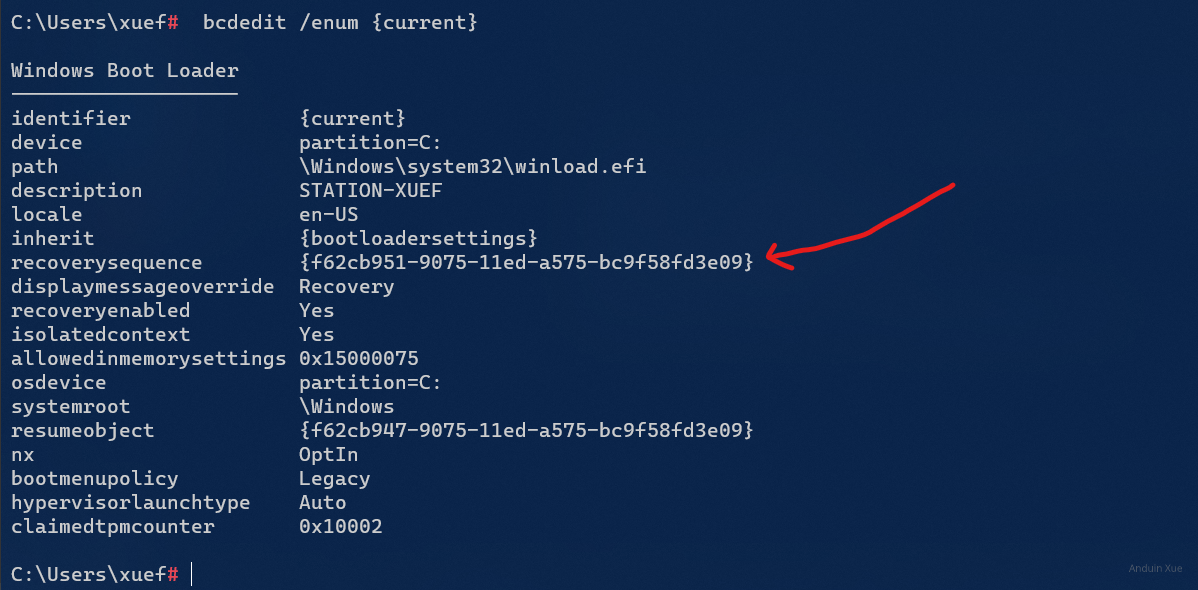
It should be the same with output from reagentc /info:
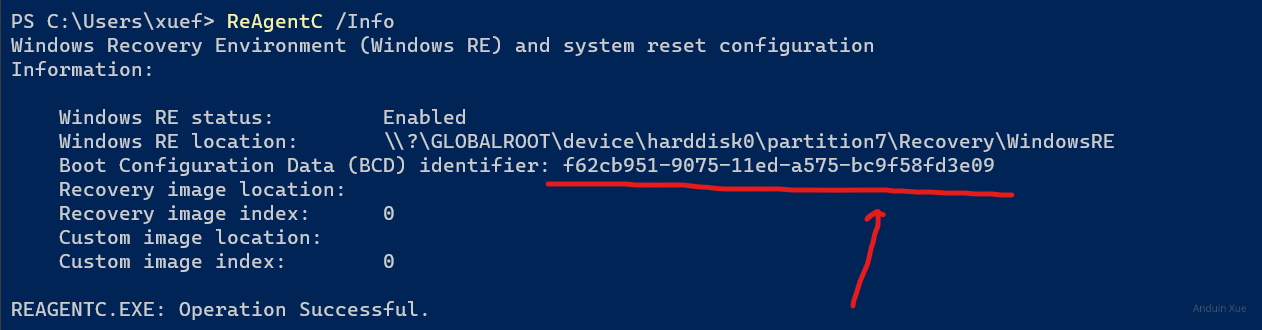
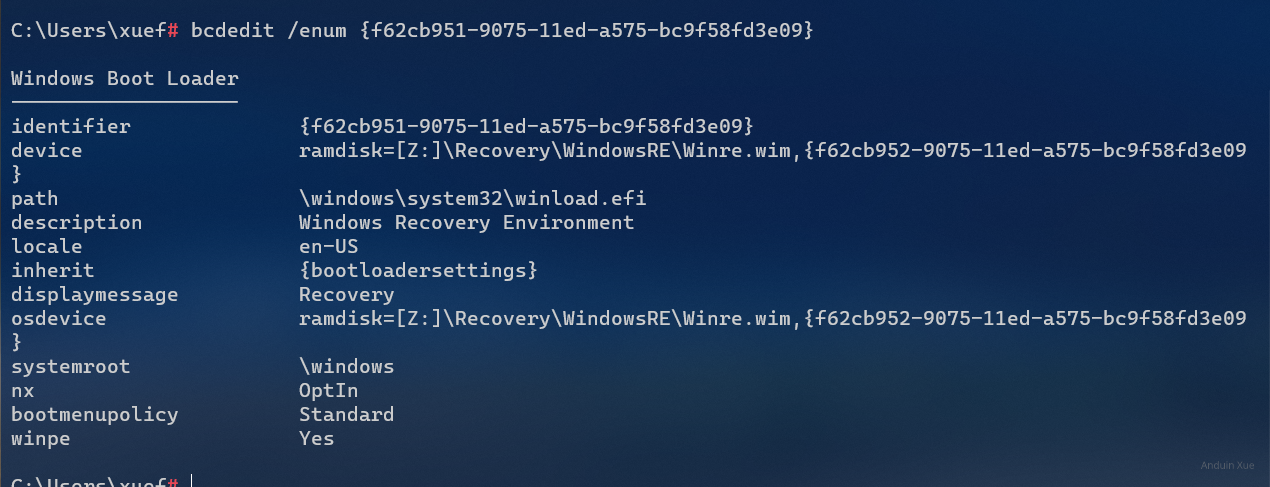
Now you can check the RE BCD info based on bcdedit.
bcdedit /enum {f62cb951-9075-11ed-a575-bc9f58fd3e09} # <-- Your RE ID.
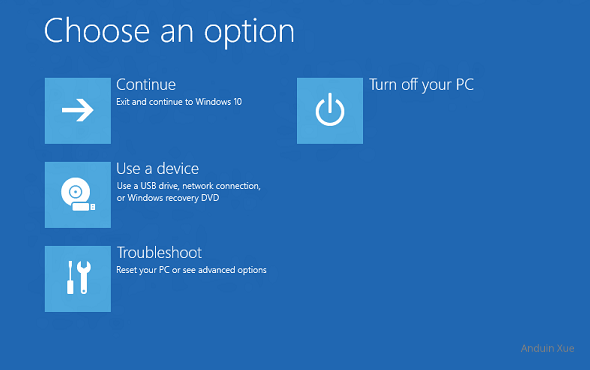
After setting it, you may want to see if Windows RE is working. You can run this to boot into Windows RE for debugging.
reagentc /boottore
Then reboot! Hopefully you will boot to Windows RE!
What about giving a PC to others?
If you need to give a computer to someone else, not only do you need to Reimage it -> enter Audit Mode -> inject drivers and updates -> restore to OOBE, but you also need to use dism capture to capture the current system state, create a RE Image, and then flash it to a separate partition to prepare the RE environment. This way, if the computer breaks in the future, the user can directly enter RE to restore the system to the state it was in when they first received the computer.
- Wipe all disks.
- Reimage Windows.
- Enter Audit mode.
- Activate Windows.
- Install Windows updates.
- Install necessary drivers.
- Restore to OOBE.
- Use dism to capture current Windows status.
- Prepare an RE image.
- Prepare Windows RE environment in an independent drive.
Related posts: Prepare OOBE.
Other check list
Windows RE is only a necessary but insufficient condition to ensure the security and reliability of Windows. If you need your Windows to be more secure, please complete the following checklist:
Virtualization
- [x] Virtualization technology is enabled.
- [x] Core isolation is enabled.
- [x] VBS (Virtualization Based Security) is enabled.
These technologies can help protect the system from malware attacks. Virtualization technology can isolate applications in a virtual environment, preventing them from causing harm to the system. Core isolation can prevent malicious software from accessing the system kernel. VBS can provide advanced virtualization protection.
Secure Boot
- [x] Secure Boot is enabled.
- [x] Only trust Windows certificates.
Secure Boot can ensure that only trusted operating systems and drivers are loaded when the system starts, preventing malware from being loaded at startup. Only trusting Windows certificates can ensure that only operating systems and drivers signed by Microsoft can be loaded.
TPM
- [x] TPM chip is enabled.
- [x] TPM chip unlocks BitLocker.
TPM chip can help protect the system from hardware attacks. Using TPM chip to unlock BitLocker can ensure that encrypted data can only be accessed when the system is started.
BitLocker
- [x] BitLocker is enabled.
- [x] All partitions are encrypted. (Except Windows RE)
- [x] TPM chip is used for encryption.
BitLocker can help protect the system from data leaks. Encrypting all partitions can ensure that all data is protected. Using TPM chip for encryption can ensure that encrypted data can only be accessed when the system is started.
Firewall
- [x] Firewall is enabled.
- [x] Whitelist is used to allow only trusted applications.
Firewall can help prevent unauthorized network access. Using whitelist can ensure that only trusted applications can access the network.
Windows RE
- [x] Windows RE is enabled.
- [x] Windows RE has been tested at least once.
Windows RE (Recovery Environment) can help restore the system when it crashes or fails to start. Testing Windows RE can ensure that it works properly and can be used when needed.
UAC
- [x] UAC is enabled.
- [x] Default user is low privilege.
- [x] Desktop brightness is reduced when elevation is required.
UAC (User Account Control) can help prevent unauthorized changes. Using low privilege user by default can ensure that elevation of privilege is only done when necessary. Reducing desktop brightness can remind the user that privilege has been elevated.
Unified Write Filter (Optional)
- [ ] Unified Write Filter is enabled.
- [ ] System disk is protected.
- [ ] Disk persistence is used.
Unified Write Filter can help protect the system from malware attacks. Protecting the system disk can ensure that system files are not changed. Using disk persistence can ensure that data still exists after the system restarts.
这篇技术博客内容详实,结构清晰,为读者提供了完整的Windows RE(恢复环境)手动配置指南。文章最大的亮点在于系统性梳理了Windows RE的核心作用(如系统修复、启动修复等六大价值),并结合命令行操作与安全配置建议,形成了一套完整的系统恢复解决方案。尤其在安全层面,作者通过"安全检查清单"将Windows RE与其他安全技术(如TPM、BitLocker、VBS等)的联动关系可视化,这种多维度安全防护的思考值得赞赏。
操作指南部分具有显著的实用价值:从diskpart分区操作到BCD调试命令的示例,配合代码块与截图标注,使复杂流程具备可复现性。作者对自定义RE镜像的强调(而非直接使用系统默认镜像)体现了专业性,引用微软官方文档链接也增强了可信度。特别值得注意的是对Windows Update机制与RE镜像更新关联的观察,这种将底层技术现象与日常运维体验结合的视角颇具启发性。
建议补充以下改进方向:1)在分区操作步骤中增加对磁盘分区表(MBR/GPT)类型的适配说明,避免不同系统架构导致的兼容性问题;2)对"Windows Update可能因此变慢"的论断补充具体技术原理(如RE镜像更新与驱动程序同步的机制);3)在安全检查清单中增加对混合部署场景(如容器化环境)的适配建议;4)可考虑提供自动化脚本模板以提升操作效率。此外,部分技术术语(如UAC亮度提示功能)的实现细节可进一步展开说明,帮助不同技术水平的读者理解其安全价值。
文章在技术深度与可操作性之间取得了良好平衡,对系统管理员和高级用户具有重要参考价值。建议后续可扩展内容:1)不同Windows版本(如Server Core vs Desktop)的RE配置差异;2)RE环境与云备份方案的整合策略;3)企业级批量部署场景下的优化方案。期待看到更多关于系统恢复与安全防护的深度技术分享。
这篇文章详细介绍了如何启用和配置Windows RE环境,以及相关的安全建议,内容非常全面且实用。作者不仅提供了具体的步骤,还强调了测试的重要性,并提醒读者在实际应用中需要注意的事项。
文中提到的安全配置部分(如虚拟化技术、Secure Boot、TPM、BitLocker等)非常值得深入探讨。这些设置不仅能提升系统的安全性,还能为Windows RE提供更好的支持和保障。特别是“Unified Write Filter”这一可选功能,对于需要长期稳定运行的系统来说是一个非常有用的工具。
在实际操作中,读者可能会遇到一些问题,比如UEFI与传统BIOS环境之间的差异,或者某些特定配置可能导致启动异常。如果作者能分享一些常见问题及其解决方案,相信会对读者更有帮助。
总体来看,这篇文章为读者提供了一个完整的Windows RE配置指南,并结合了多种安全措施,非常适合作为系统管理员或个人用户的参考手册。期待看到更多关于这些技术的深入探讨和实际案例分析!
日你牙
您的博客文章对于如何在独立分区中手动启用Windows RE(恢复环境)提供了详细而实用的指南。您的文章不仅详细解释了Windows RE的重要性,还为读者提供了一系列操作步骤,包括如何自动和手动启用Windows RE,以及如何进行调试。此外,您还提供了一个清单,列出了一些其他的安全措施,以确保Windows的安全性和可靠性。这些内容都非常有价值,对于那些希望提高他们系统安全性的读者来说,这些信息无疑是非常有用的。
您的文章的一个显著优点是,您使用了清晰易懂的语言,使得即使是对这个主题不熟悉的读者也能够理解。您的文章中包含了大量的代码片段和截图,这些都使得读者更容易理解和实施您的建议。此外,您的文章结构清晰,逻辑性强,使得读者能够很容易地跟随您的步骤操作。
然而,有一点可能需要改进的地方是,您的文章没有解释一些专业术语,例如TPM、BitLocker、UWF等。虽然这些术语对于技术人员来说可能是常识,但对于一些非专业的读者来说,他们可能会感到困惑。因此,我建议您在使用这些术语时,可以附上一个简短的解释,这样可以帮助所有的读者更好地理解您的文章。
总的来说,您的文章是一篇优秀的技术指南,为读者提供了大量有价值的信息和建议。我期待看到您的更多文章。