Brief
This article introduces about how I configure my local Minecraft client.
This post is for Java edition. Not Bedrock(mobile) edition!
Step 1 - Install Java
Run the following command with admin:
winget install Microsoft.OpenJDK.17
Or download it here:
https://docs.microsoft.com/en-us/java/openjdk/download
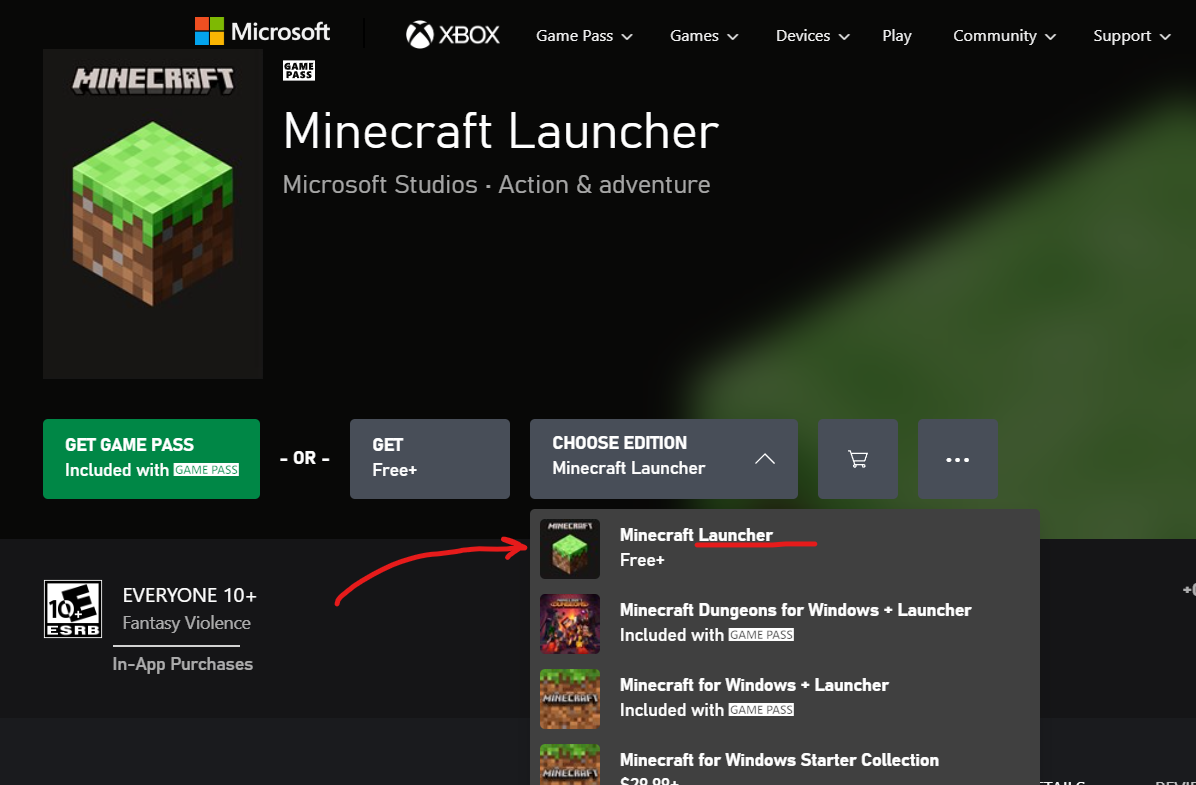
Step 2 - Install Minecraft
You can buy Minecraft launcher (Java) at Xbox Store:
Or at Minecraft official website:
Only install the launcher! Do NOT install Minecraft for Windows (Bedrock)
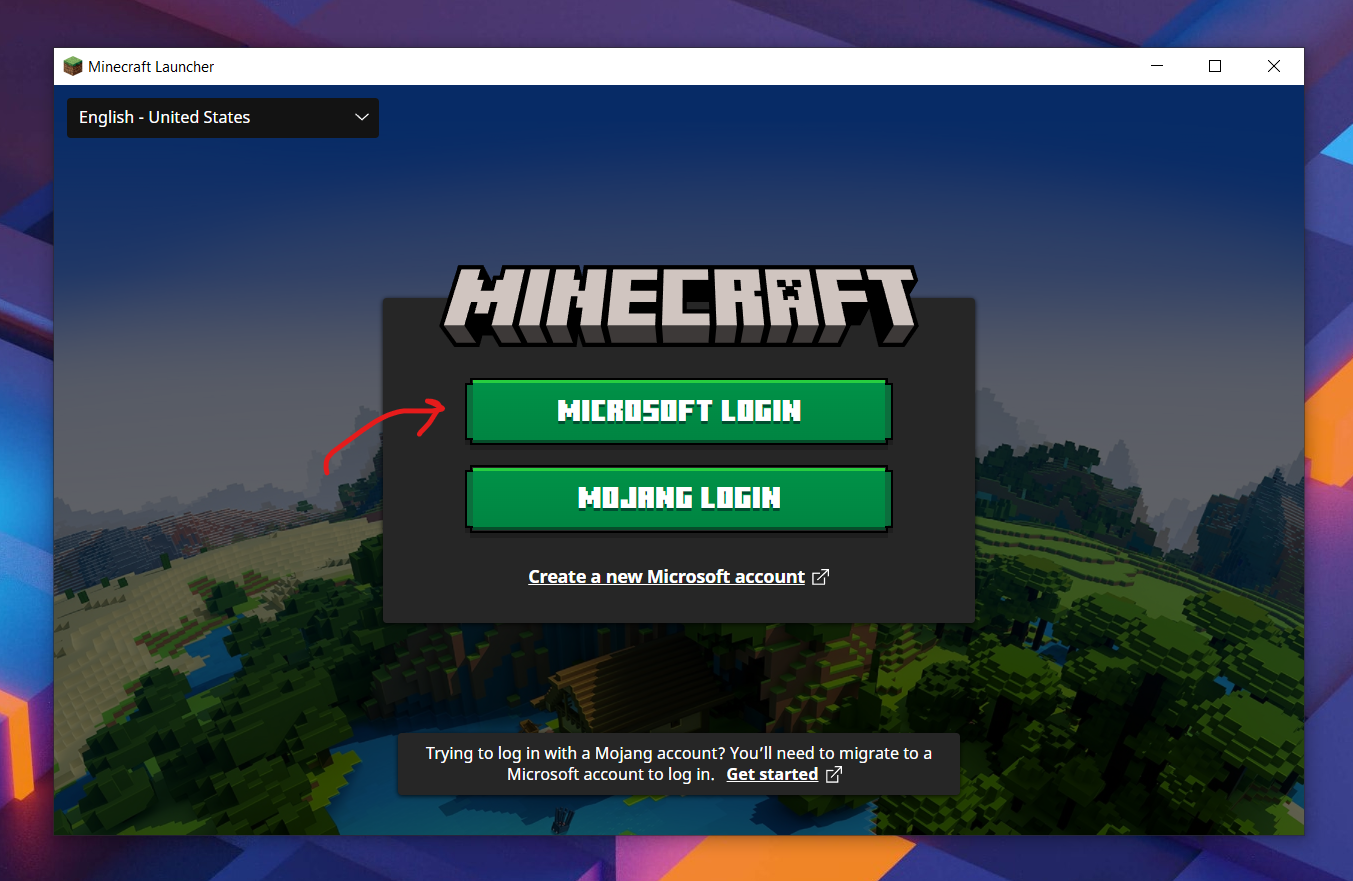
Step 3 - Start Minecraft
After installing from the store, you can start the launcher and try to run it once.
Select Microsoft sign in.
Click Play. This will actually start downloading Minecraft Java.
(Minecraft latest version might no be 1.18.1 now. These screenshots may not be updated in time. It is recommended that you download the latest version directly instead of the version in the screenshot)
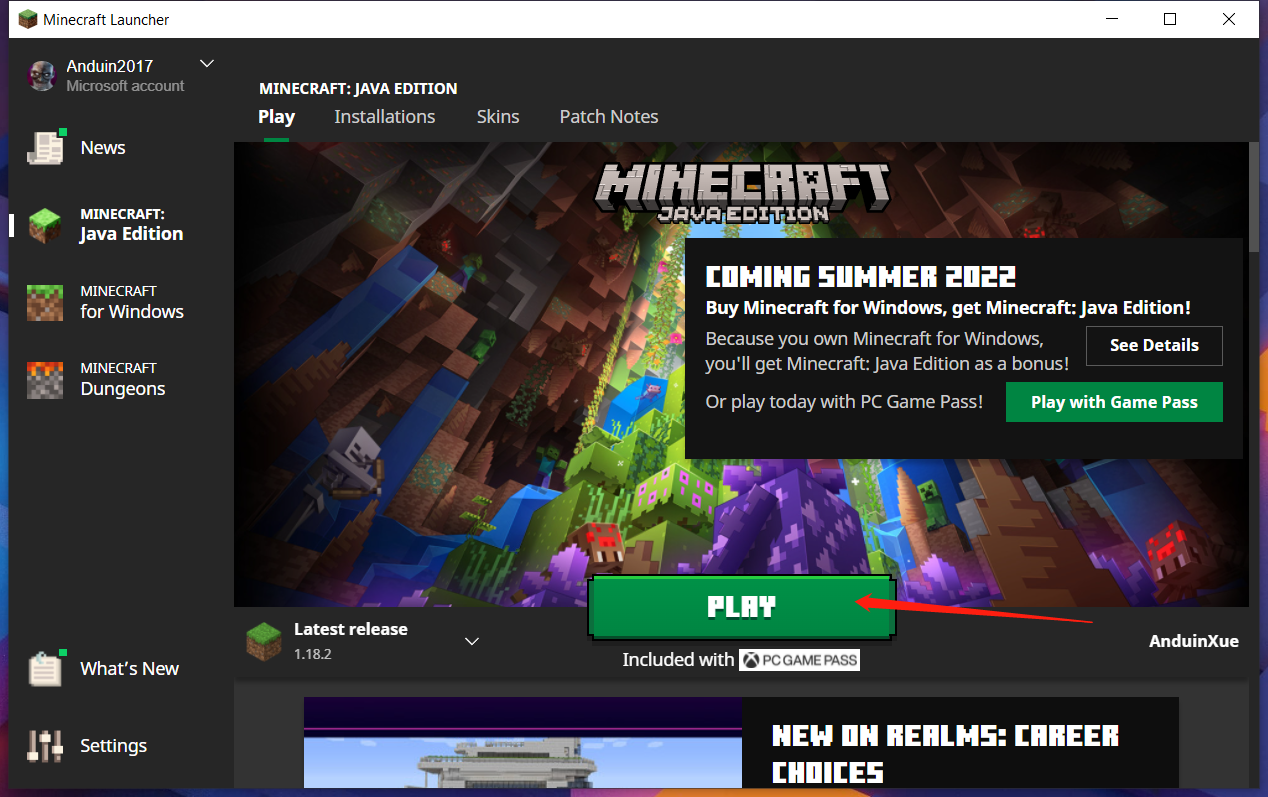
The Minecraft files will actually be installed at: C:\Users\xuef\AppData\Roaming\.minecraft (For Windows)
And make sure it runs.

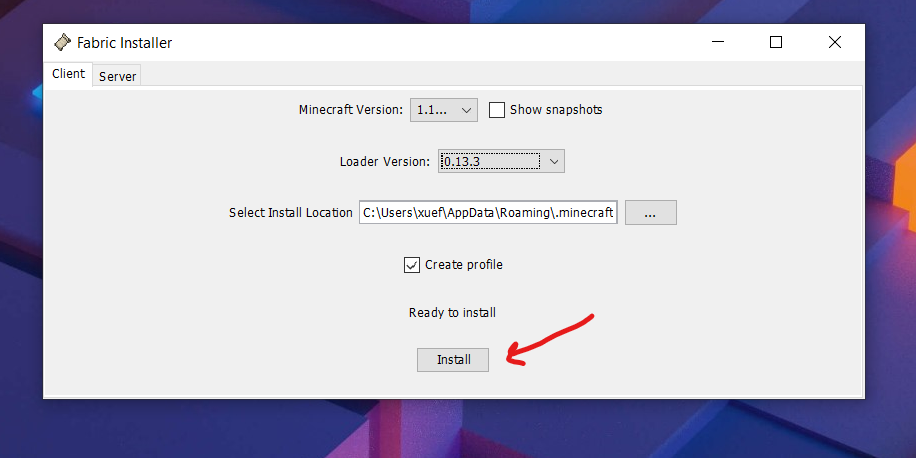
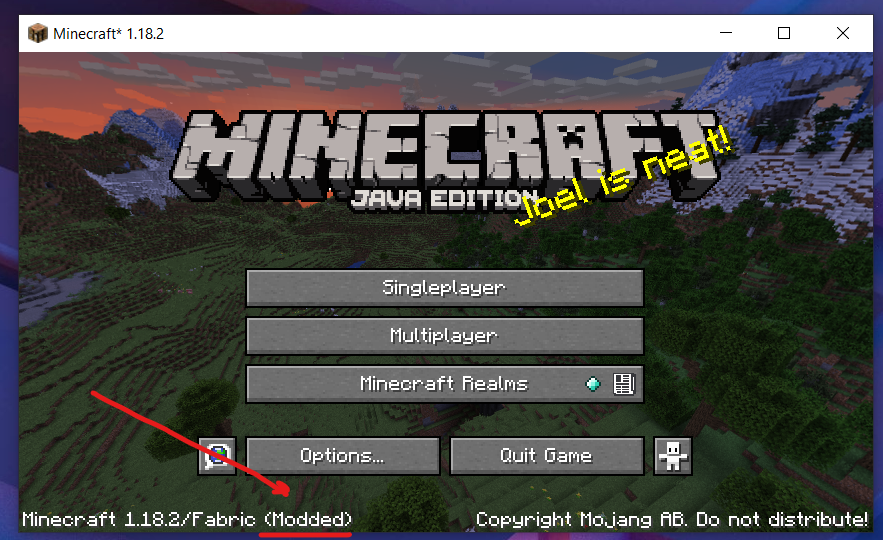
Step 4 - Download Fabric Minecraft
Download Fabric Minecraft here:
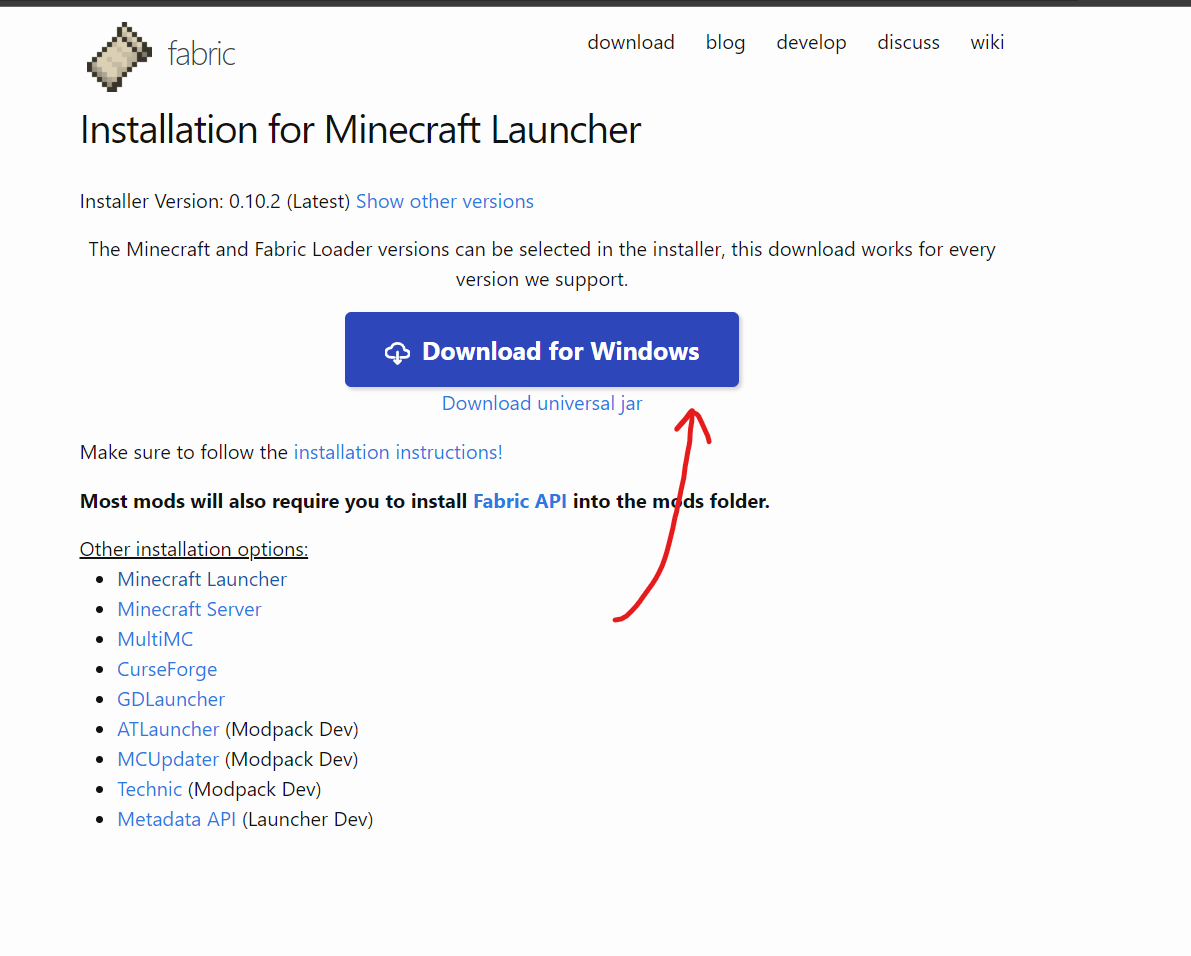
After downloading, double click to install it.
(Minecraft latest version might no be 1.18.1 now. These screenshots may not be updated in time. It is recommended that you download the latest version directly instead of the version in the screenshot)
After installing, there will be a new option to start Fabric MC directly.
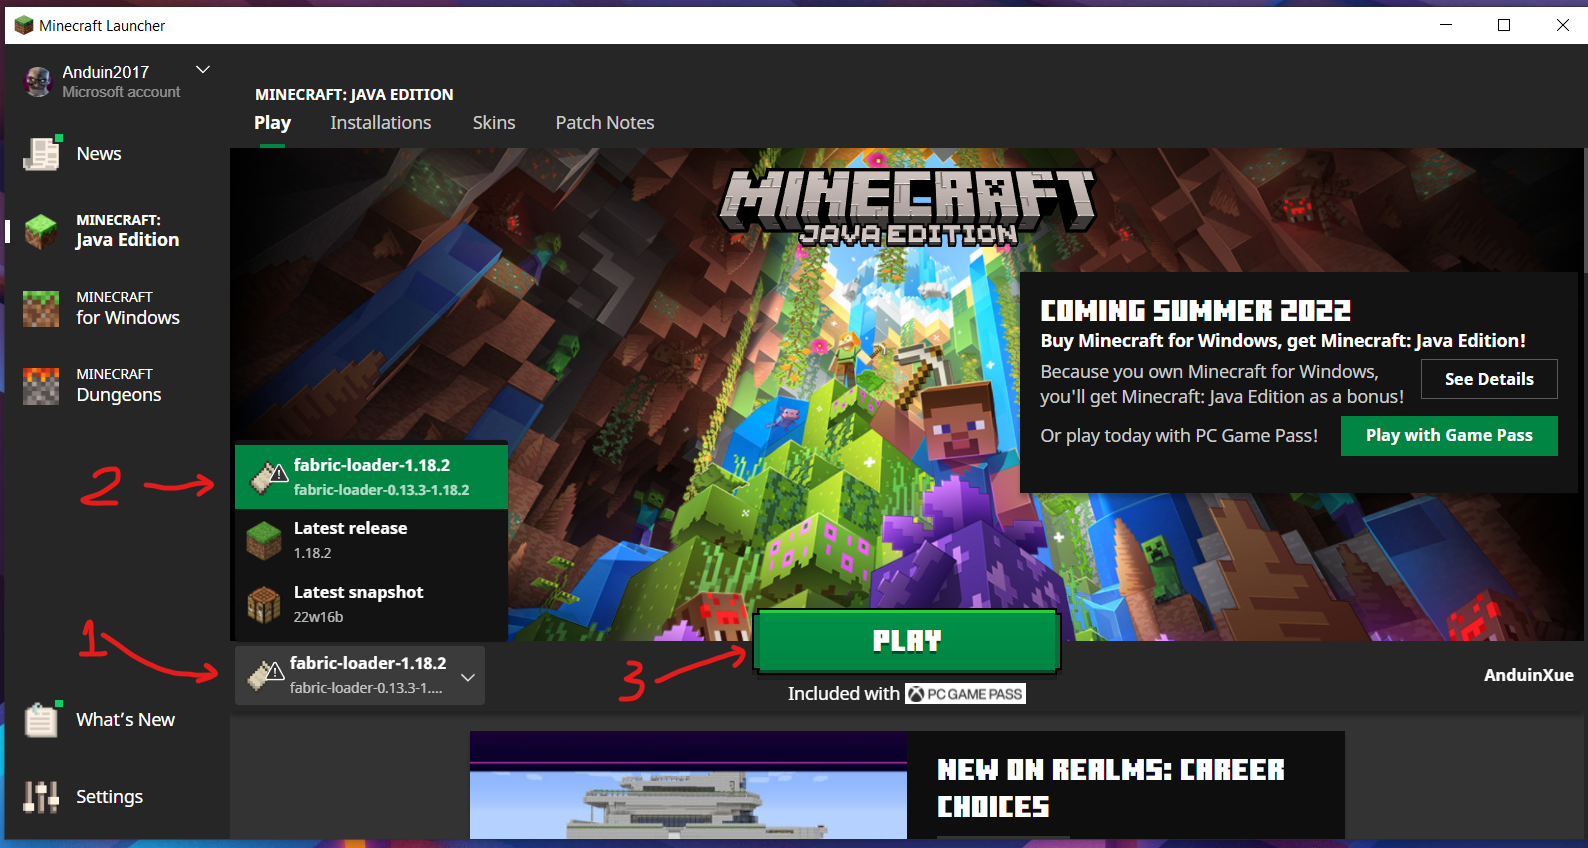
(Minecraft latest version might no be 1.18.1 now. These screenshots may not be updated in time. It is recommended that you download the latest version directly instead of the version in the screenshot)
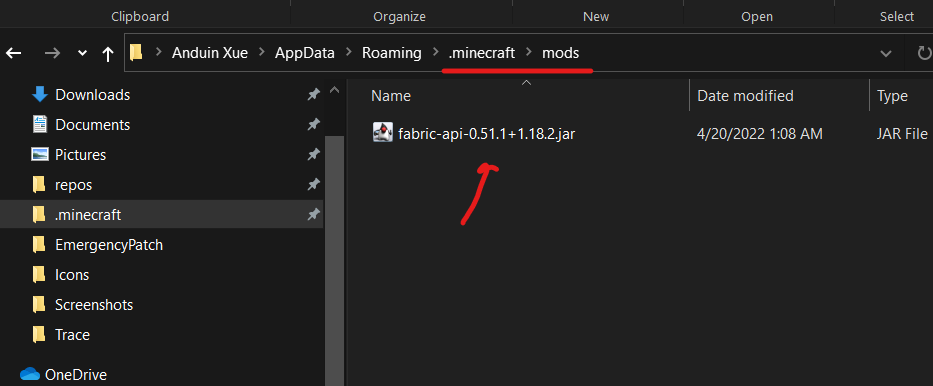
Step 5 - Download Fabric API
- Download at curseforge
(Minecraft latest version might no be 1.18.1 now. These screenshots may not be updated in time. It is recommended that you download the latest version directly instead of the version in the screenshot)
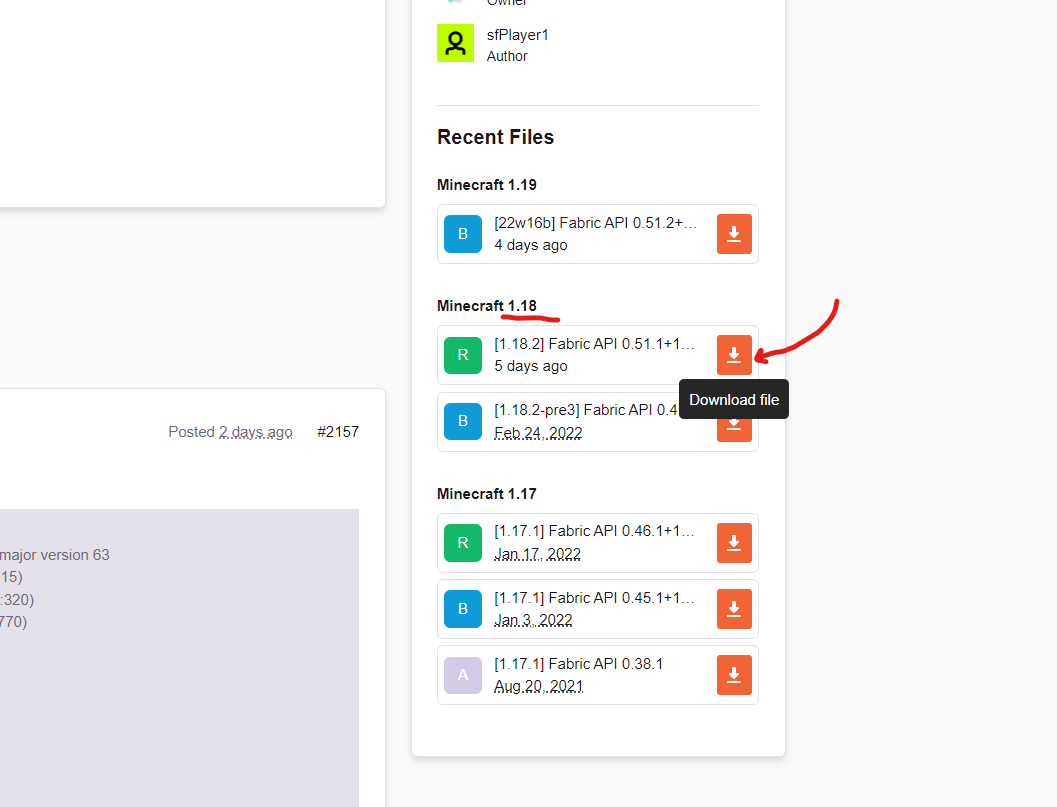
After downloading, put the downloaded file in the mods folder.
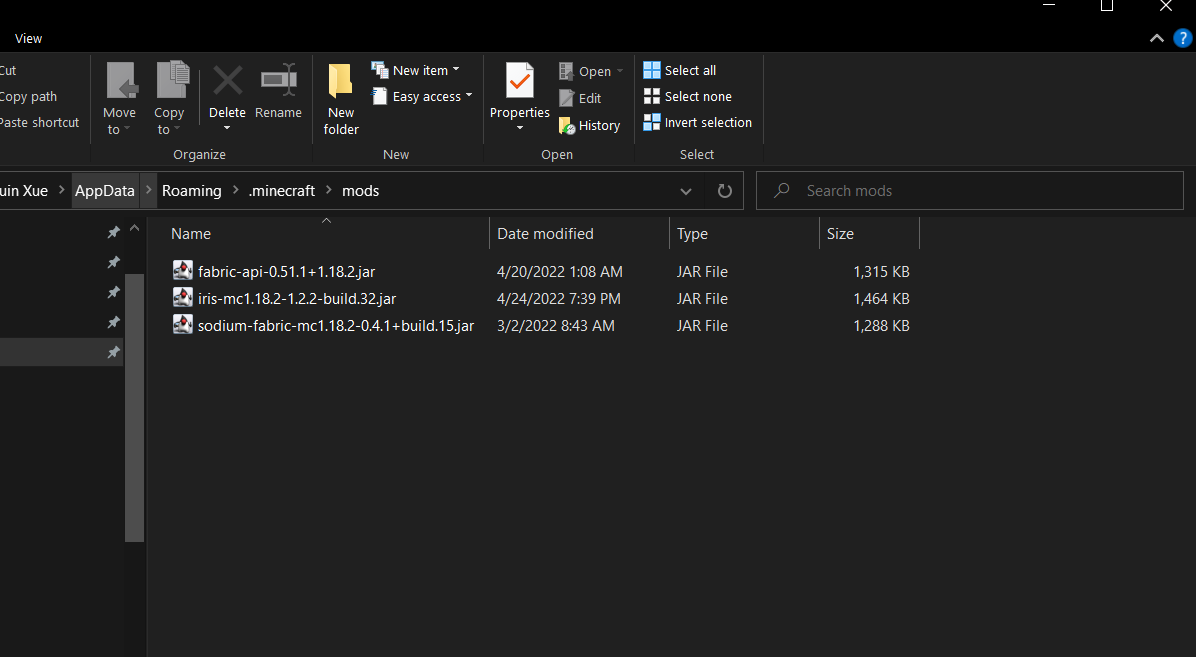
Step 6 - Download Sodium and Iris
- Download Sodium first at: https://modrinth.com/mod/sodium/versions
- Download Iris at https://irisshaders.net/
Also put the downloaded file under the mods folder.
(Minecraft latest version might no be 1.18.1 now. These screenshots may not be updated in time. It is recommended that you download the latest version directly instead of the version in the screenshot)
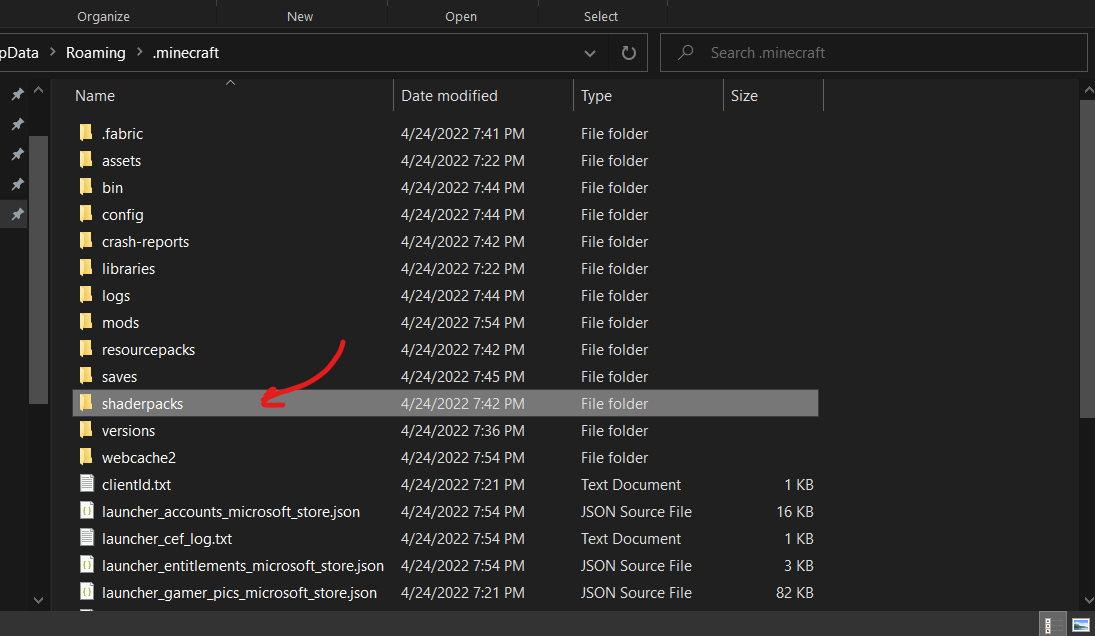
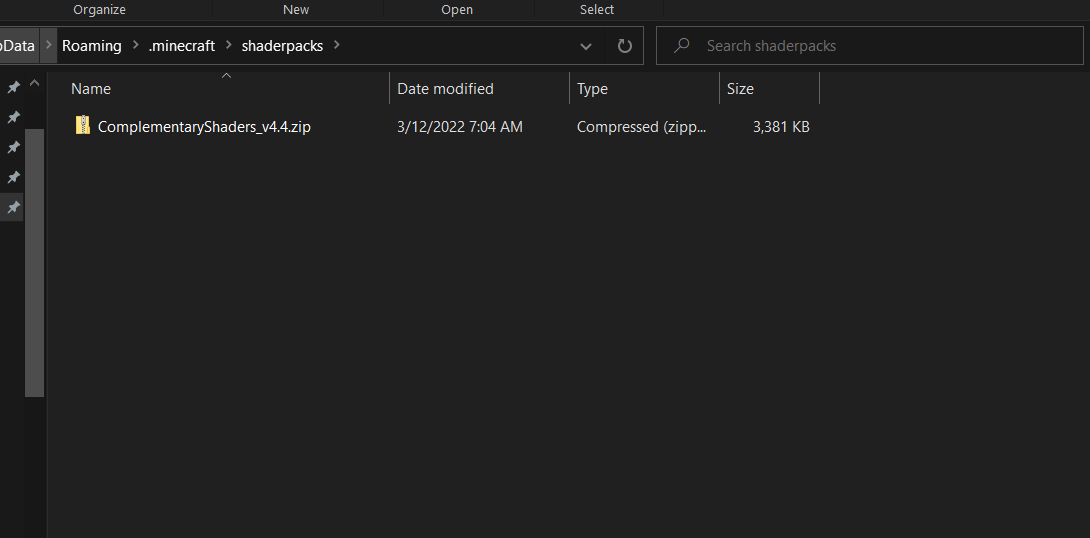
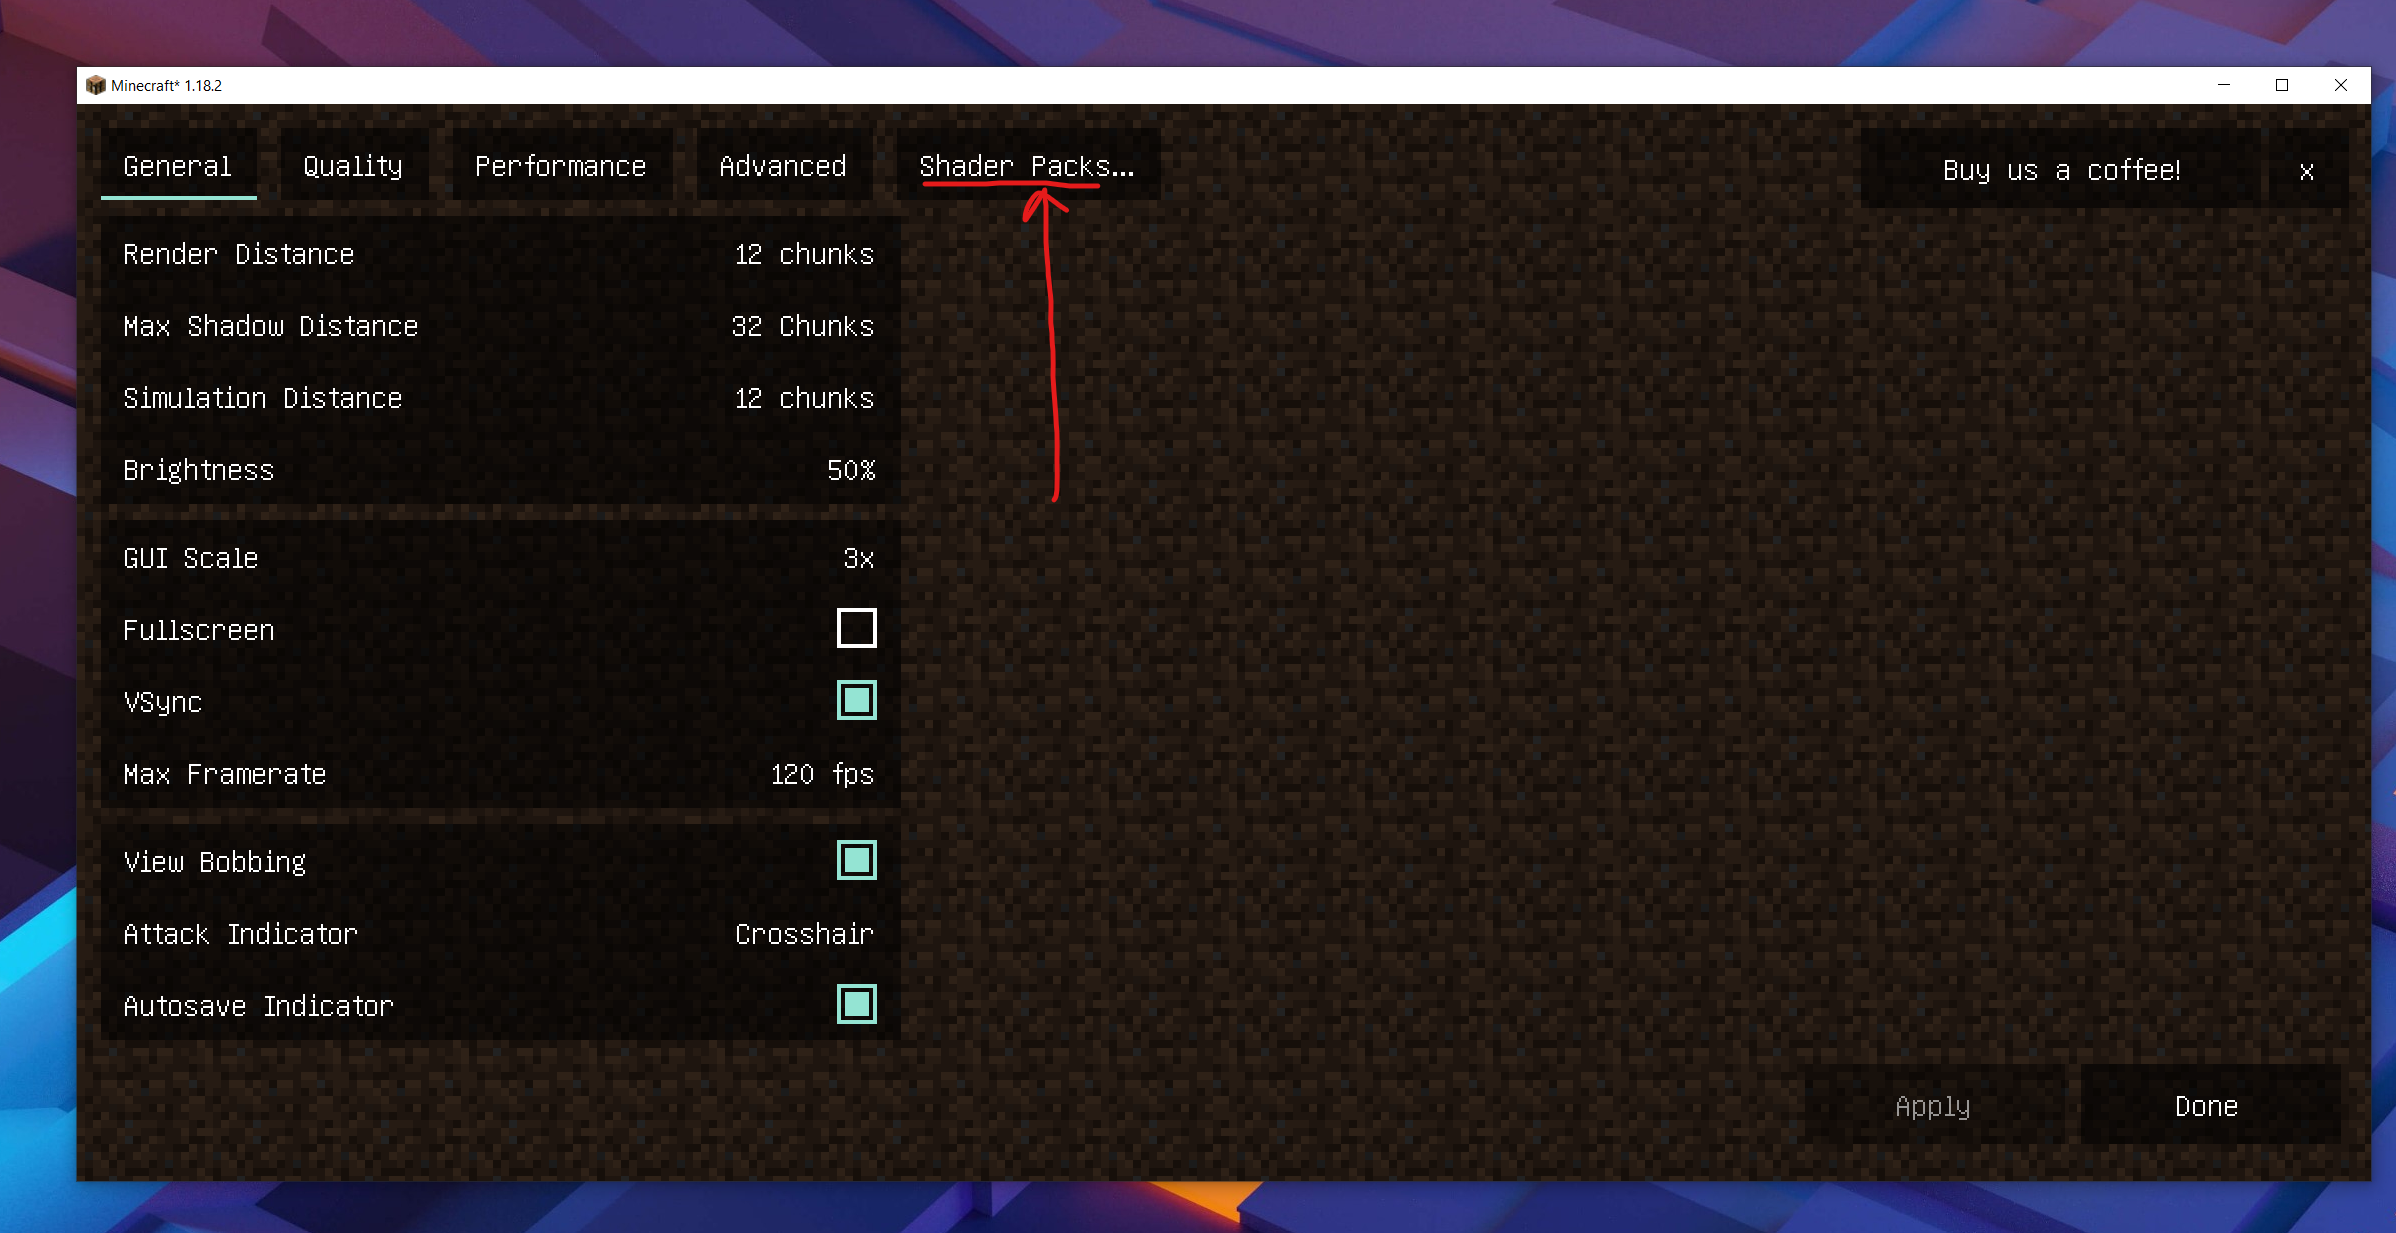
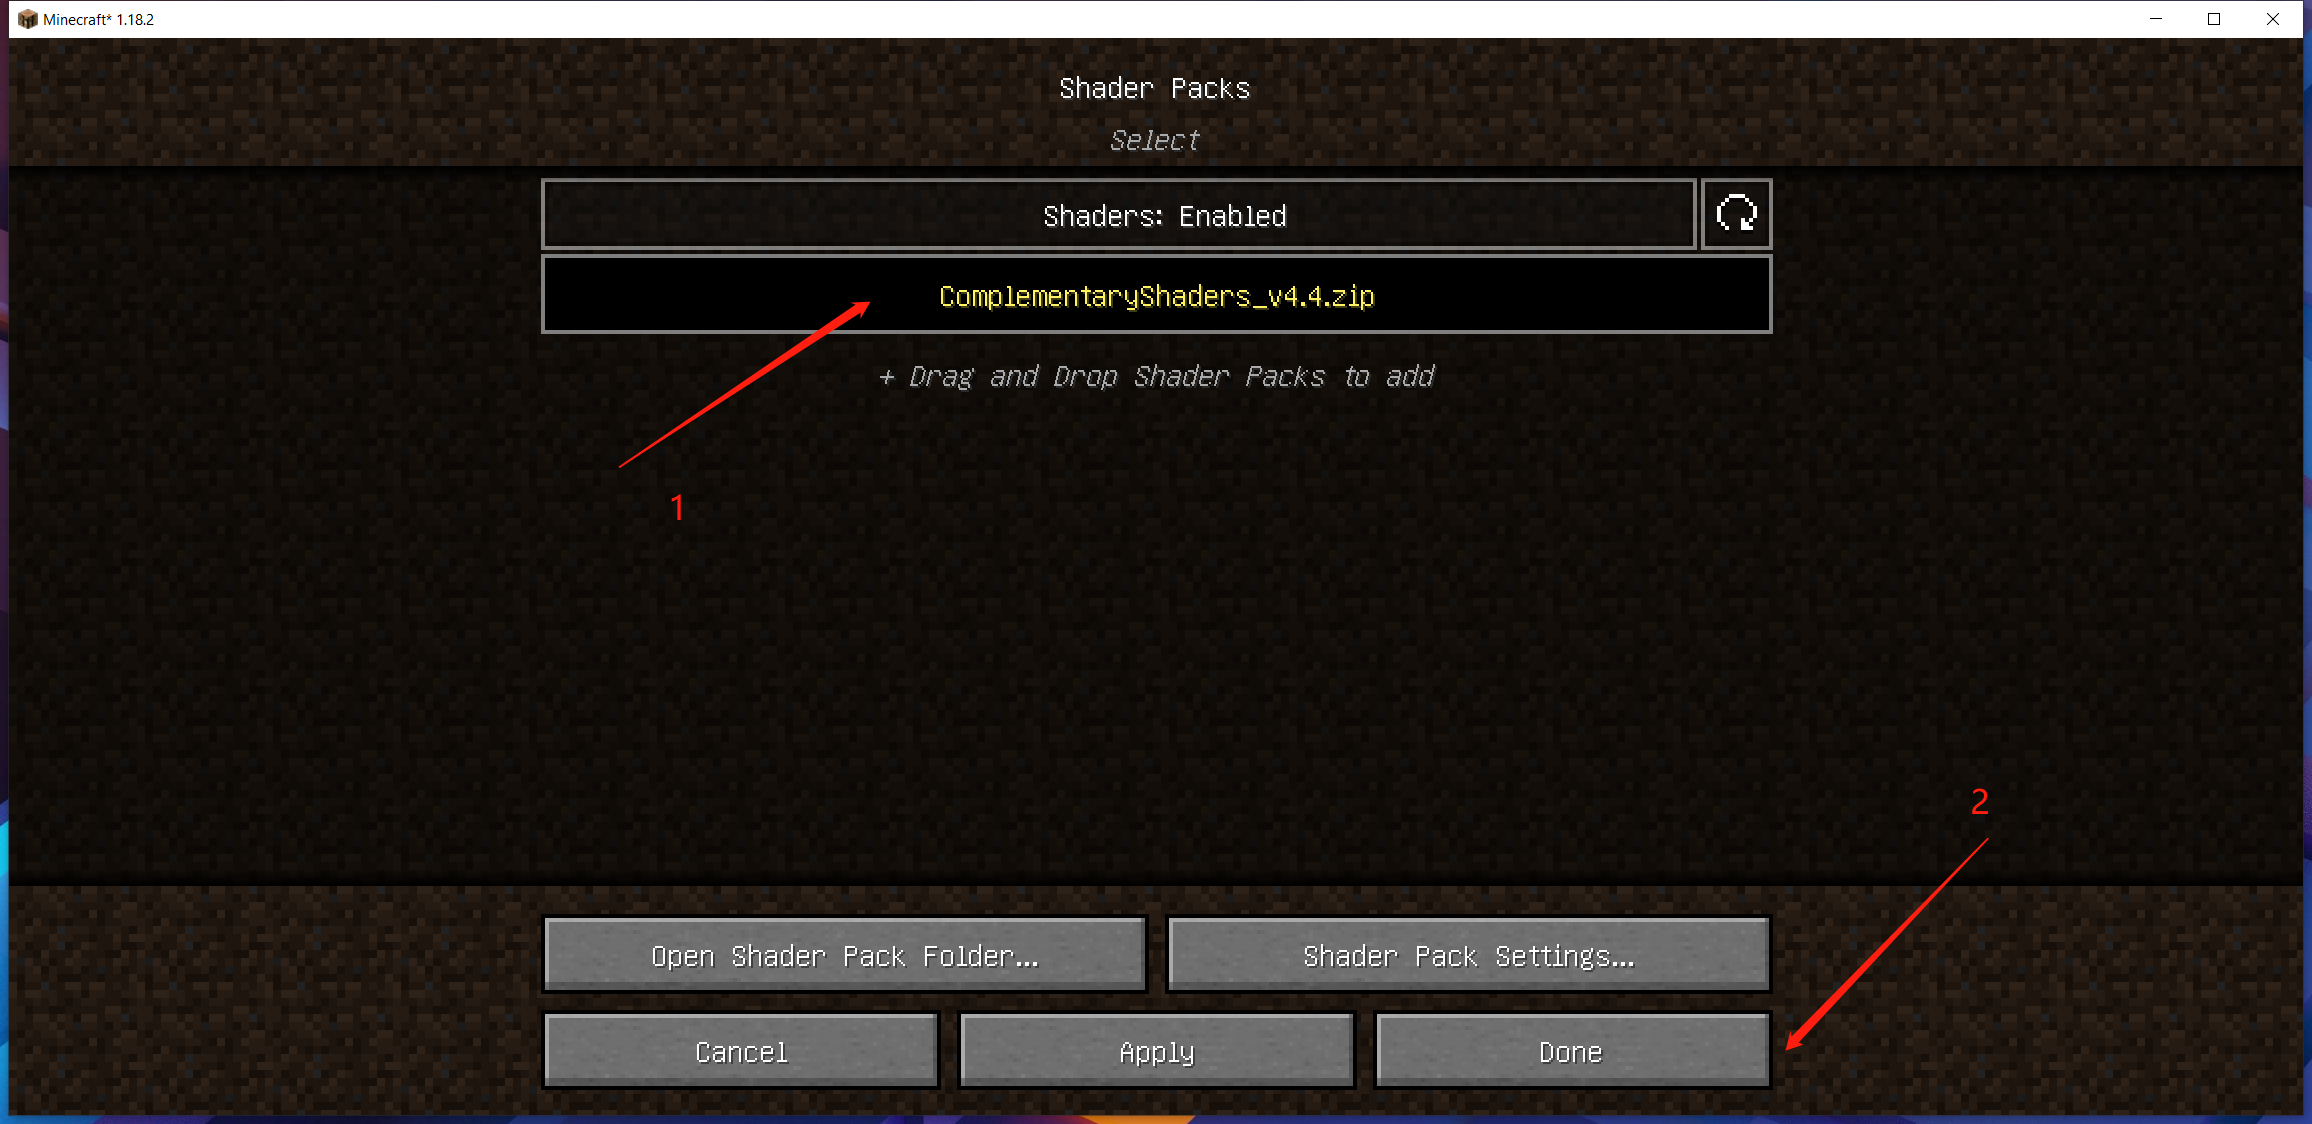
Step 7 - Download complementary shaders
- Download at resourcepack.net
- Download at curseforge
After downloading, put the .zip file to the shaderpacks folder.
Just put the .zip file here.
(Minecraft latest version might no be 1.18.1 now. These screenshots may not be updated in time. It is recommended that you download the latest version directly instead of the version in the screenshot)
Start the game. Go to video settings.
Select shader packs:
And select complementary shaders!
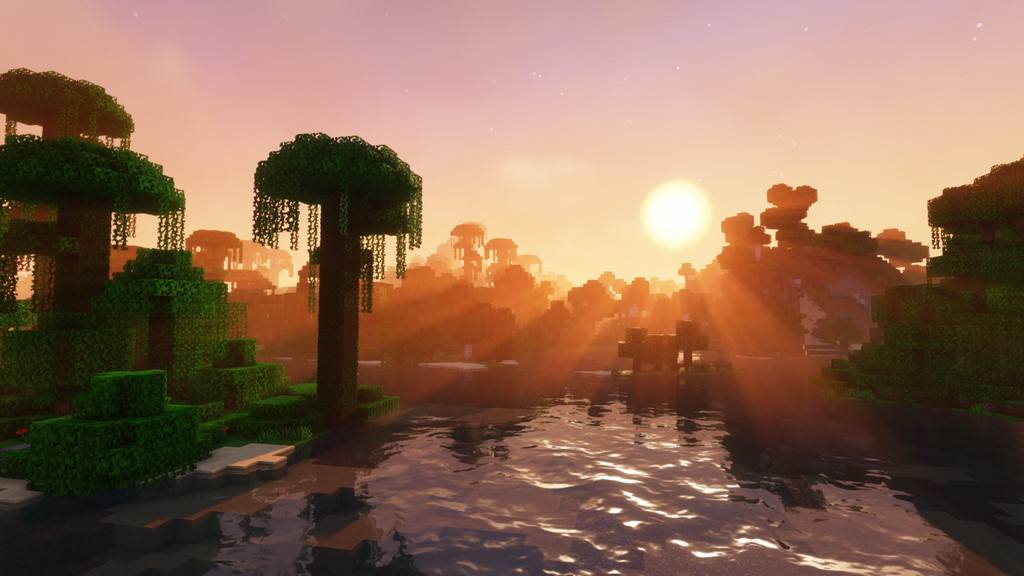
Now the world will looks gorgerous!

Step 8 - Download Xaero map and Xaero world map
- Download minimap at curseforge
- Download worldmap at curseforge
All put to .mods folder. This will show a map to help you.
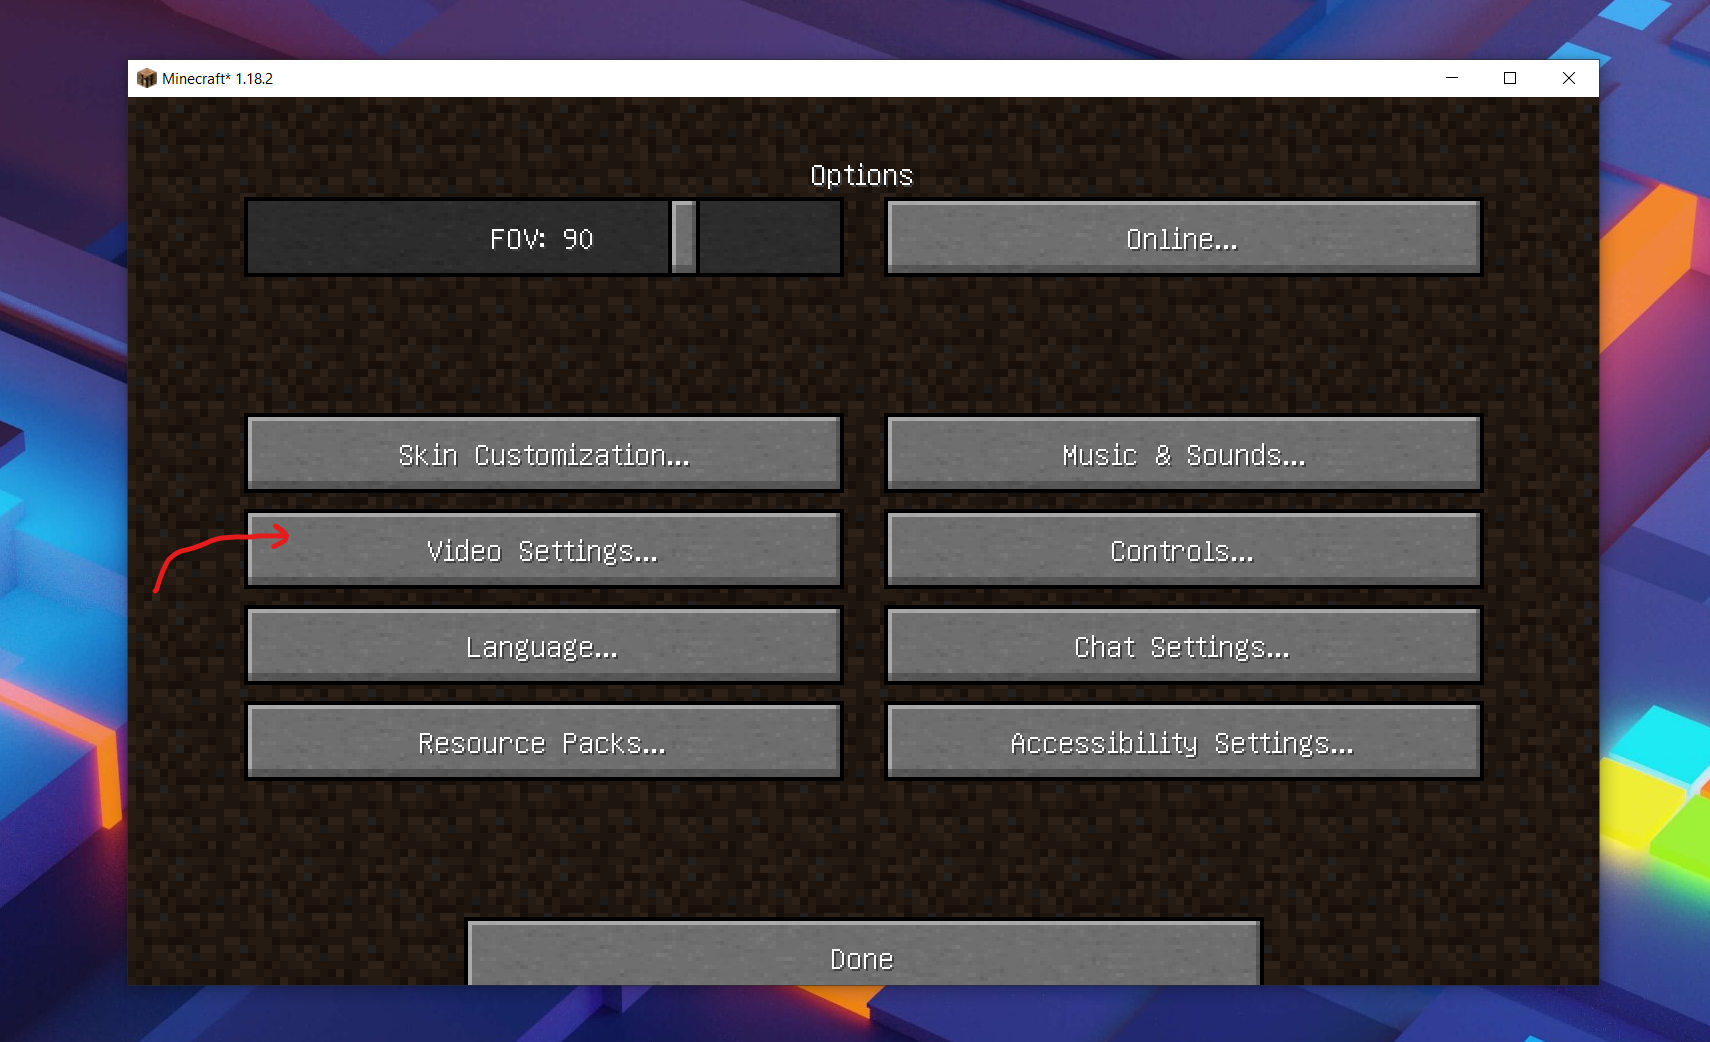
Step 9 - Setup your personal settings!
Now you can setup some personal settings and start gaming!
For example, I will:
- Switch language to Chinese.
- Turn off AutoJump
- Change FOV to 90
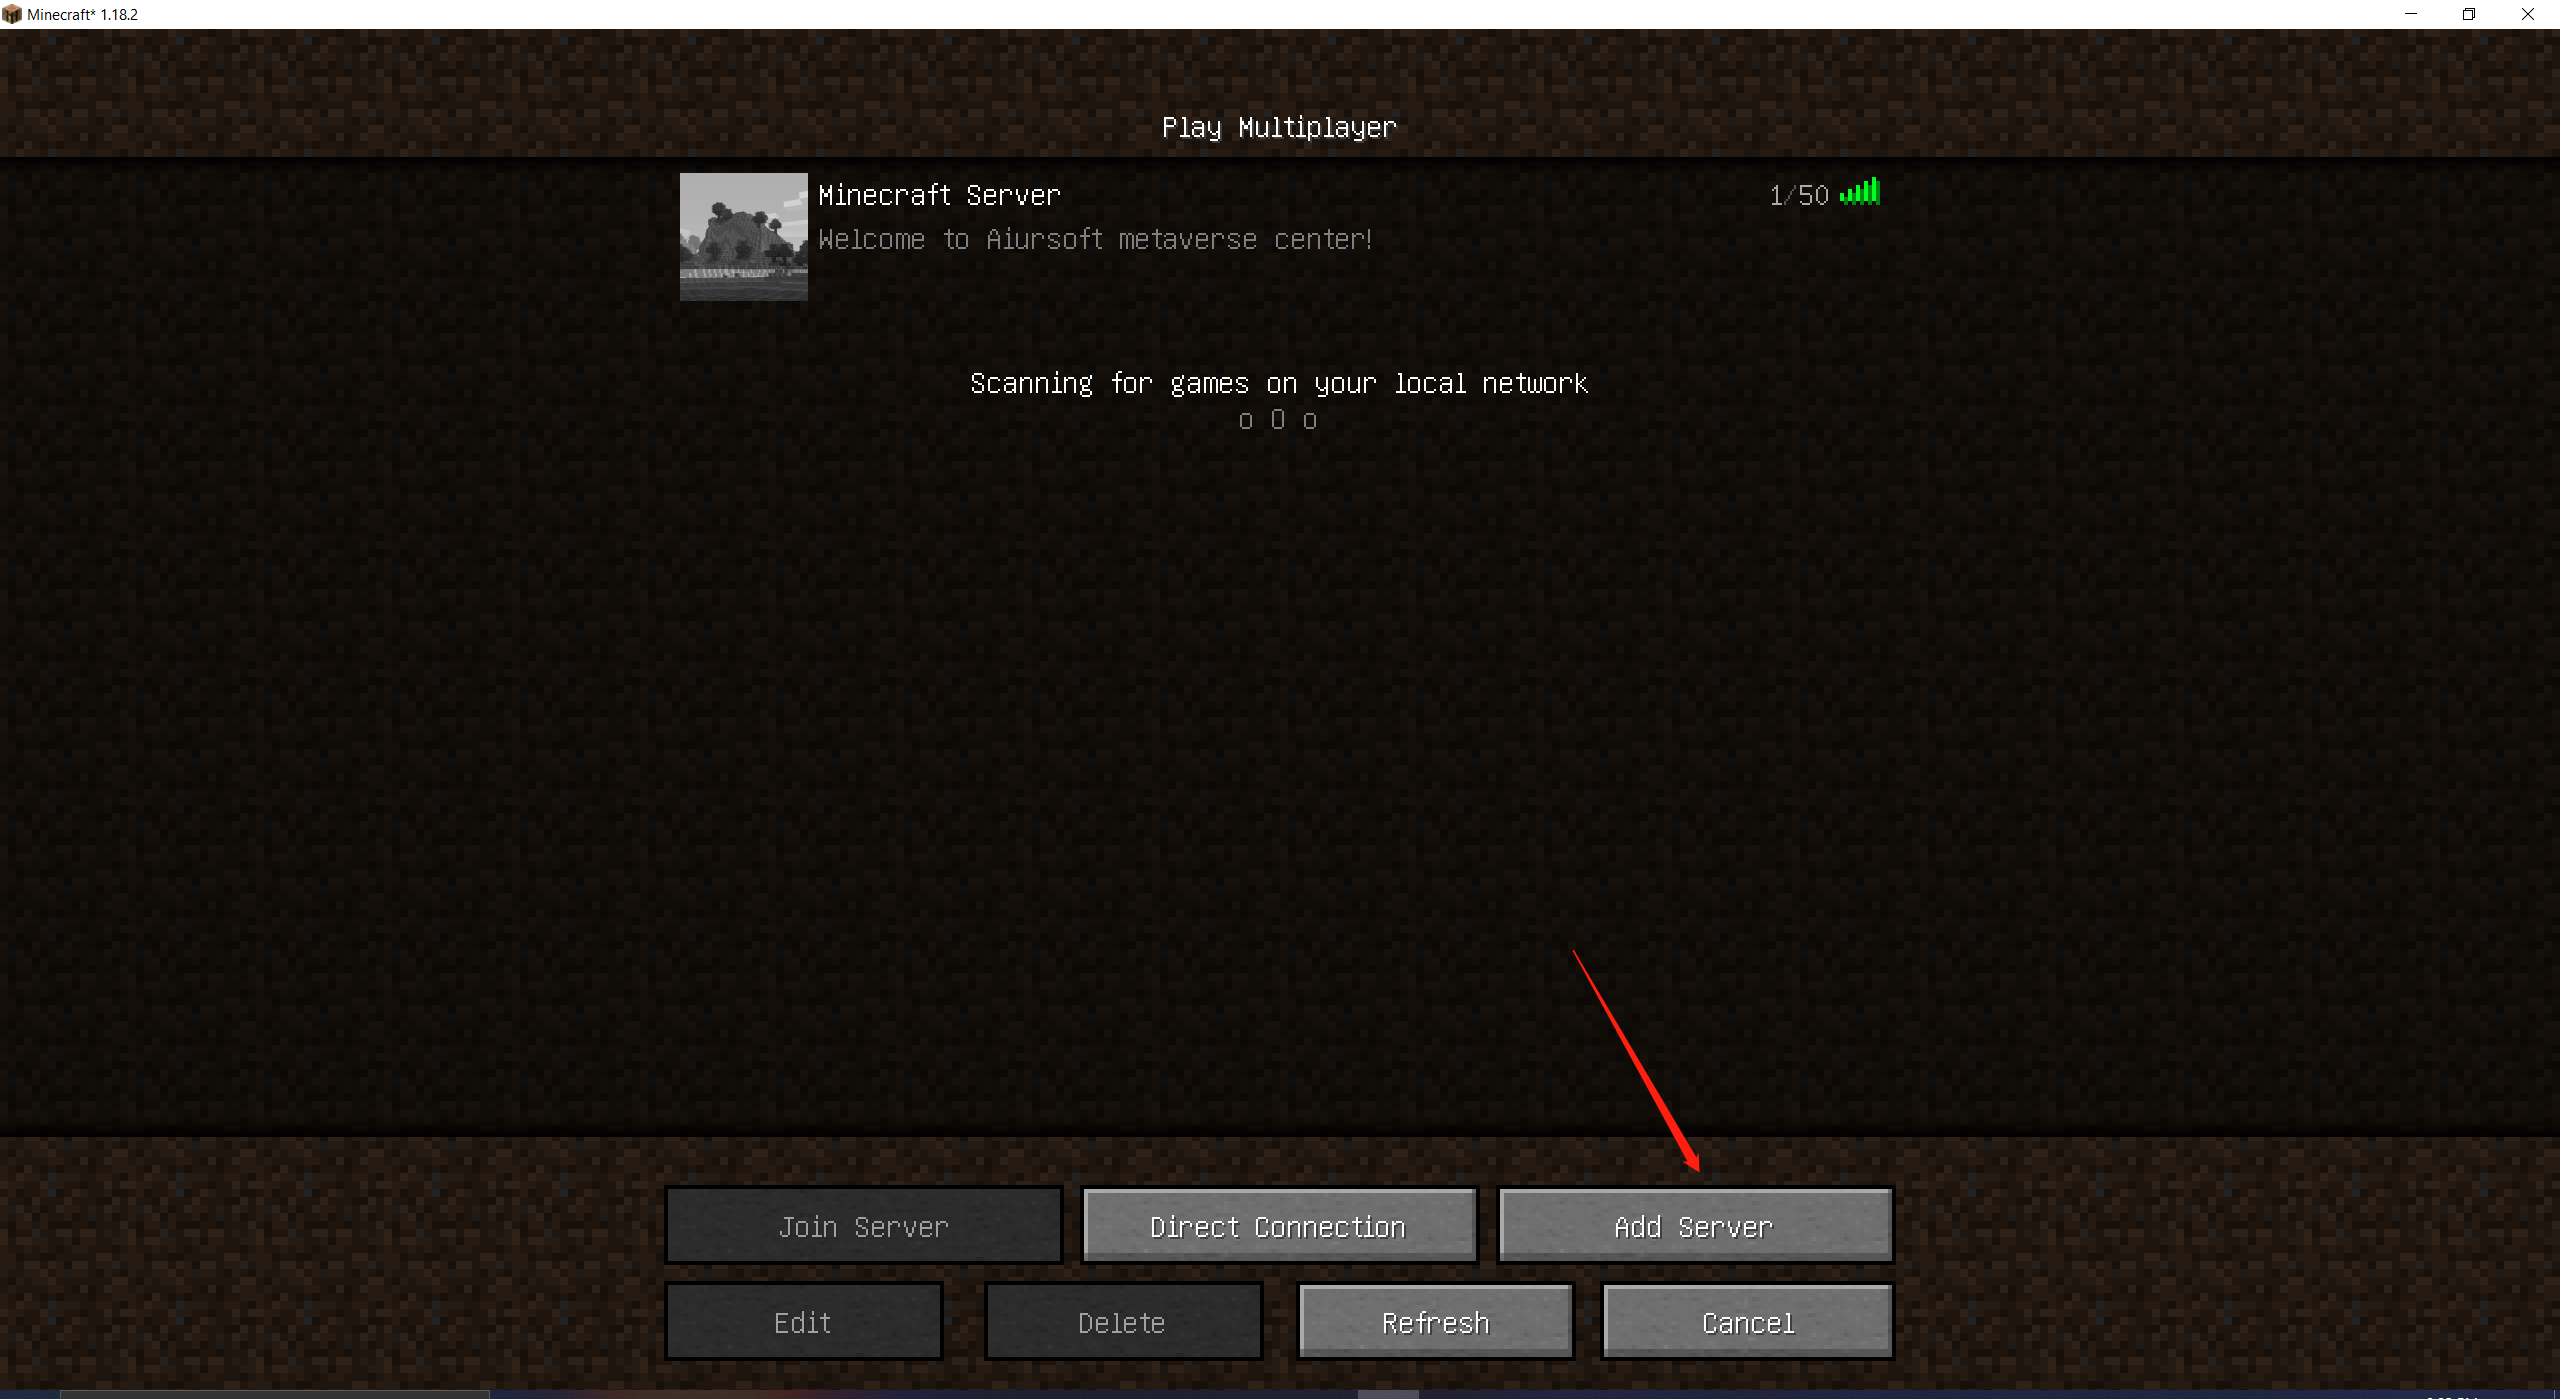
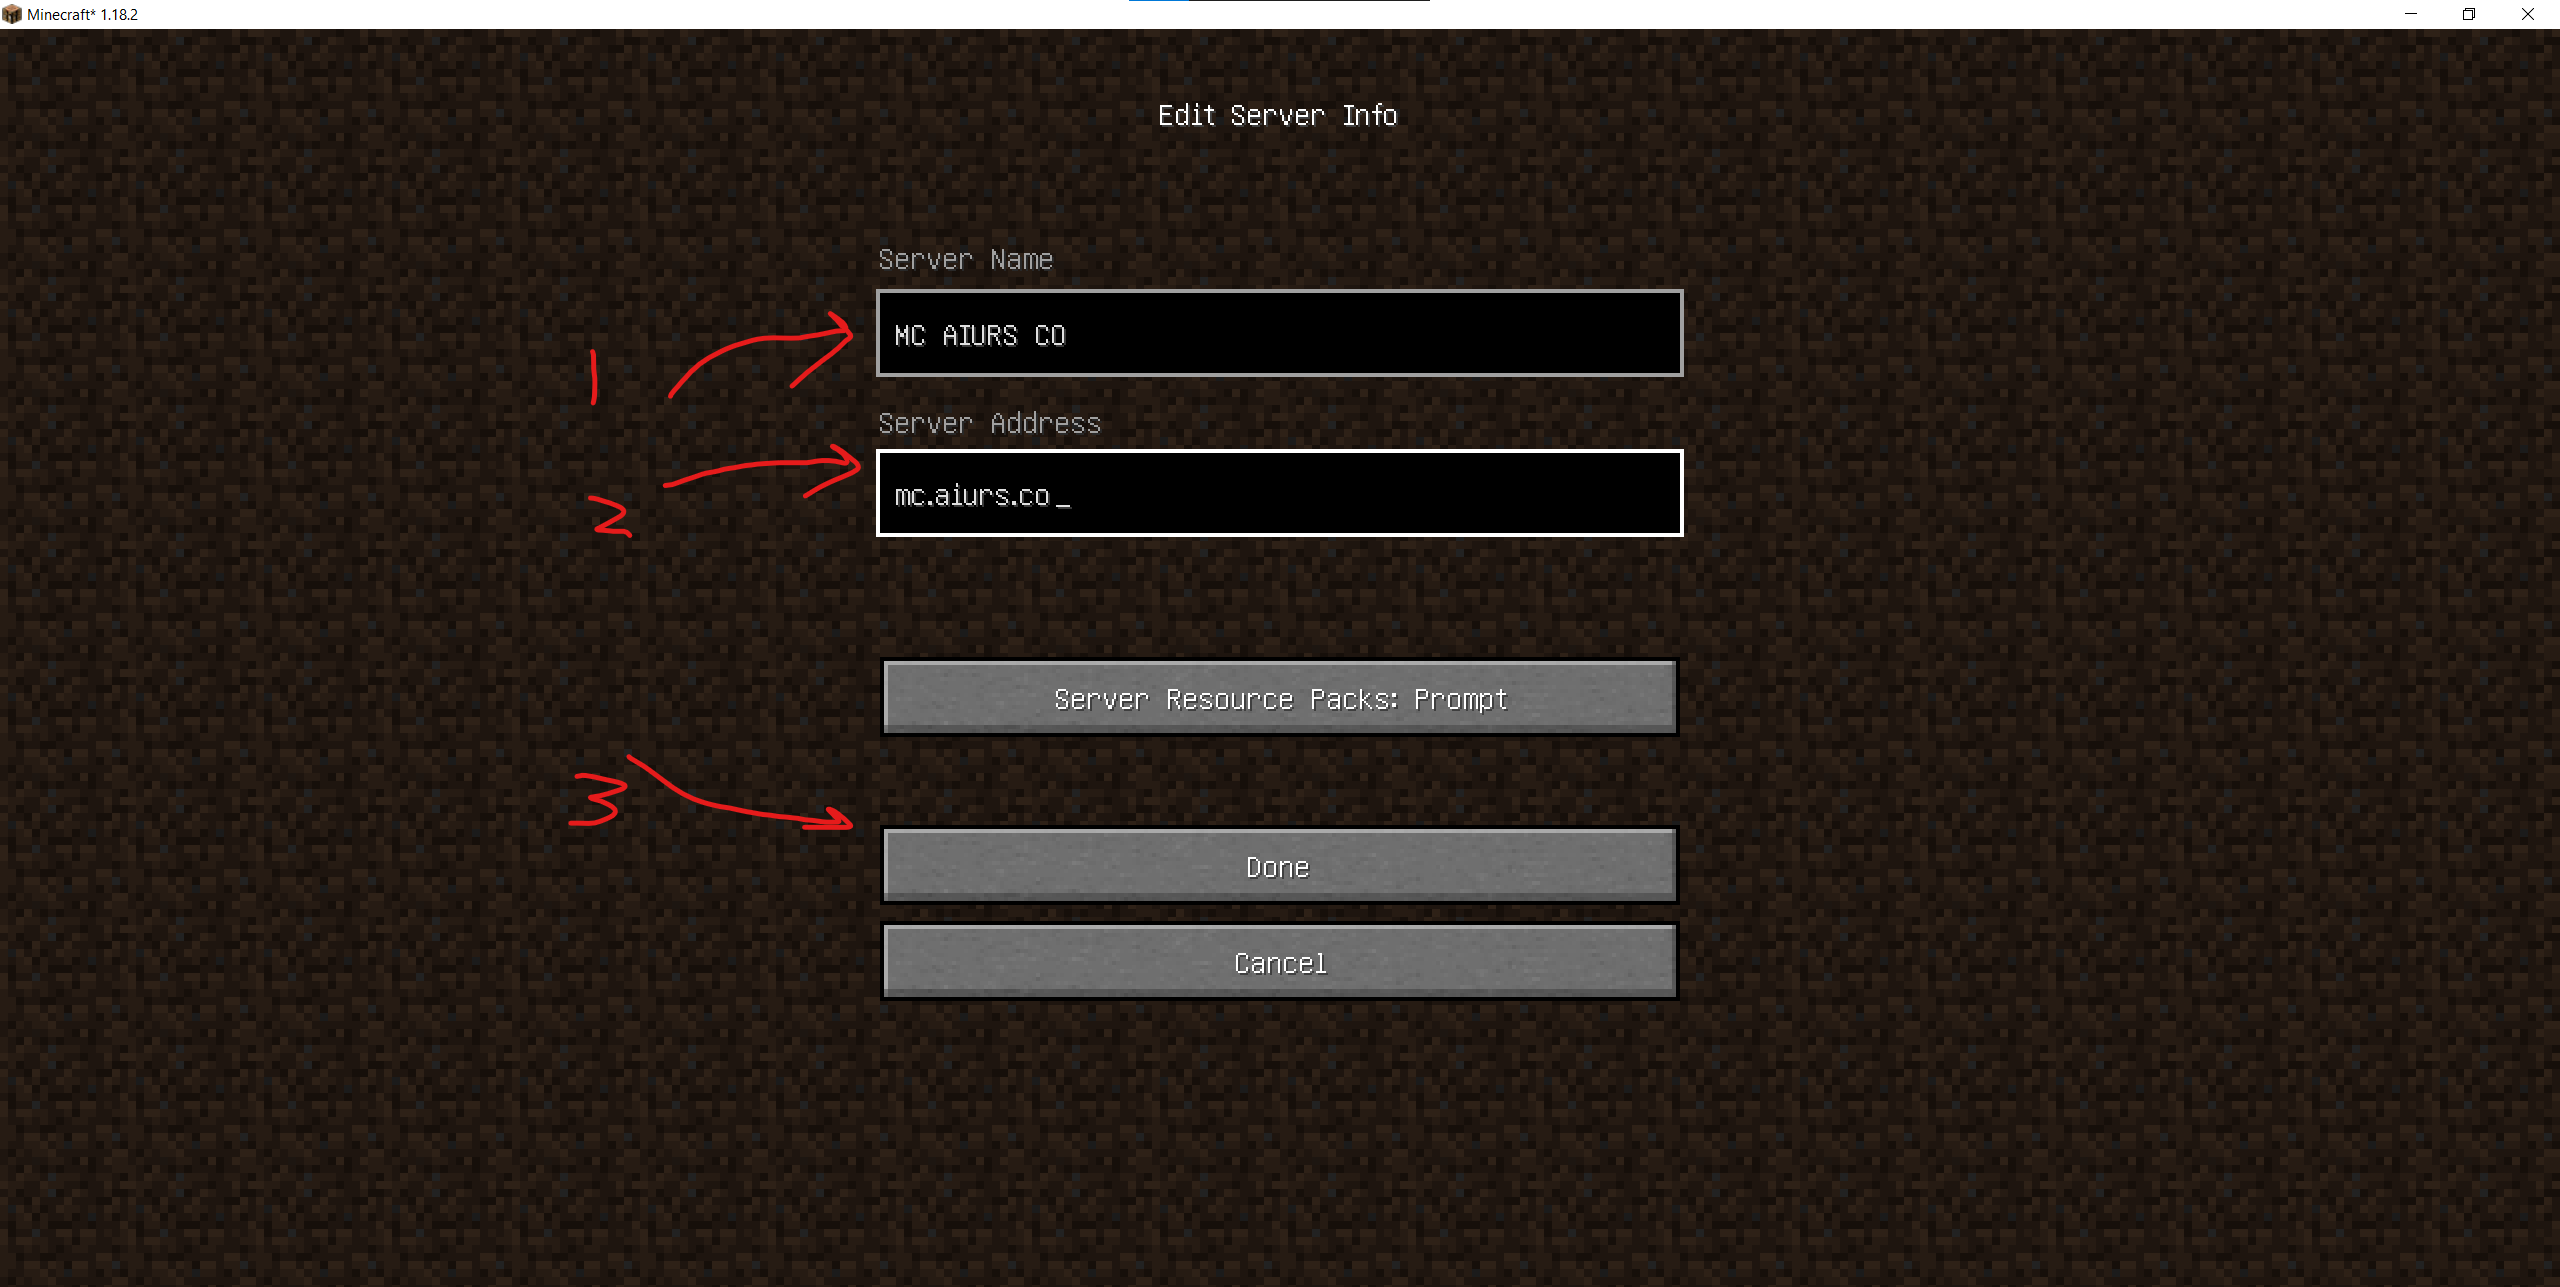
If you want to have fun with me, you can sign in my server: mc.aiurs.co
Other mods suggestion
- cloth-config (Necessary for some mods)
- Kotlin-support (Necessary for some mods)
- badpackets (Necessary for some mods)
- modmenu (Add mod menu)
- inventory-profiles-next (Helps sorting inventory)
- Appleskin (Better health bar)
- not-enough-animations (More animations)
- extrasounds (More sounds)
- BetterF3 (Better F3)
- Better Third Person (Better third person)
- IMBlockerFabric (Block IM)
- presence-footsteps (Better foot steps)
- Blur (Blue effect)
- falling-leaves-fabric (Falling leavs)
- WTHIT (What the hell is this)
- enhanced-attack-indicator
- held-item-info
- advancementinfo
- inventory-hud-forge
- autofish
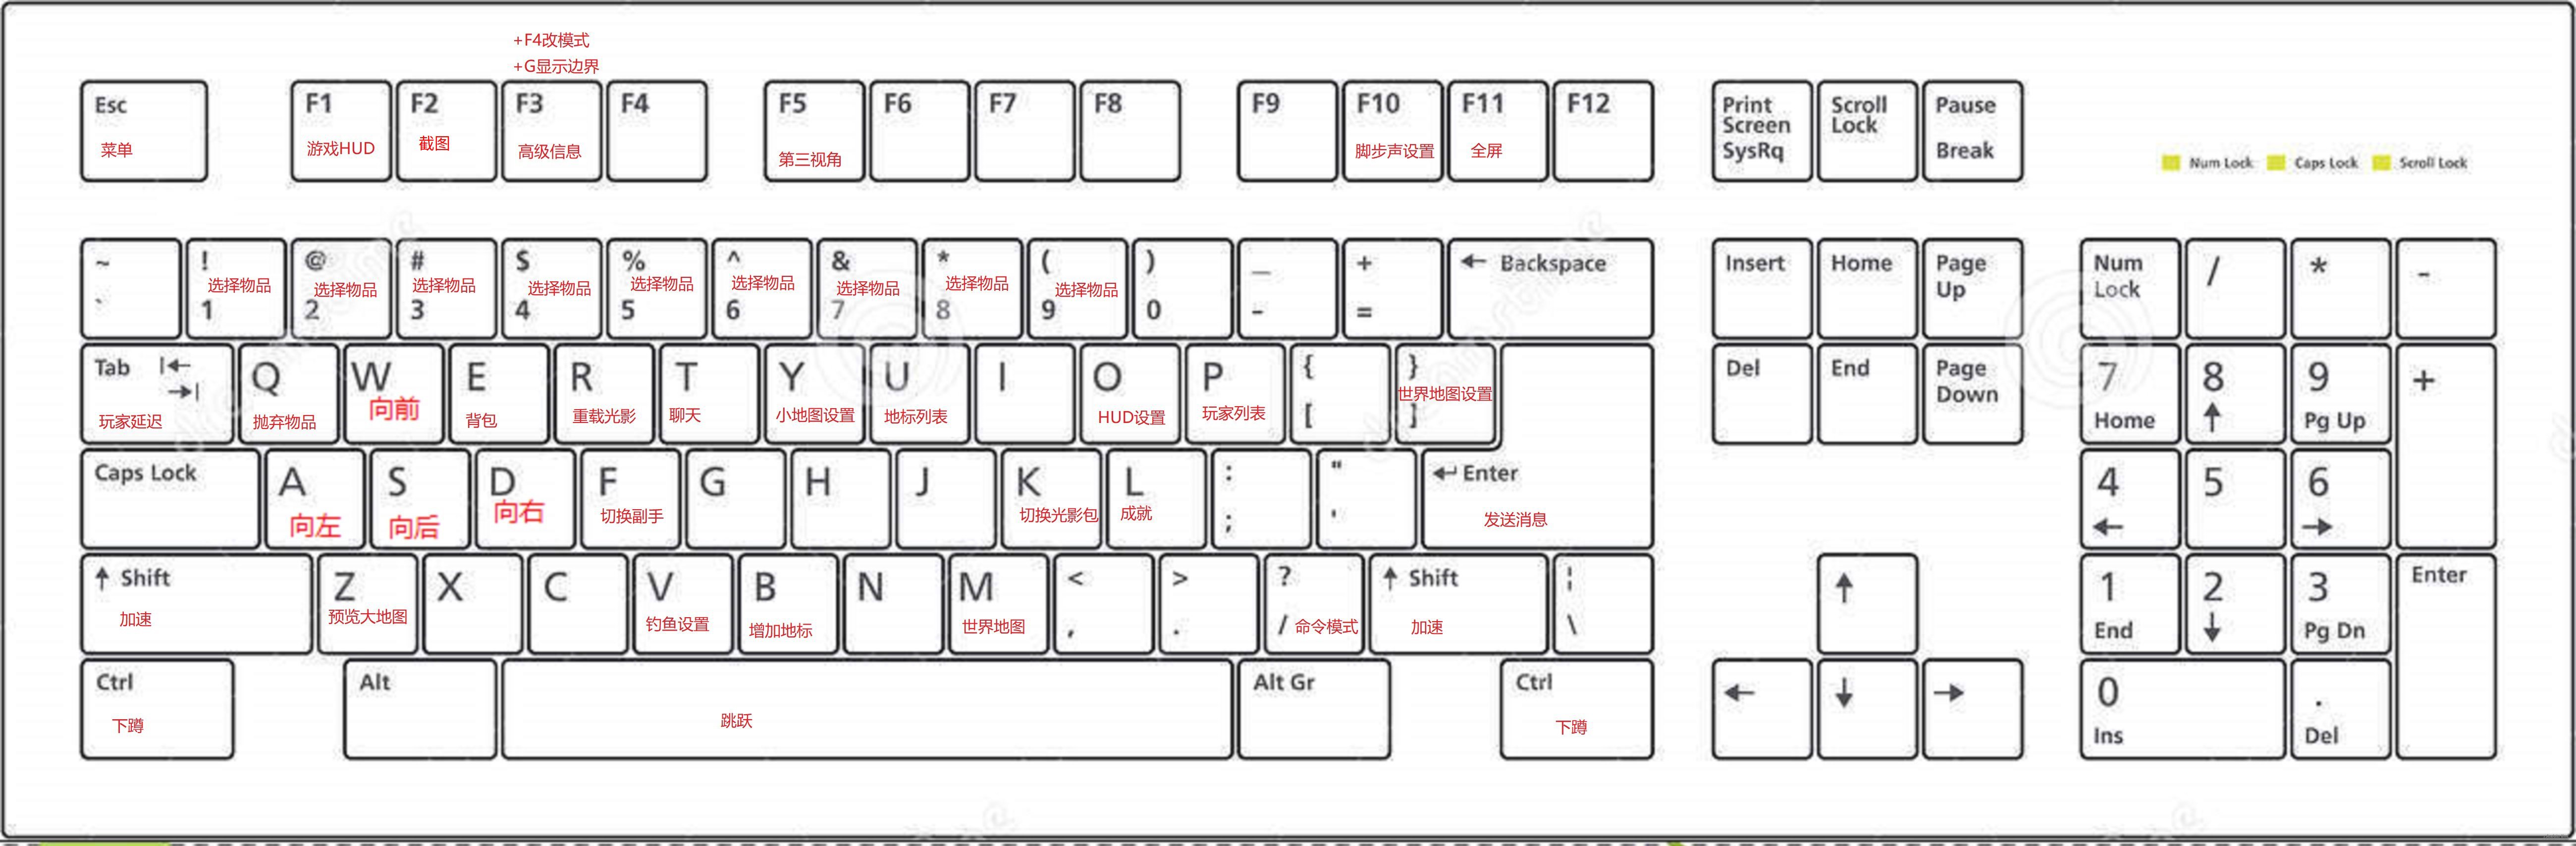
After installing all those mods, you may have the following key mappings:
Own a server?
Do you own a server? Of course you can make it a Minecraft Server!
Suggested engine:
Suggested mods:
- Dungeon Now Loading 15.9% - More map structures
- Incendium ~ Nether Expansion - More Nether structures
- Keepin (Keep inventory but lose all xp upon death)
- Ships out on the oceans
- Terralith - Better world generation
- TreeCapitator
- nullscape
- reds-more-structures
- blazeandcave
Suggested settings modification
- Change server name in paper.yml.
- Enable the keepin mod.
- Enable the tree mod.
- Ajust default game mode in server.properties.
- Ajust default message in server.properties.
- Ajust spawn protection to 1 in server.properties
- Ajust max-players to 500 in server.properties
- Ajust gamerule default difficulty to hard.
- Ajust gamerule mobGriefing to false
- Ajust gamerule sleep percentage to 70.
- Ajust gamerule spawn radius to 2000-5000. (To spread new players)
- Ajust gamerule randomTickSpeed to 70-180 to slow down or speed up growth.
- Set world border via /worldborder set 7000-13000 (To limit map size)
- Ajust monsters amount to 80-400 in bukit.yml. (To make it more difficult)
这篇文章结构清晰地梳理了Minecraft Java版优化配置的完整流程,展现了作者对模组生态的深刻理解。最大的亮点在于将性能优化(Sodium)、视觉增强(Iris+Complementary Shaders)与实用功能(Xaero地图)有机结合,构建了从基础安装到高级定制的完整指南。通过多次强调"建议下载最新版本"的提示,体现了对技术时效性的重视,这种前瞻性思维值得肯定。
在技术细节处理上,作者通过12个步骤系统化解构了Fabric模组生态的搭建过程,尤其对mod依赖关系的梳理(如cloth-config与Kotlin-support的前置安装)展现了良好的工程思维。推荐的mod列表覆盖了性能、视觉、交互三大核心需求,且每个mod的推荐理由都暗含用户体验考量(如inventory-profiles-next对背包管理的优化)。服务器配置建议部分更体现出作者对社区运营的深度思考,从Paper引擎选择到gamerule参数调整的细节设计,都展现了系统化配置的思维框架。
建议在版本管理方面增加mod兼容性说明,例如Fabric API与Sodium的版本匹配要求。部分操作步骤可以补充文件路径的可视化说明(如.minecraf文件夹的定位),并考虑增加常见错误代码的排查指南。对于推荐的200+模组,可尝试按功能维度(性能/视觉/交互)进行分类标注,帮助读者快速定位需求。最后,若能补充硬件配置建议(如显卡驱动版本要求),将使指南更具普适性。
这篇文章非常详细地分享了如何优化Minecraft的游戏体验,无论是作为玩家还是服务器管理员,都能从中获得不少启发。以下是我对这篇文章的一些思考和补充:
客户端游戏体验优化
作者推荐了许多Mod和工具,这些Mod确实能显著提升游戏的可玩性和视觉效果。不过,对于新手玩家来说,安装这么多Mod可能会导致兼容性问题或者性能下降。建议分阶段安装,逐步测试每个Mod的效果,避免一次性加载太多导致卡顿。另外,提到的键位映射图非常实用,但也可以根据个人习惯进行调整。
服务器搭建建议
推荐使用PaperMC作为服务器引擎是一个不错的选择,它不仅性能优越,还支持大量的插件和数据包。不过,在实际操作中,需要考虑服务器硬件配置是否足够强大以支撑这些设置。例如,将max-players设置为500可能会对带宽和处理器造成较大压力,建议根据实际情况调整。
数据包推荐
文章提到的数据包如Terralith、Nullscape等都非常经典,它们能显著改善游戏世界生成的多样性和美观度。不过,对于一些小型服务器来说,这些数据包可能会占用较多资源,需要权衡性能和视觉效果之间的关系。另外,Keepin数据包虽然有趣,但可能会影响游戏难度曲线,适合 Hardcore 服务器。
游戏规则调整
调整spawn radius和world border是提升玩家体验的好方法,尤其是对于新手来说,更大的世界探索范围能增加趣味性。不过,过大的设置可能会导致资源生成不均,建议根据服务器规模逐步测试和调整。
个人补充
除了提到的Mod和数据包,还可以考虑使用一些自动化工具(如AutoFish)来提升游戏效率。另外,在服务器管理方面,定期备份和监控性能也是非常重要的。
总的来说,这篇文章为Minecraft玩家和管理员提供了丰富的资源和建议,但实际应用时需要根据自己的需求和技术水平进行调整。如果你有更多关于Mod组合或服务器配置的经验,欢迎分享!
I just finished reading your blog post on setting up the perfect Minecraft gaming experience, and I must say, I am impressed by the level of detail and organization you've put into it. The step-by-step guide is incredibly helpful, especially for those who might be new to the game or looking to enhance their experience. Your inclusion of screenshots and links to download resources is a great touch, making it easy for readers to follow along and set up their games just as you've described.
One of the most significant aspects of your post is the variety of mods and shaders you've recommended. This shows that you have a deep understanding of what can enhance the Minecraft experience and have taken the time to research and test these mods. Additionally, your suggestions for server owners and potential settings modifications demonstrate your comprehensive knowledge of the game and its mechanics.
While your blog post is already very informative, there are a few areas where you could potentially improve or expand upon. For example, you could provide a brief description of each mod and shader you've recommended, explaining why you think it's a valuable addition to the game. This would give readers a better understanding of what each mod does and help them decide if they want to incorporate it into their gameplay.
Another potential improvement would be to discuss any compatibility issues that might arise when using multiple mods together. Are there any known conflicts between the mods you've suggested, or any specific load order that should be followed to ensure smooth gameplay? Providing this information would be beneficial for readers who are less experienced with modding.
Overall, your blog post is a fantastic resource for anyone looking to enhance their Minecraft experience. By incorporating the suggestions mentioned above, you could make it even more comprehensive and helpful for your readers. Keep up the great work, and I look forward to reading more of your content in the future!
🐂🍺