Sometimes we might need to host a website in Azure. And there are so many options, like storage account, app service. But none of those supports wildcard HTTPS and auto-renew. An ideal configuration shall be static which means that it will never crash even when no one maintains it. Auto-renew is a must-have feature for HTTPS.
Luckily, I got a solution based on win-acme: https://github.com/win-acme/win-acme/. And also based on Azure DNS.
The certificate is issued by let's encrypt. https://letsencrypt.org/ It's a nonprofit Certificate Authority providing TLS certificates to 225 million websites. So we can always use if for free.
The brief steps of the setup:
- Migrate your DNS to Azure DNS
- Create your Azure virtual machine with Windows Server 2016+ and IIS 10.0
- Install win-acme and Azure DNS verification plugin.
- Set up your app registration and get configuration details
- Apply for a wildcard HTTPS certificate with the auto-renew feature.
Migrate your DNS to Azure DNS
Migrating your DNS to Azure DNS so you can edit your records within Azure, no matter in the portal, or via API so the steps can be automatically done.
You MUST complete this step because, without Azure DNS, you can't modify DNS records based on your Azure identification and can not get a wildcard HTTPS certificate.
Before starting, I strongly suggest you create a new clean resource group just for you Azure DNS resources.
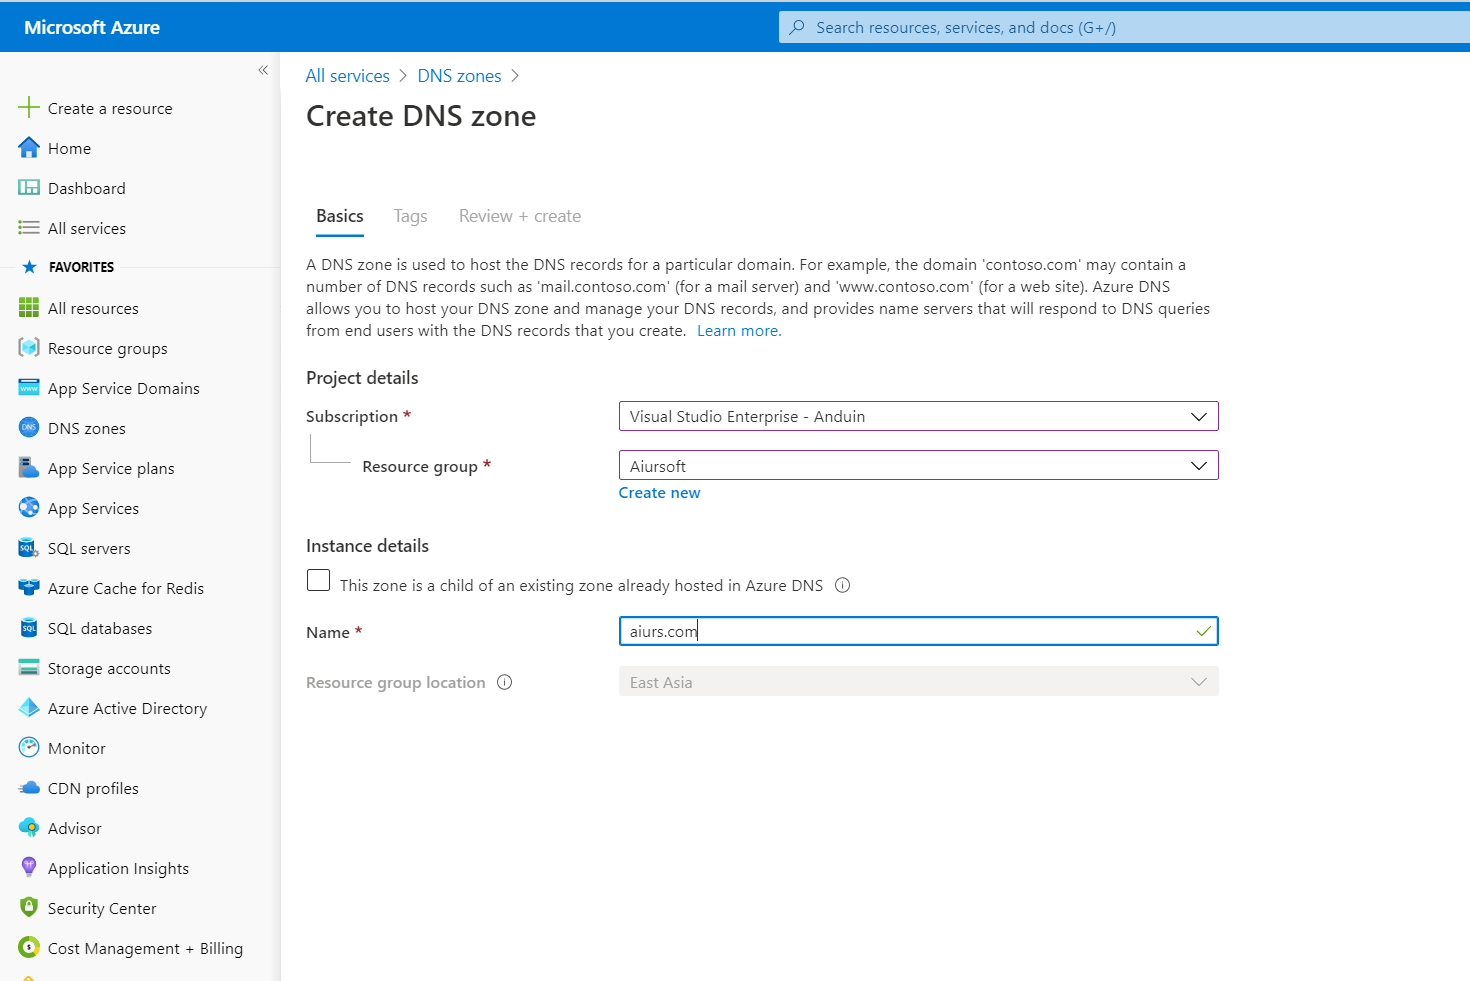
Before migrating, you need to first create your Azure DNS service at https://portal.azure.com.
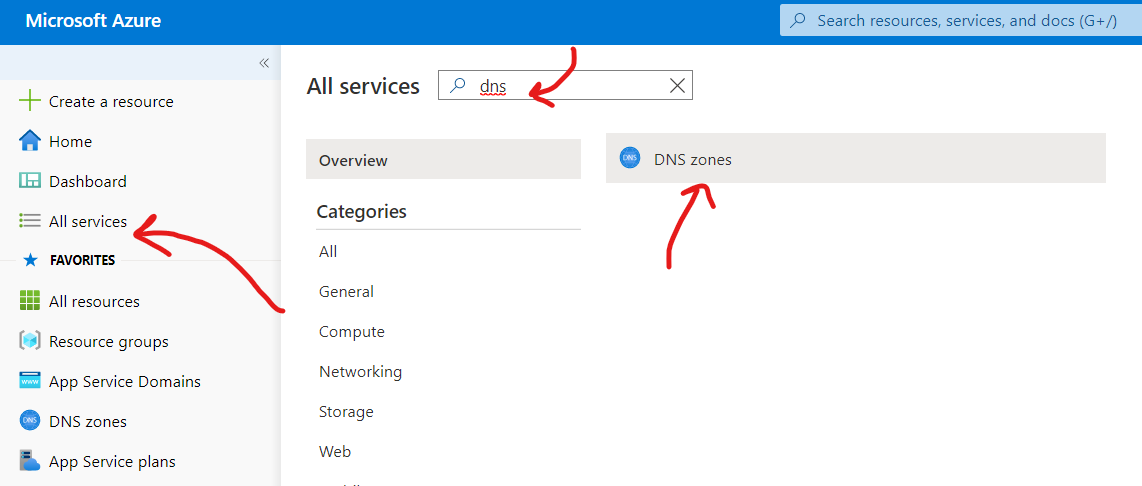
And type your domain name here like this:
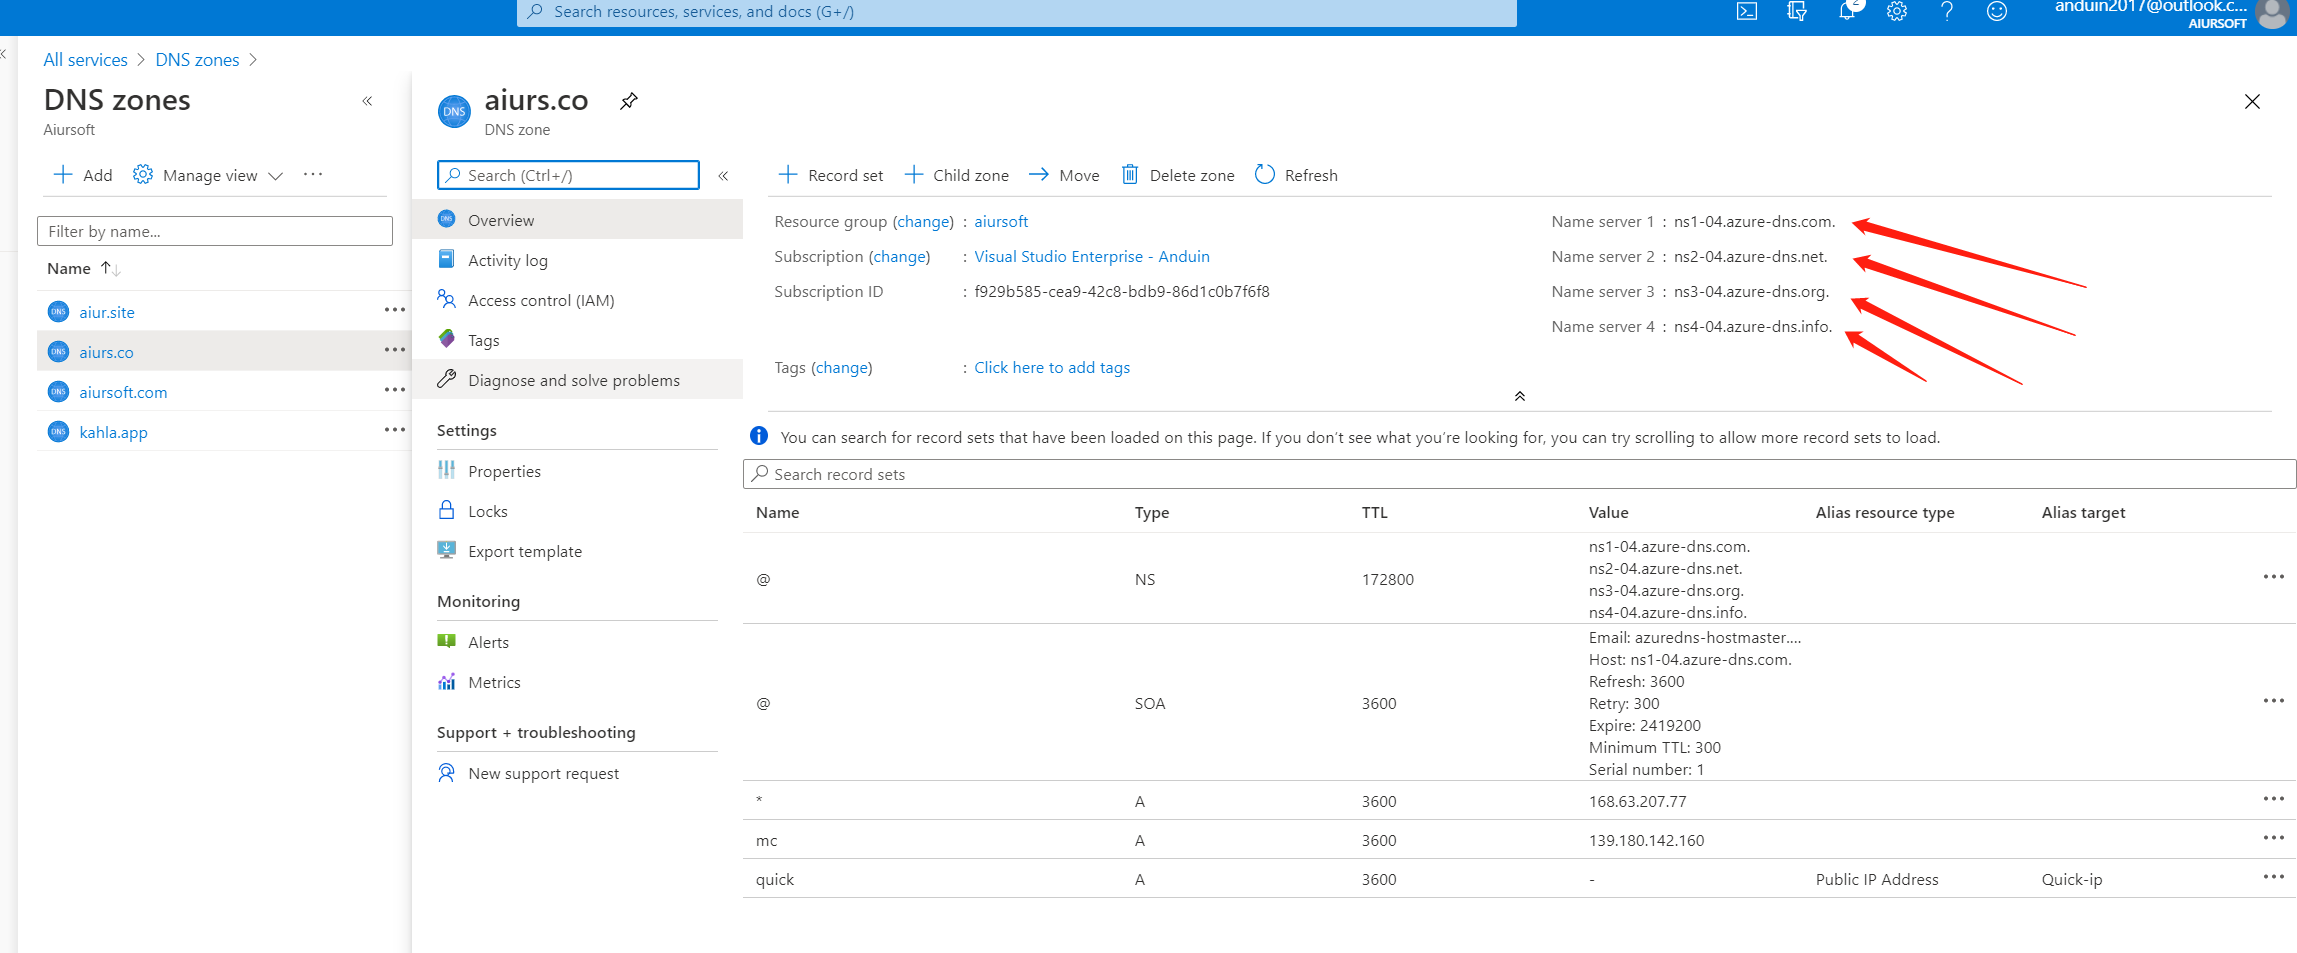
After creating it, you gonna find the DNS server address. Copy the server names to a notebook.
And for your domain name provider, edit the name server to the values you copied. For example, I registered my domain at https://godaddy.com. And you can edit it like this:
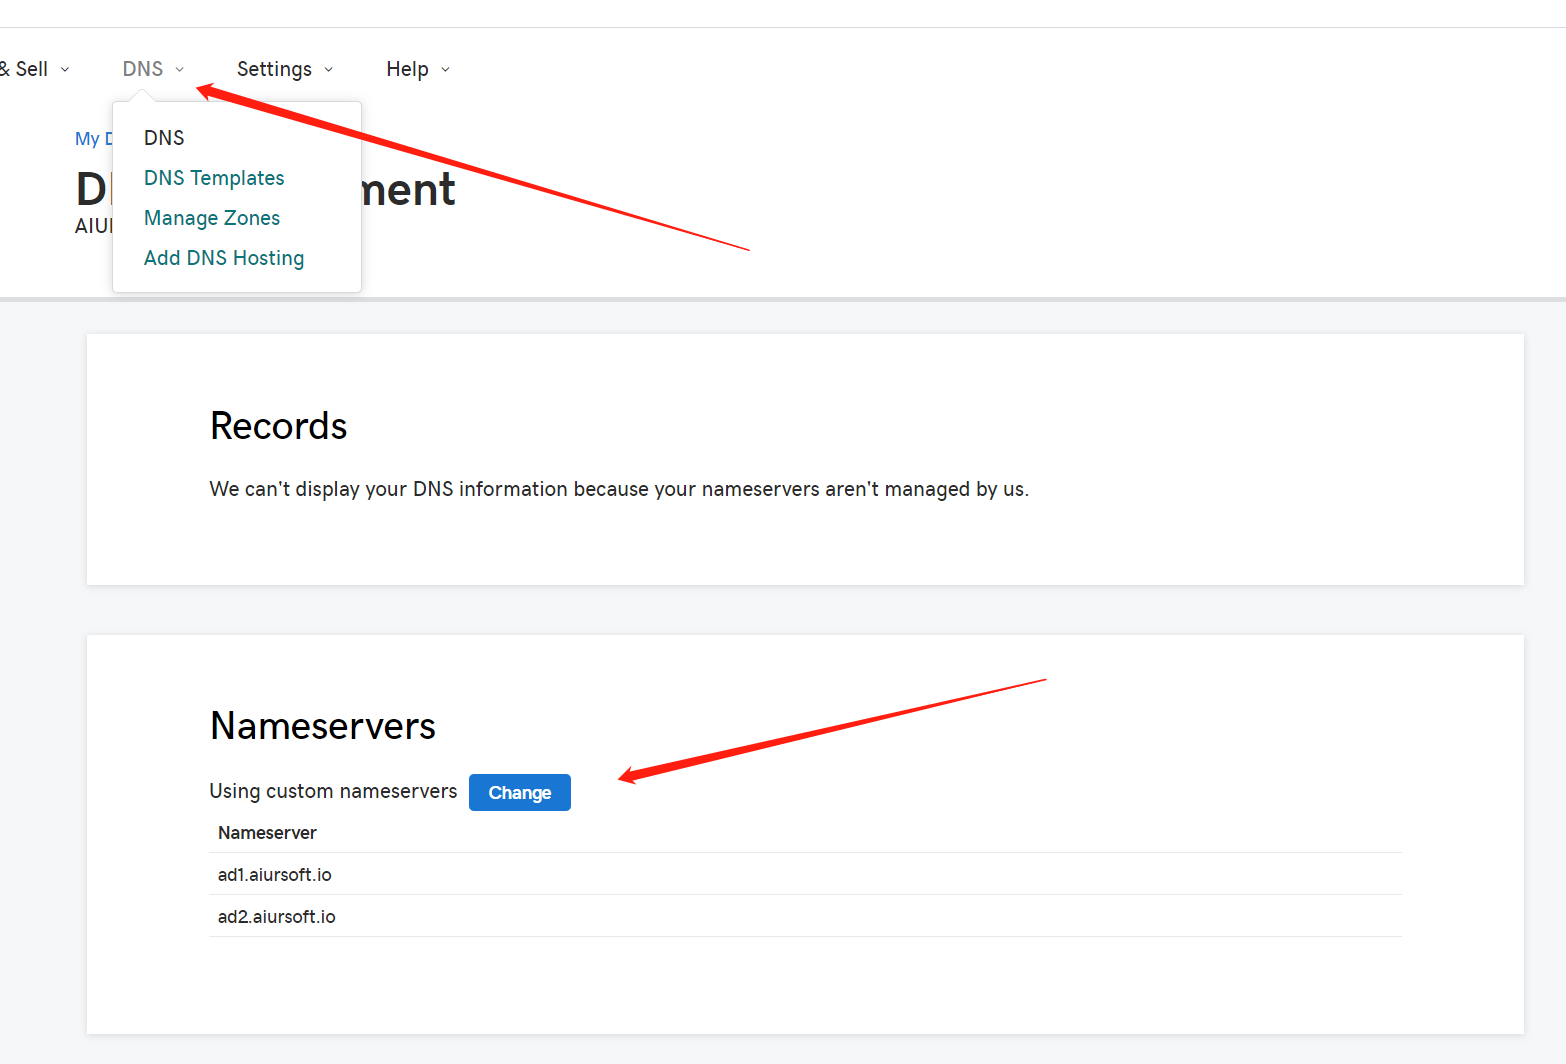
And change it to Azure DNS like this:
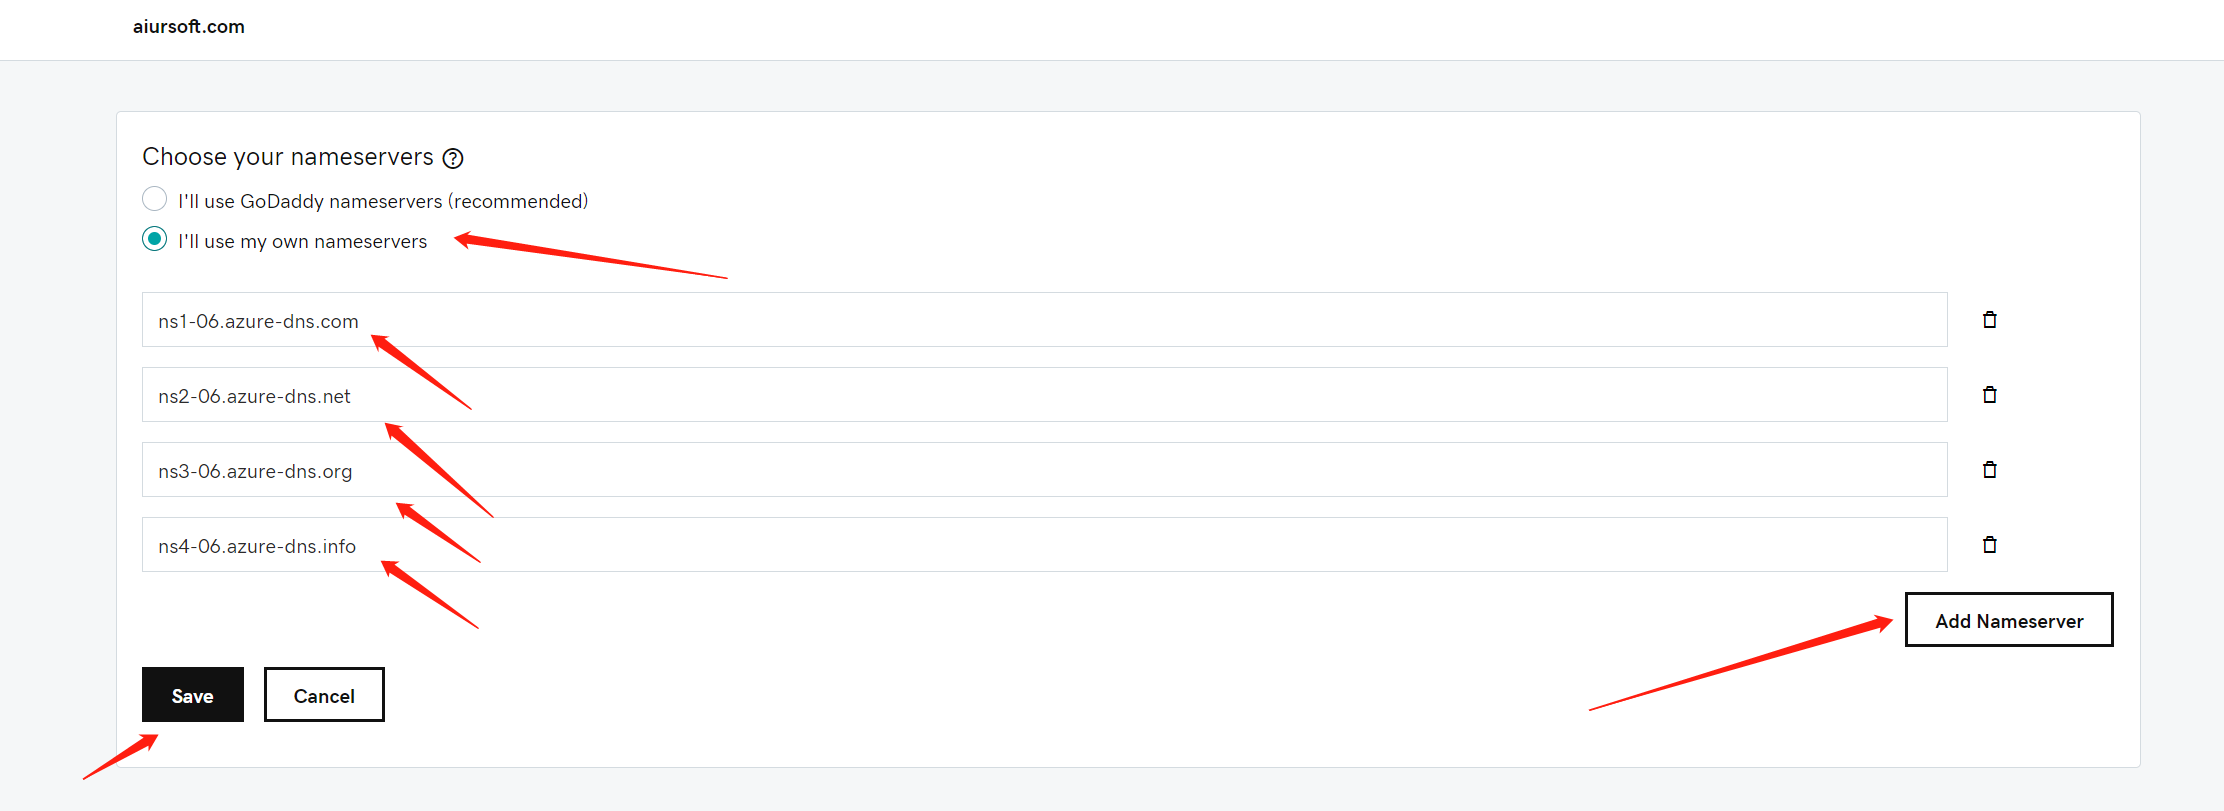
After saving it, it may cost about 2-48 hours to take effect. So changing this is pretty dangerous for your online services that may break up during the migrating process. After migrating, set your previous DNS values to Azure immediately to keep your business.
Create your Azure virtual machine with Windows Server 2016+ and IIS 10.0
Creating a new Azure virtual machine is pretty simple and is basic knowledge. Make sure that you created a clean Windows Server 2016+ is ok.
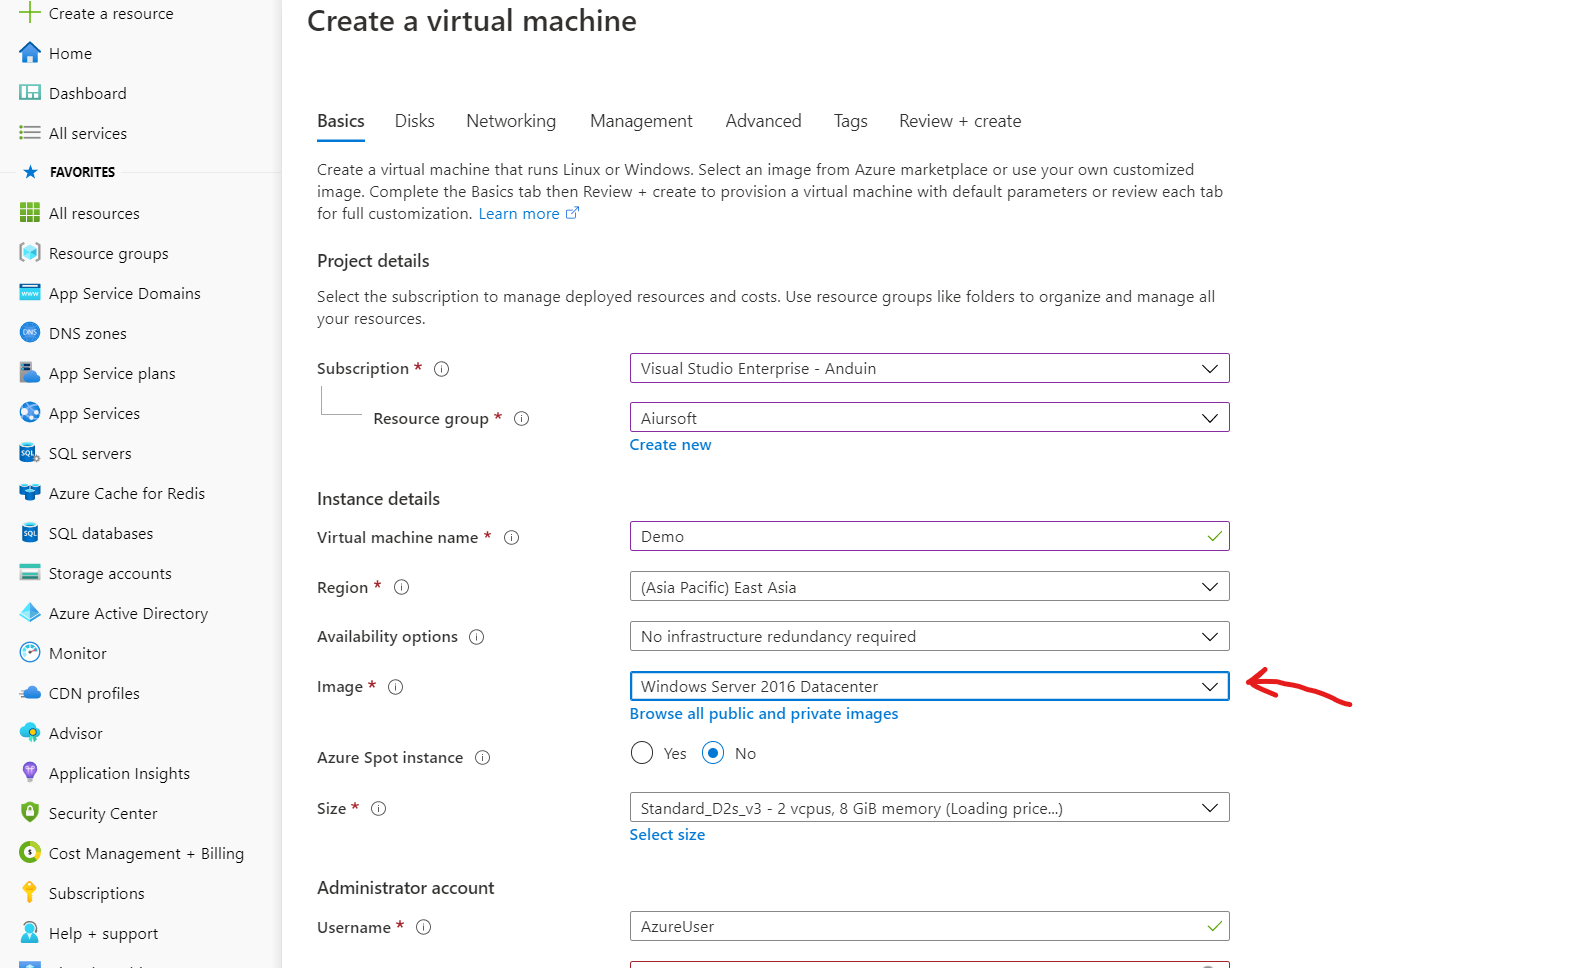
After creating your new Windows Server, install IIS on it.
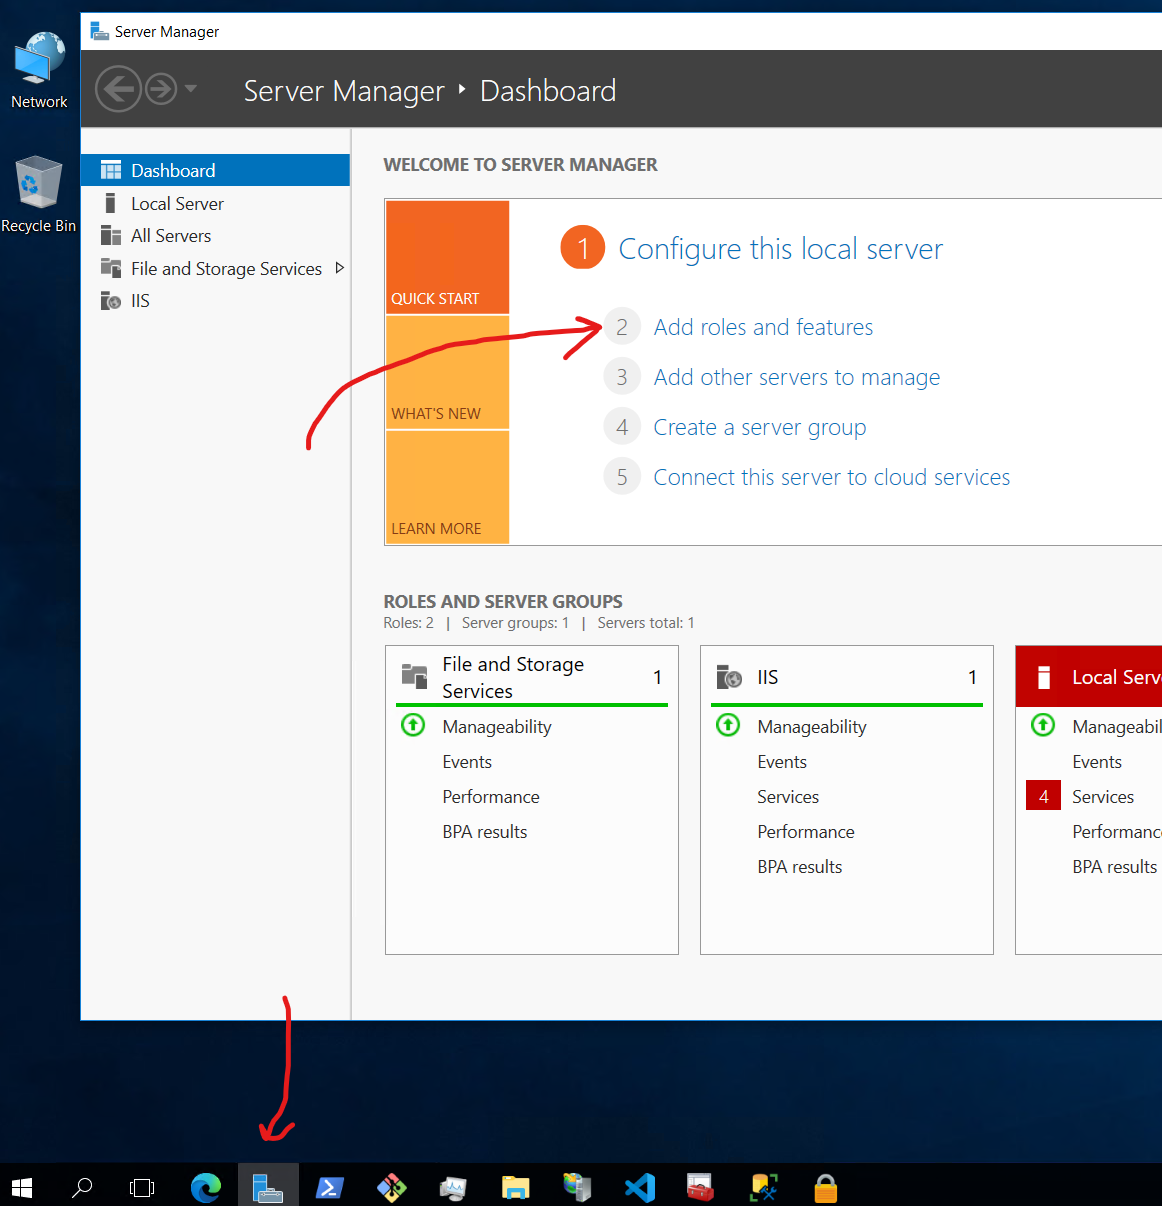
And select Web Server to install.

After installing IIS, your server is ready to host a website, but HTTP only.
Install win-acme and Azure DNS verification plugin
To get a certificate, win-acme is a great automatic tool that automatics the apply, verify, and install steps. To download it, go to the GitHub release downloads: https://github.com/win-acme/win-acme/releases.
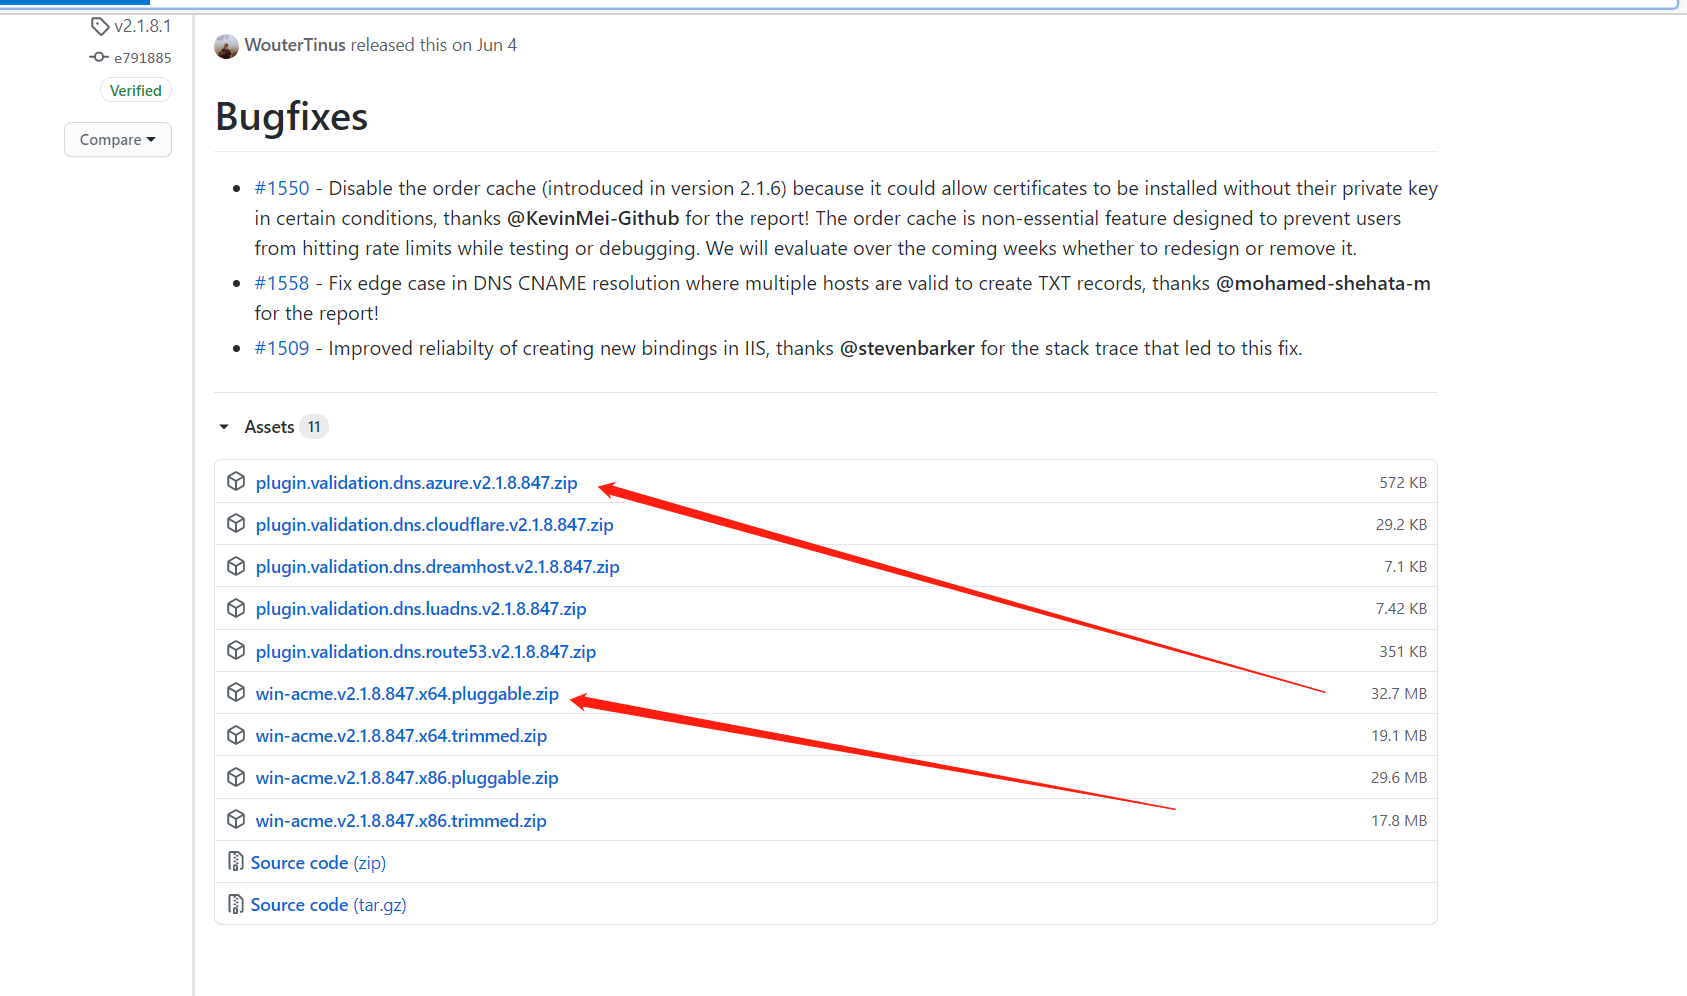
Select x64 pluggable win-acme and the azure plugin. Make sure you download the same version of the main program and the plugin or there may cause some loading issues. After downloading, there gonna be the following files:

And unzip both of it to the same folder:

And copy the entire folder to your server. Run the wacs.exe as admin.
Set up your app registration and get configuration details
And to verify your ownership for your domain for win-acme, you need to give it permission to modify your Azure DNS settings.
To do this, we gonna create a new app registration in your Azure portal.

Copy your application ID.
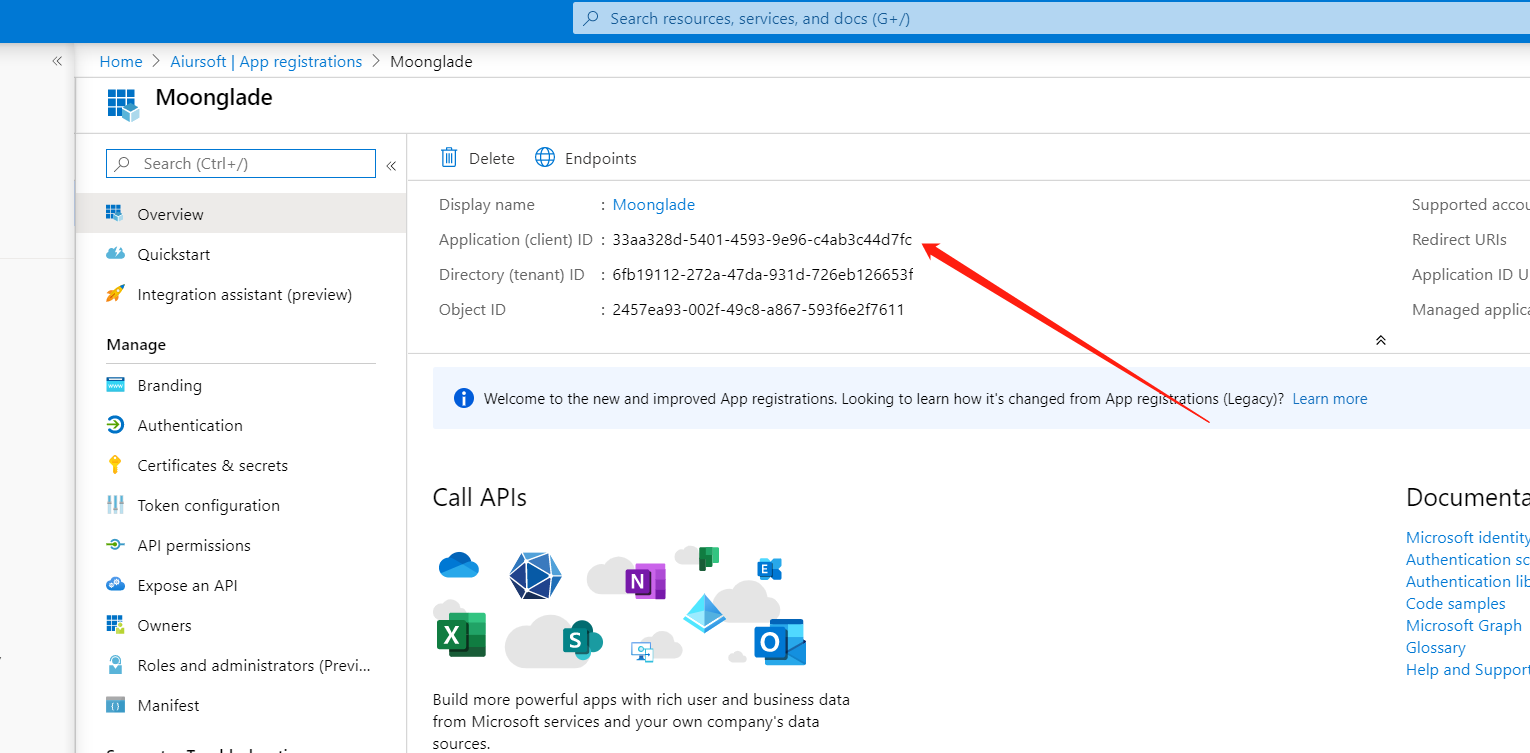
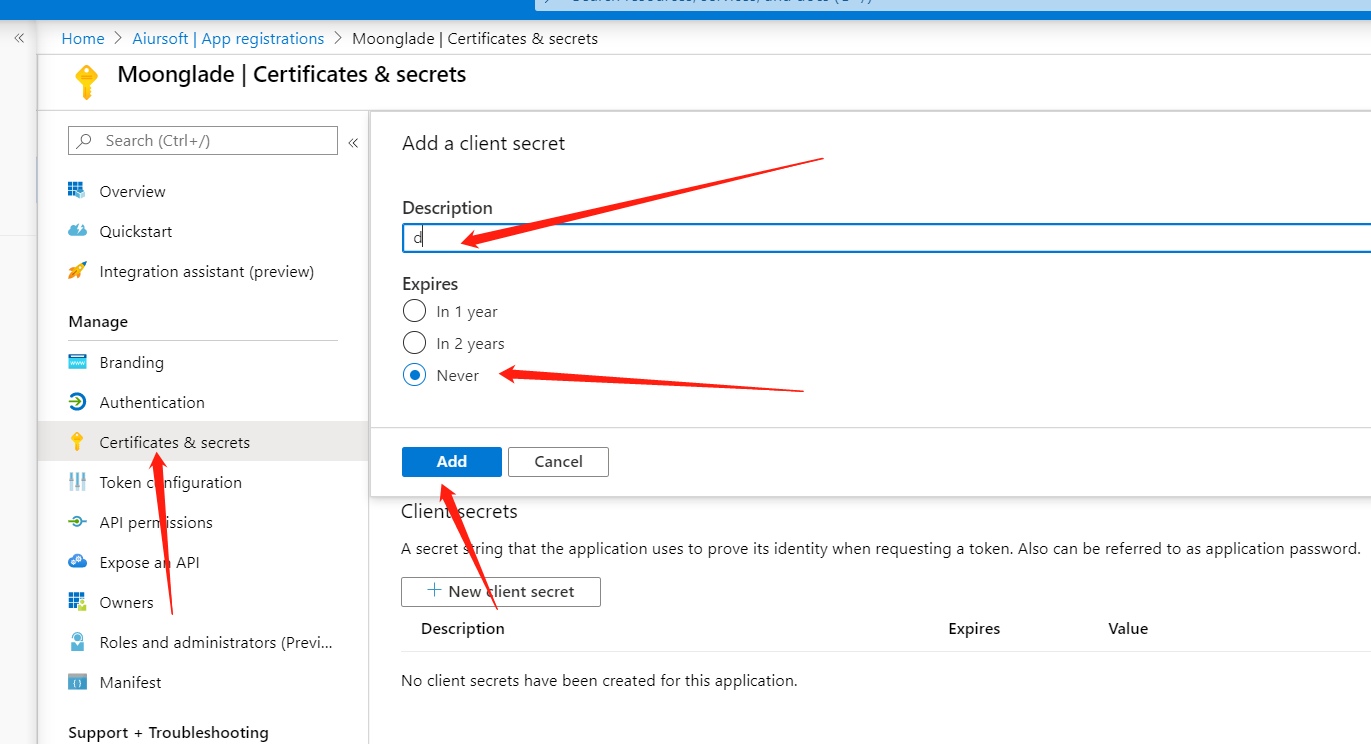
And create a new secret.
And copy the resource group name which contains your Azure DNS.

Copy your AAD tenant Id.
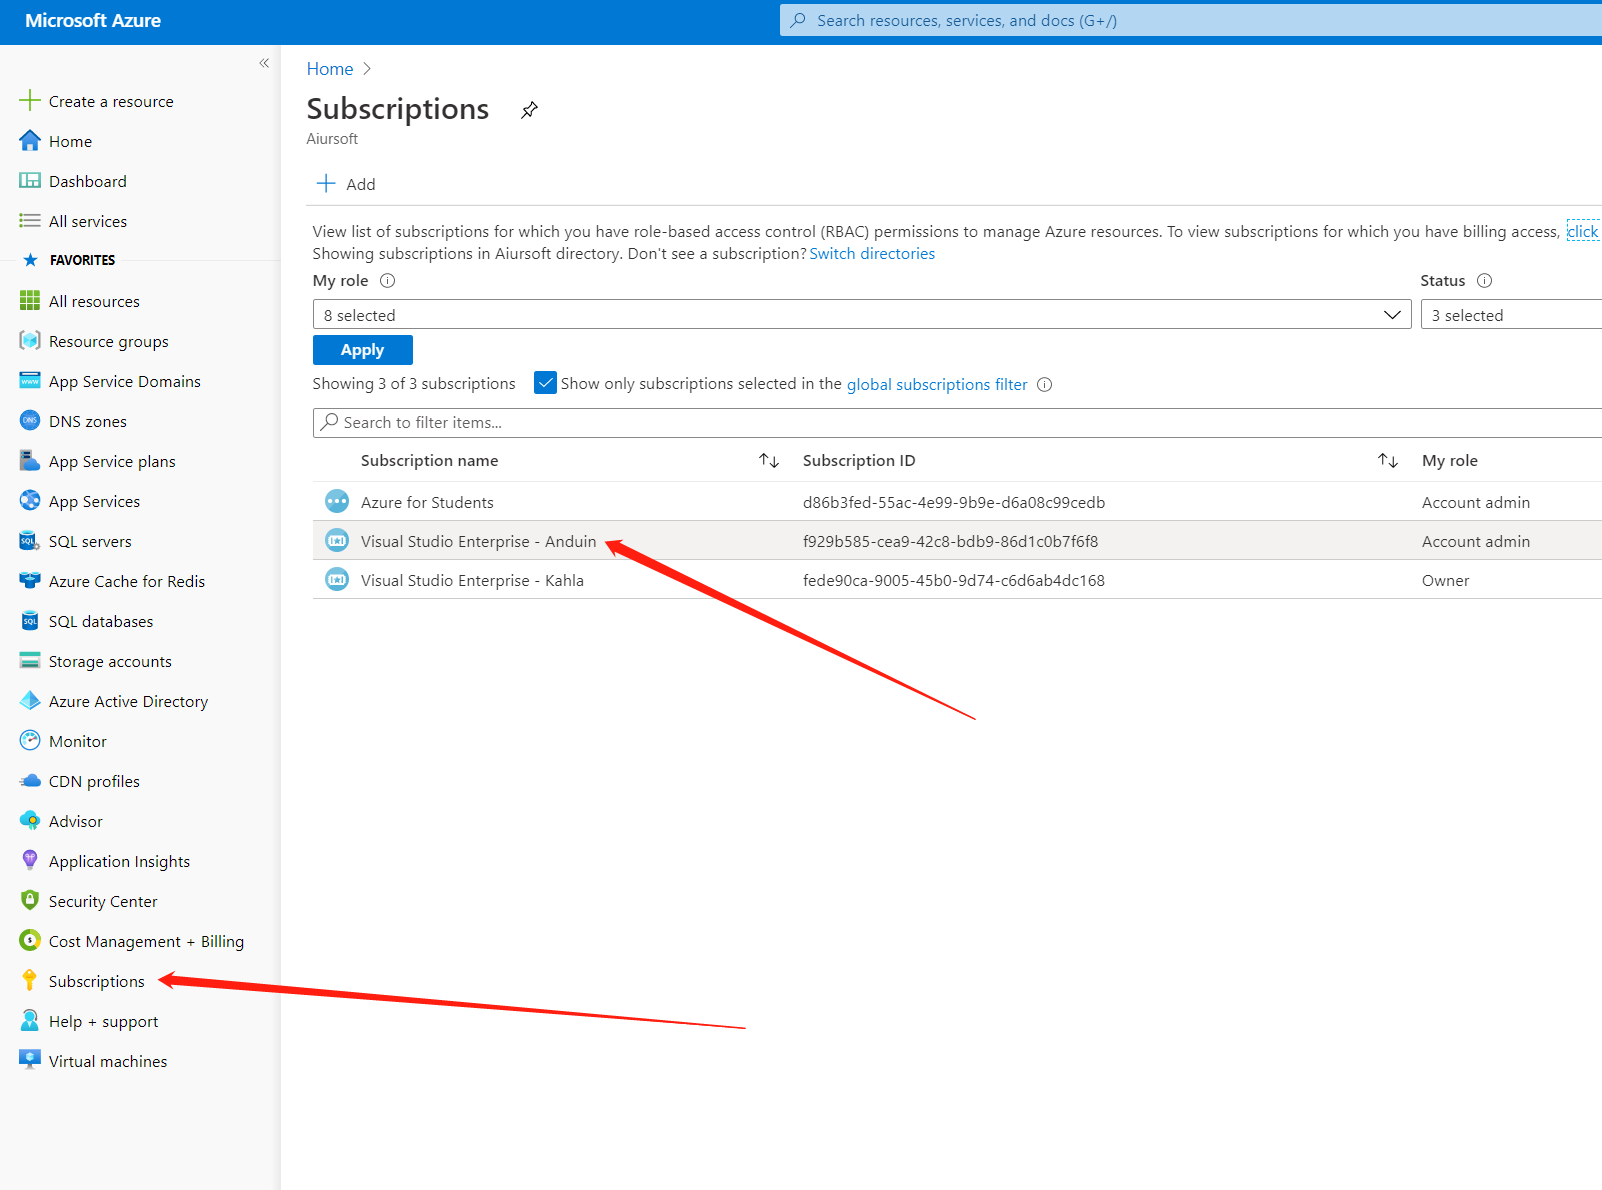
And copy your subscription ID.
And after copying all those required identity ID, we gonna make sure that the created app have the privilege to modify DNS. Add it as a contributor to your resource group or subscription.
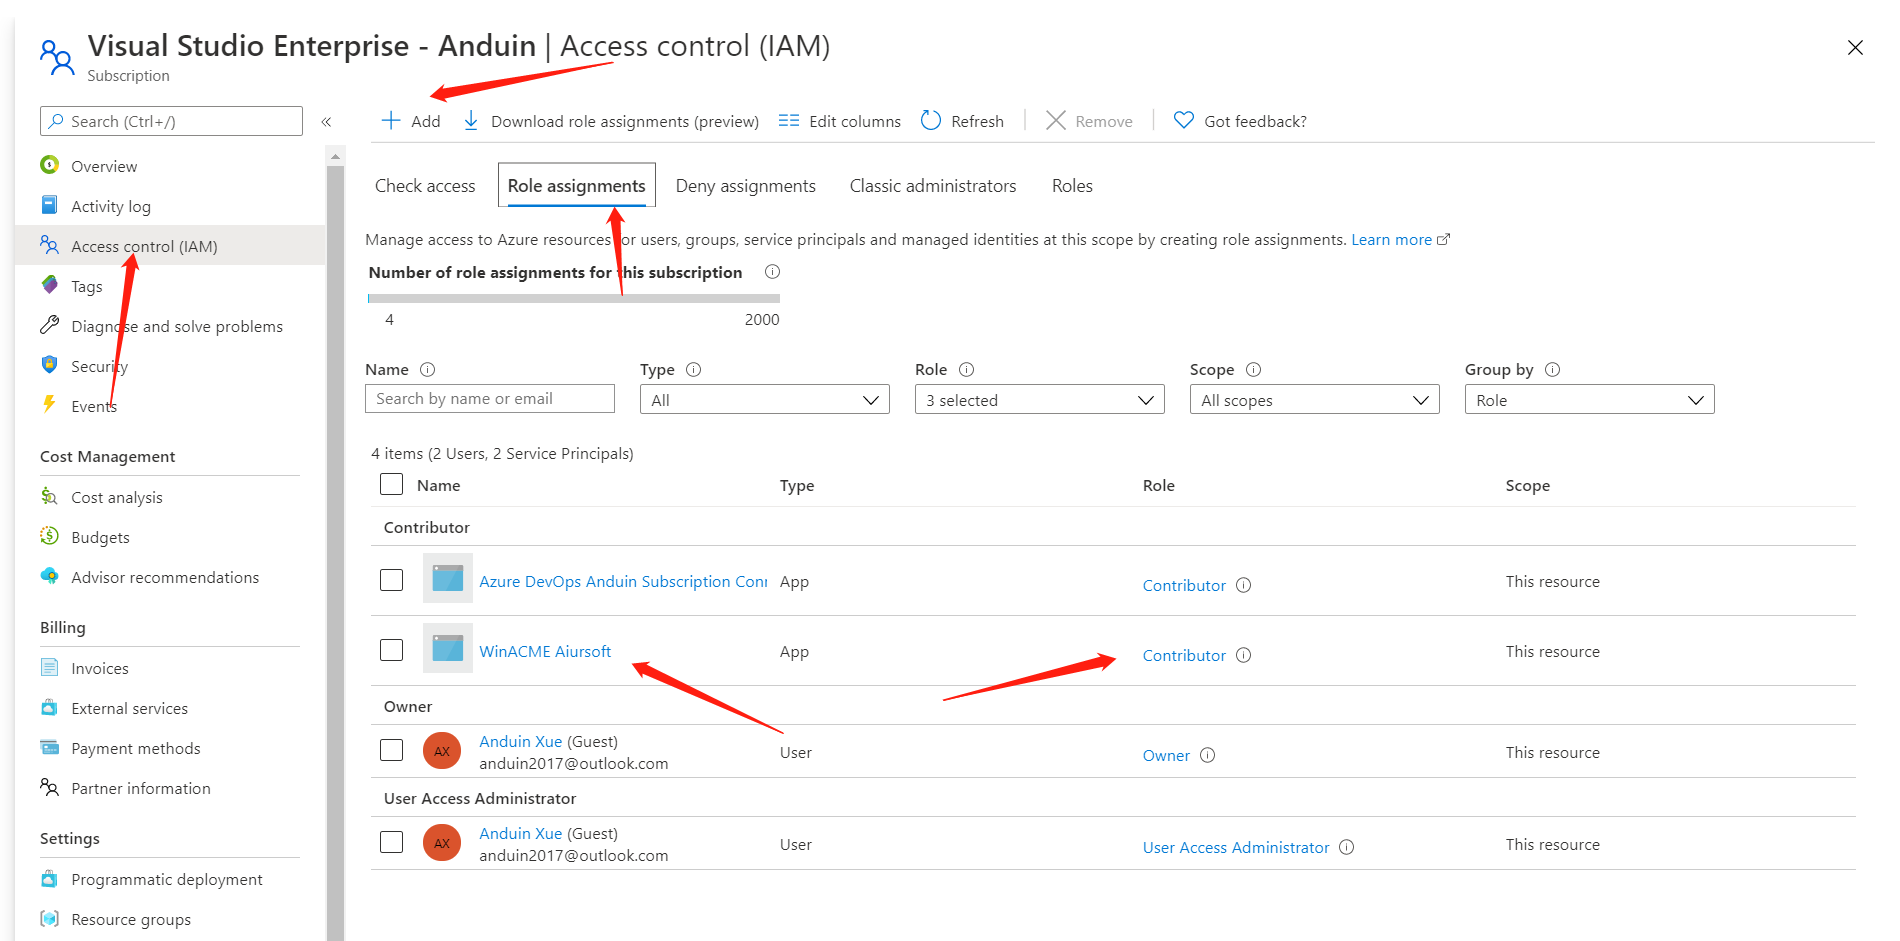
That's done. Save the copied properties to a safe note file and it will be required in the next step.
Apply for a wildcard HTTPS certificate with the auto-renew feature
Now we gonna do the final config: apply for the wild card certificate. Before starting, we need to set the wild card DNS record to our server.
Copy the public IP address of your virtual machine first like this:
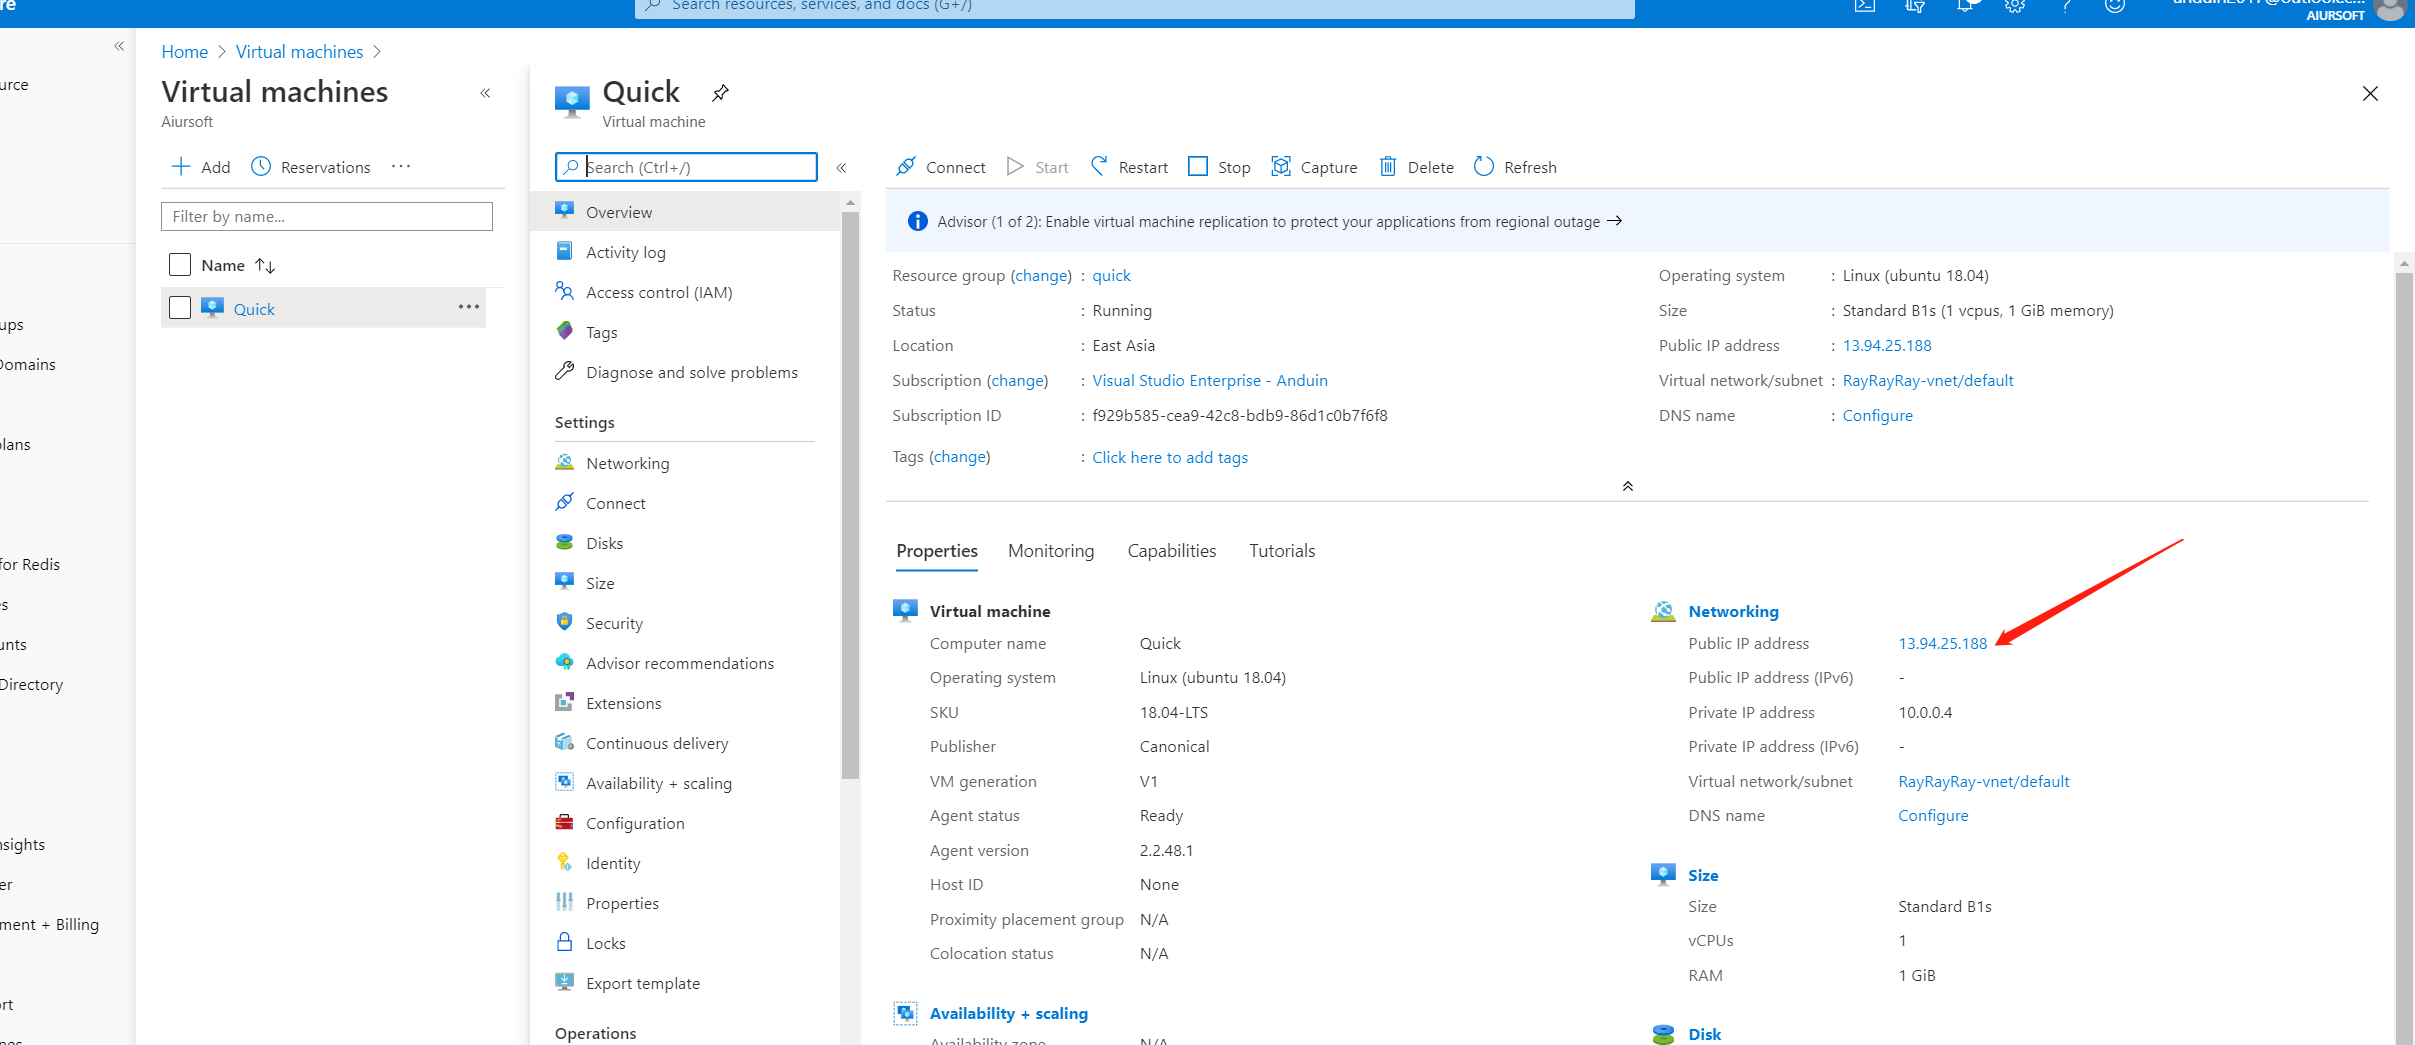
And now back to Azure DNS settings. Add a new A record to point * to that IP. So any subdomain goes to your server.
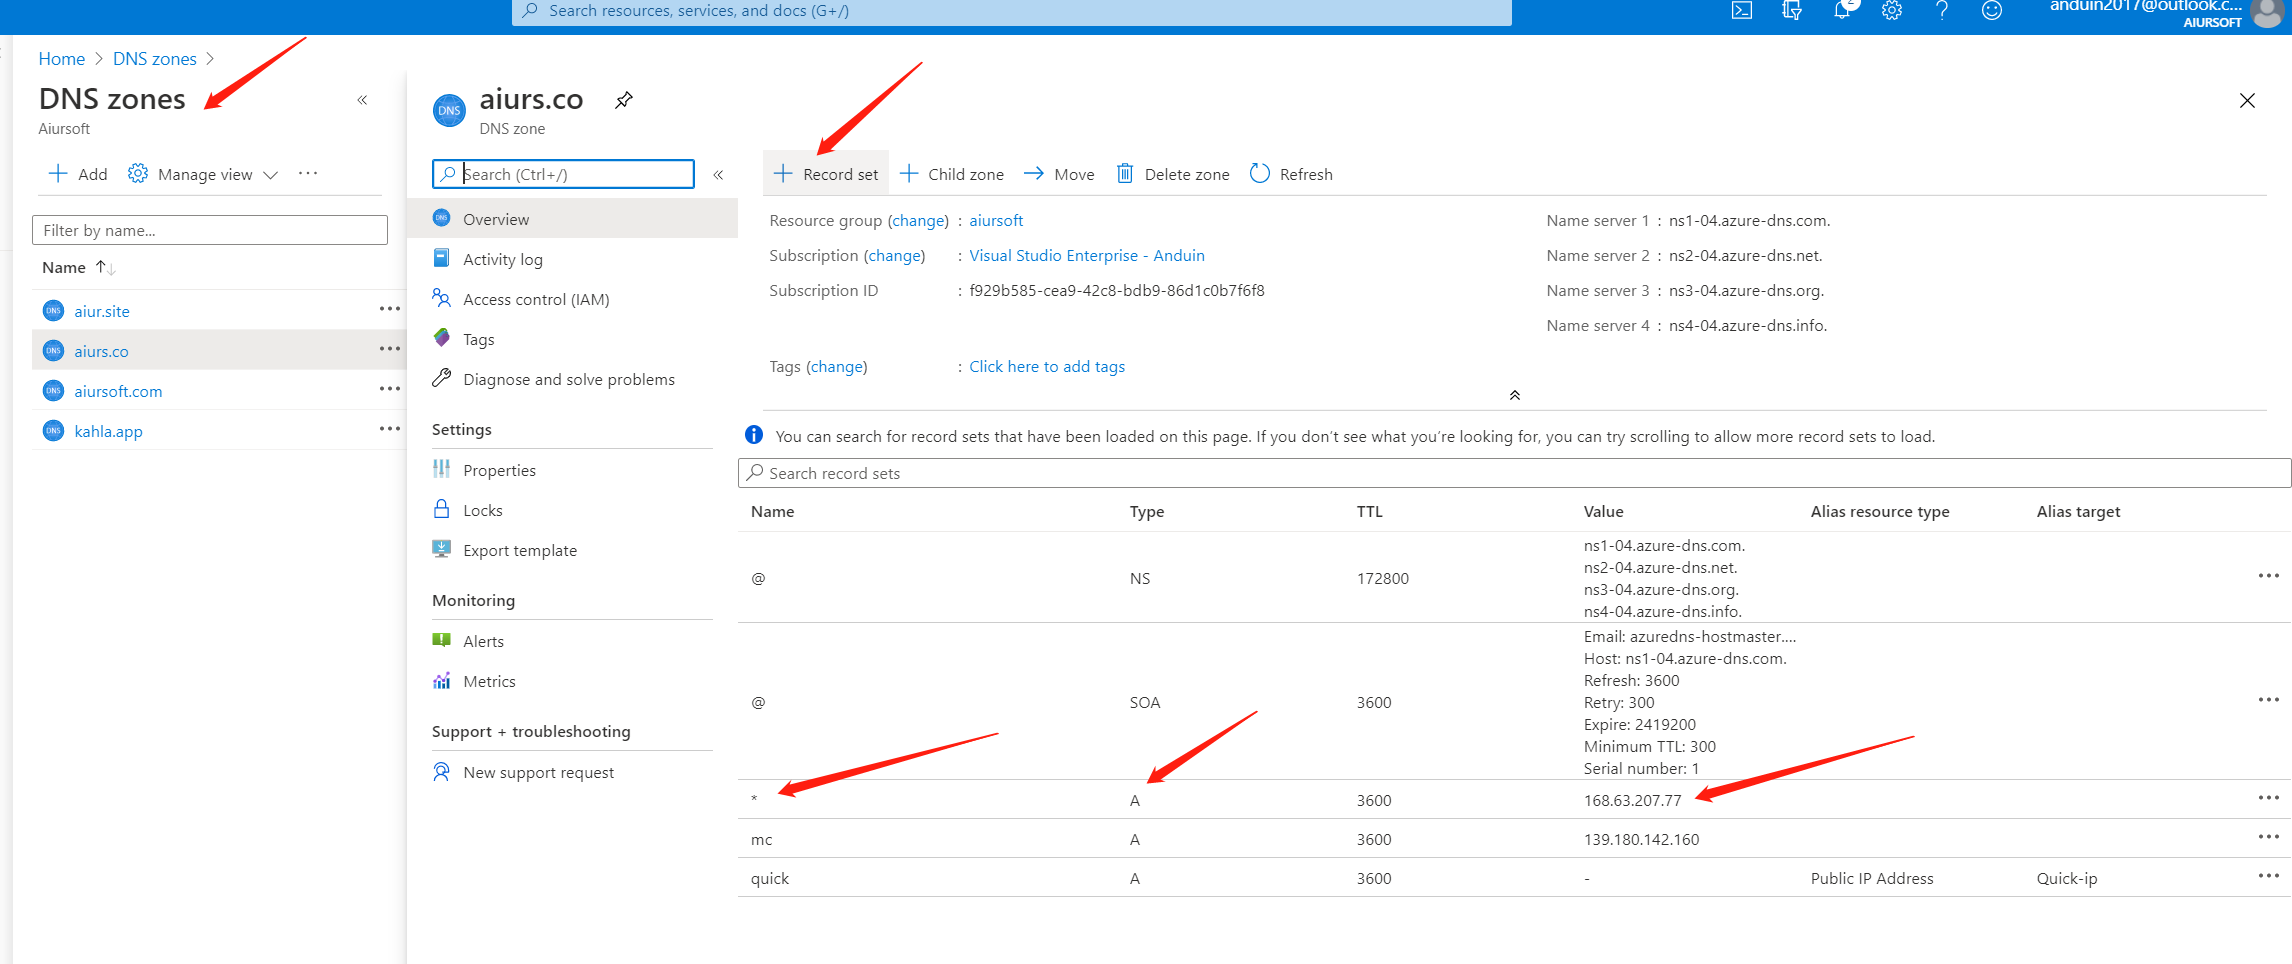
And that's for the DNS config. Back to your server with remote desktop, run the wacs.exe.
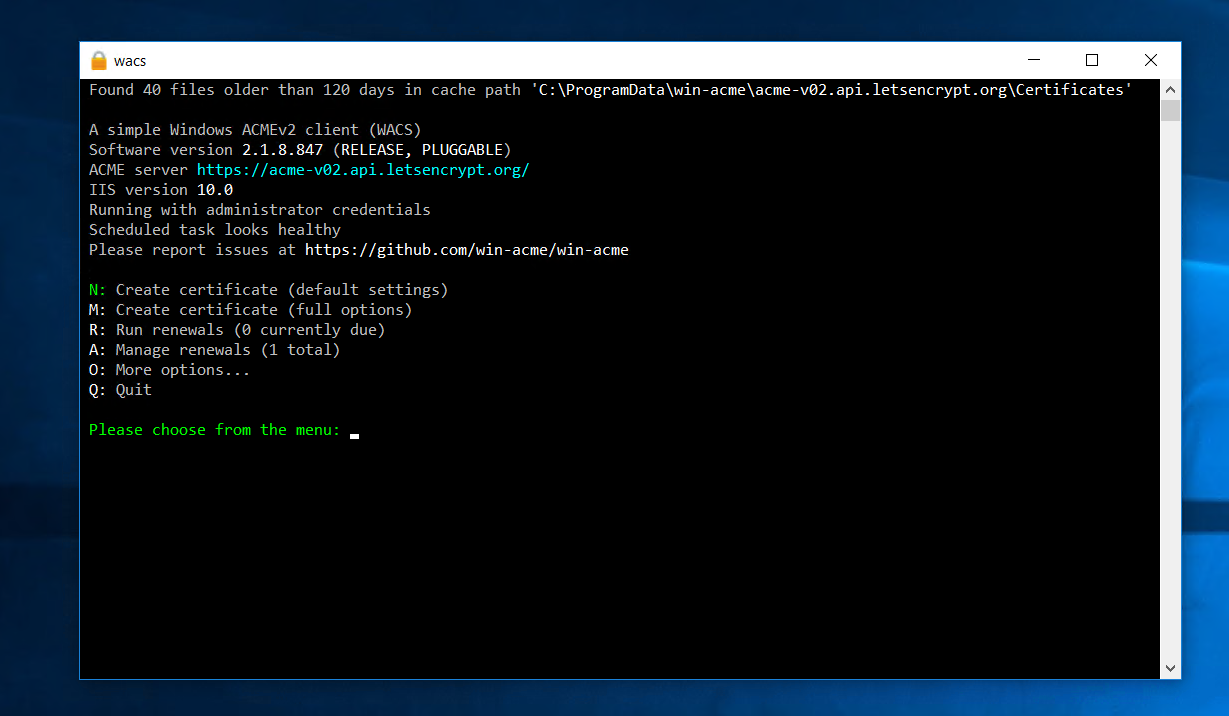
Press M to apply for a new certificate with full options. Read site configuration from IIS, and select your wildcard site.
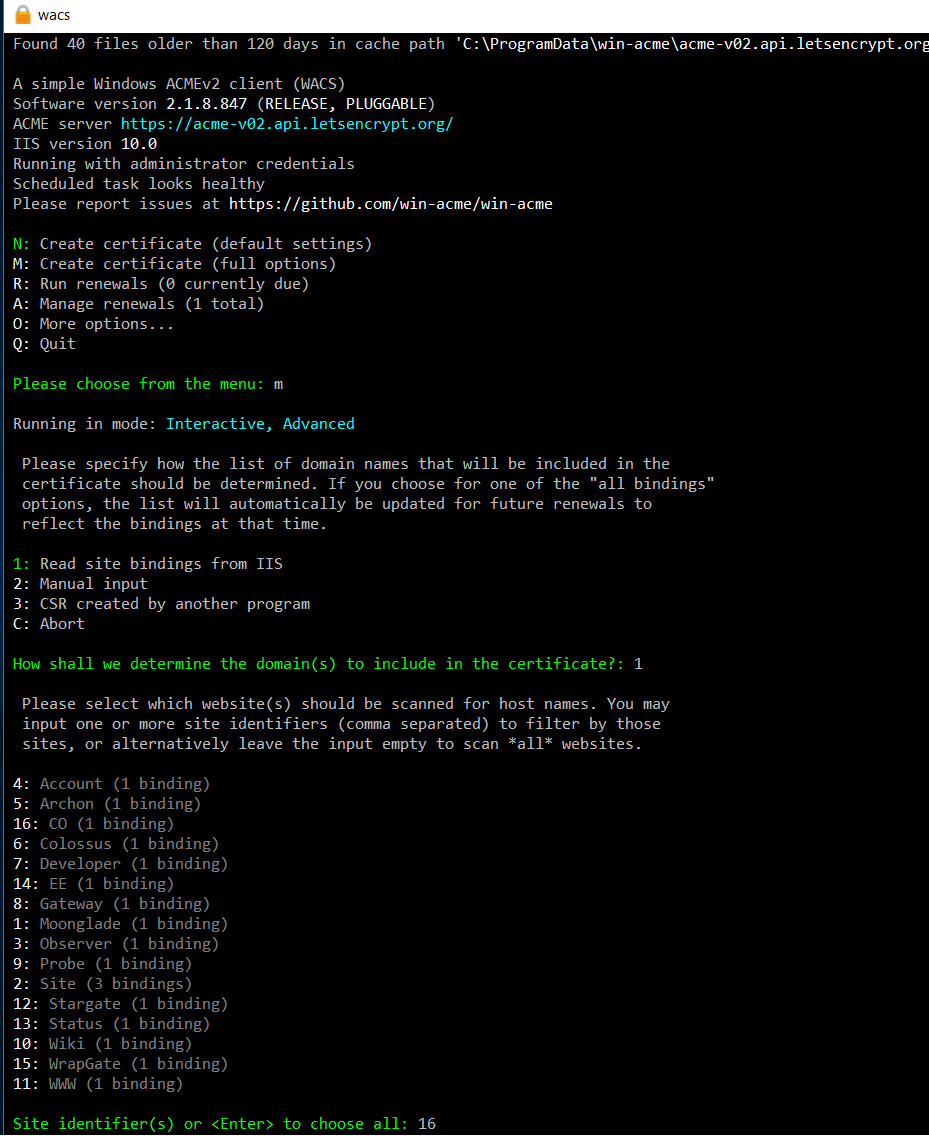
Loading bindings from IIS. And in my example, there is only one binding as the wildcard binding. Just select it. And select DNS verification with Azure DNS (6).
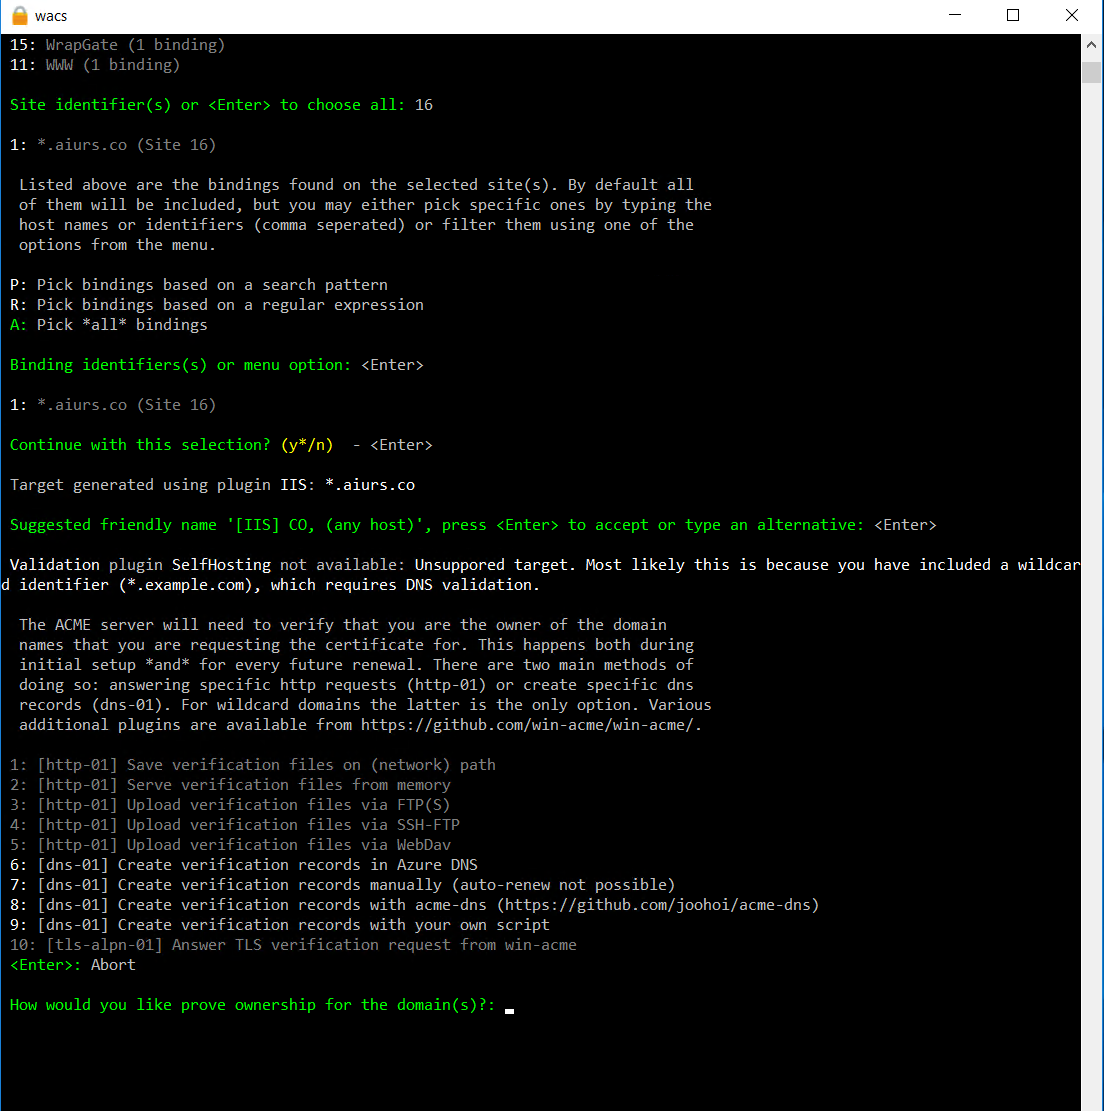

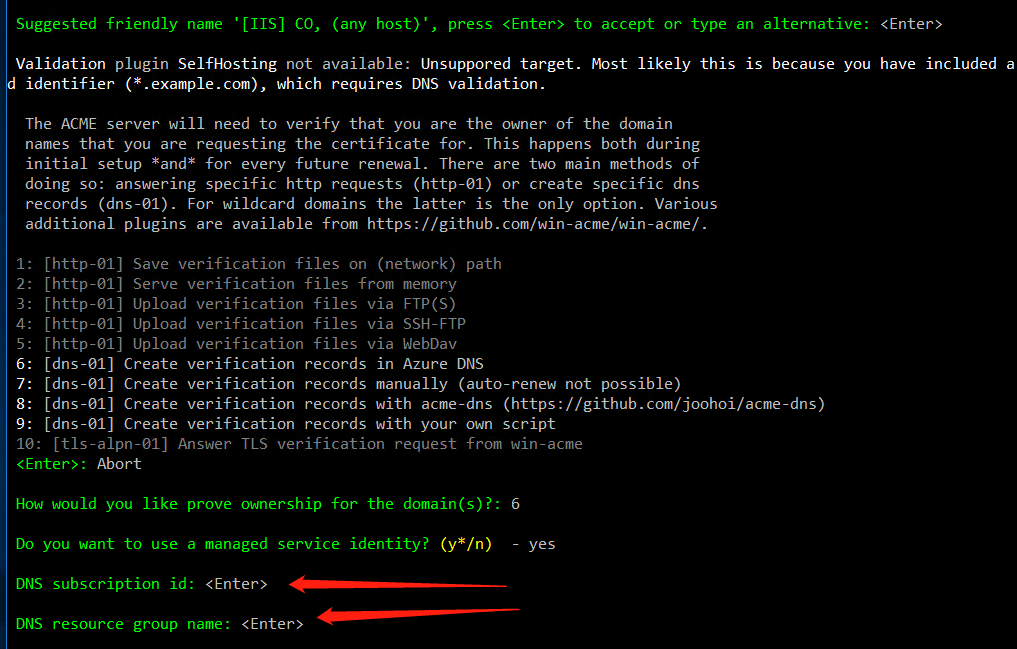
Now enter the properties you copied in the previous step.
During the setup of the validation, the program will ask several questions. Here is to answer them with information from the Azure Portal.
DNS Subscription ID: DNS Zones >sub.example.com>Subscription IDDNS Resource Group Name: DNS zones >sub.example.com>Resource Group)Directory/tenant id: Azure Active Directory > Properties >Directory ID.Application client id: Azure Active Directory > App registrations > [Service Principal] >Application ID.Application client secret: The password that was generated when you created the Service Principal Account.
And win-acme will start to verify, apply and install your certificate automatically. If everything works fine, there gonna be no warning.

And now your site is encrypted with HTTPS. That's it!

(In my screenshot, I applied a certificate for all my sites and all my bindings. So the output might be different. But the steps are the same.)
这篇文章详细介绍了如何在Azure虚拟机上配置自动续期的通配符HTTPS证书,结构清晰、步骤明确,具有较强的实践指导价值。以下是针对文章内容的客观分析与建议:
优点与核心理念
核心价值突出
文章抓住了HTTPS证书自动化管理这一关键需求,通过结合
win-acme工具与Azure DNS验证插件,提出了一套完整的解决方案。尤其强调“静态配置”与“无人维护”的设计理念,符合现代云服务对稳定性和自动化运维的追求。工具与开源生态结合
选用Let's Encrypt作为证书颁发机构(免费且权威)和
win-acme作为自动化工具,既降低了技术门槛,又增强了方案的可验证性。同时,通过Azure官方服务(如DNS、App Registration)实现权限控制,体现了对云平台能力的深度整合。风险提示与细节把控
在DNS迁移环节明确指出“2-48小时生效期”的潜在风险,提醒读者提前备份原有DNS设置,这种对实际操作中突发情况的预判值得肯定。此外,对版本兼容性(如Windows Server 2016+与IIS 10.0)的说明也体现了对技术细节的严谨态度。
改进建议
增强可访问性与可读性
/image/xxx.png),可能导致外部读者无法查看。建议将图片托管至公开图床(如GitHub Pages、Cloudflare Images),或直接嵌入Base64编码。补充异常处理与安全建议
wacs.exe的日志输出路径。扩展技术深度与场景适配
win-acme申请多域名证书(SAN证书)的配置方法。certbot),以覆盖更广泛的读者需求。逻辑与表述优化
win-acme与Azure DNS插件的版本匹配要求(如v2.3.0以上),避免因版本不一致导致的插件加载失败。总结
本文是一篇实用性极强的技术指南,为开发者提供了一条从零到一配置HTTPS证书的完整路径。作者对工具链的选型与步骤拆解展现了扎实的工程思维。若能进一步强化异常处理、安全性细节与跨平台适配性,文章的影响力和实用性将更上一层楼。期待未来看到更多关于自动化运维与云安全的深度分享!
这篇文章提供了一步步的指导来在 Azure 环境中实现网站的 HTTPS 配置,特别是使用泛域名证书和自动续签功能。作者从配置虚拟机、设置 DNS 记录到申请和验证证书的过程描述得非常详细,适合有一定技术基础但需要明确步骤的读者。
在实际操作过程中,可能会遇到一些挑战,例如确保所有 Azure 服务的身份验证权限正确设置,或者处理 DNS 配置中的潜在延迟。此外,虽然文章提到使用 win-ACME 工具自动申请和安装证书,但对于初次接触该工具的用户来说,可能需要更多的解释或示例来理解每一步的作用。
总体而言,这篇文章是一个很好的起点,它帮助读者通过 Azure 和 win-ACME 实现网站的安全配置。对于希望深入了解 HTTPS 配置细节的技术人员,这篇文章提供了清晰且实用的信息。
In this blog post, the author provides a detailed guide on setting up auto-renew wildcard HTTPS certificates on Azure virtual machines. The core idea is to enhance the security of websites hosted on Azure virtual machines by using wildcard HTTPS certificates, which are automatically renewed.
The author does an excellent job of explaining each step in the process, which includes migrating the domain to Azure DNS, creating a virtual machine with Windows Server 2016+ and IIS 10.0, installing win-acme and the Azure DNS verification plugin, setting up app registration and obtaining configuration details, and finally, applying for a wildcard HTTPS certificate with the auto-renew feature. The use of screenshots throughout the article helps to visualize each step, making it easier for readers to follow along.
One of the main highlights of this blog post is the detailed explanation of each step, which ensures that even readers with limited knowledge of Azure and HTTPS certificates can follow the guide successfully. The author also provides valuable tips and warnings throughout the article, ensuring that readers are aware of potential issues and how to avoid them.
In terms of improvement, the author could consider providing more context on the importance of HTTPS certificates and their benefits, especially for readers who may not be familiar with the concept. Additionally, it would be helpful to include links to relevant documentation or resources for readers who may want to explore certain topics in more depth.
Overall, this blog post is a valuable resource for anyone looking to set up auto-renew wildcard HTTPS certificates on Azure virtual machines. The author's detailed explanations and helpful tips make it an accessible guide for readers of all skill levels.
日你牙
不清真的我用Caddy2反代automatic_https
太清真了!