IIS is a popular web server with awesome GUI management and high performance. And sometimes we just need IIS works as a reverse proxy.
Last week, I was building Aiursoft.IO. Aiursoft.IO is a project which reverse-proxies https://probe.aiursoft.com to provide a shorter download URL. And we already have a Windows Server virtual machine and Azure App Service Plan. So we don't plan to buy an additional Linux virtual machine.
For Azure App Service based on the Windows server, the config is all shared and just runs smoothly without changing anything. So this is a great practice for us now.
Before configuring your reverse proxy, you need to install IIS first. IIS can't run as a reverse proxy without extensions. You need to install some additional packages:
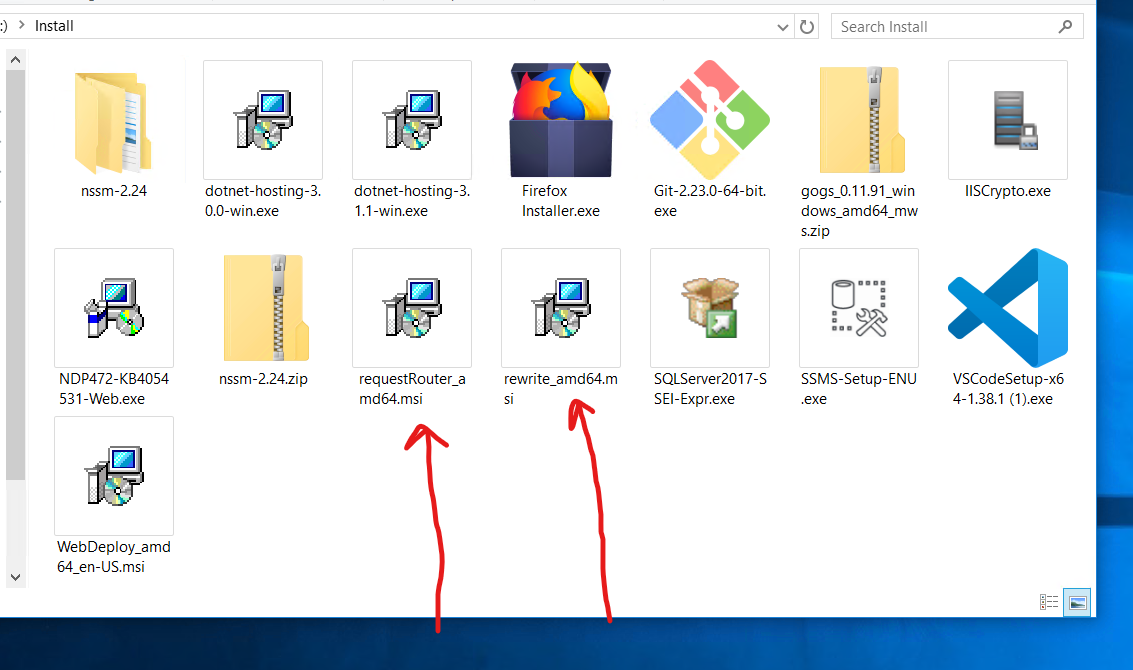
In the picture, there are packages I usually install on a Windows Server. The highlighted package: RequestRouter and Rewrite are necessary.
Those two packages can be downloaded at:
https://www.microsoft.com/en-us/download/details.aspx?id=47333
https://www.microsoft.com/en-us/download/details.aspx?id=47337
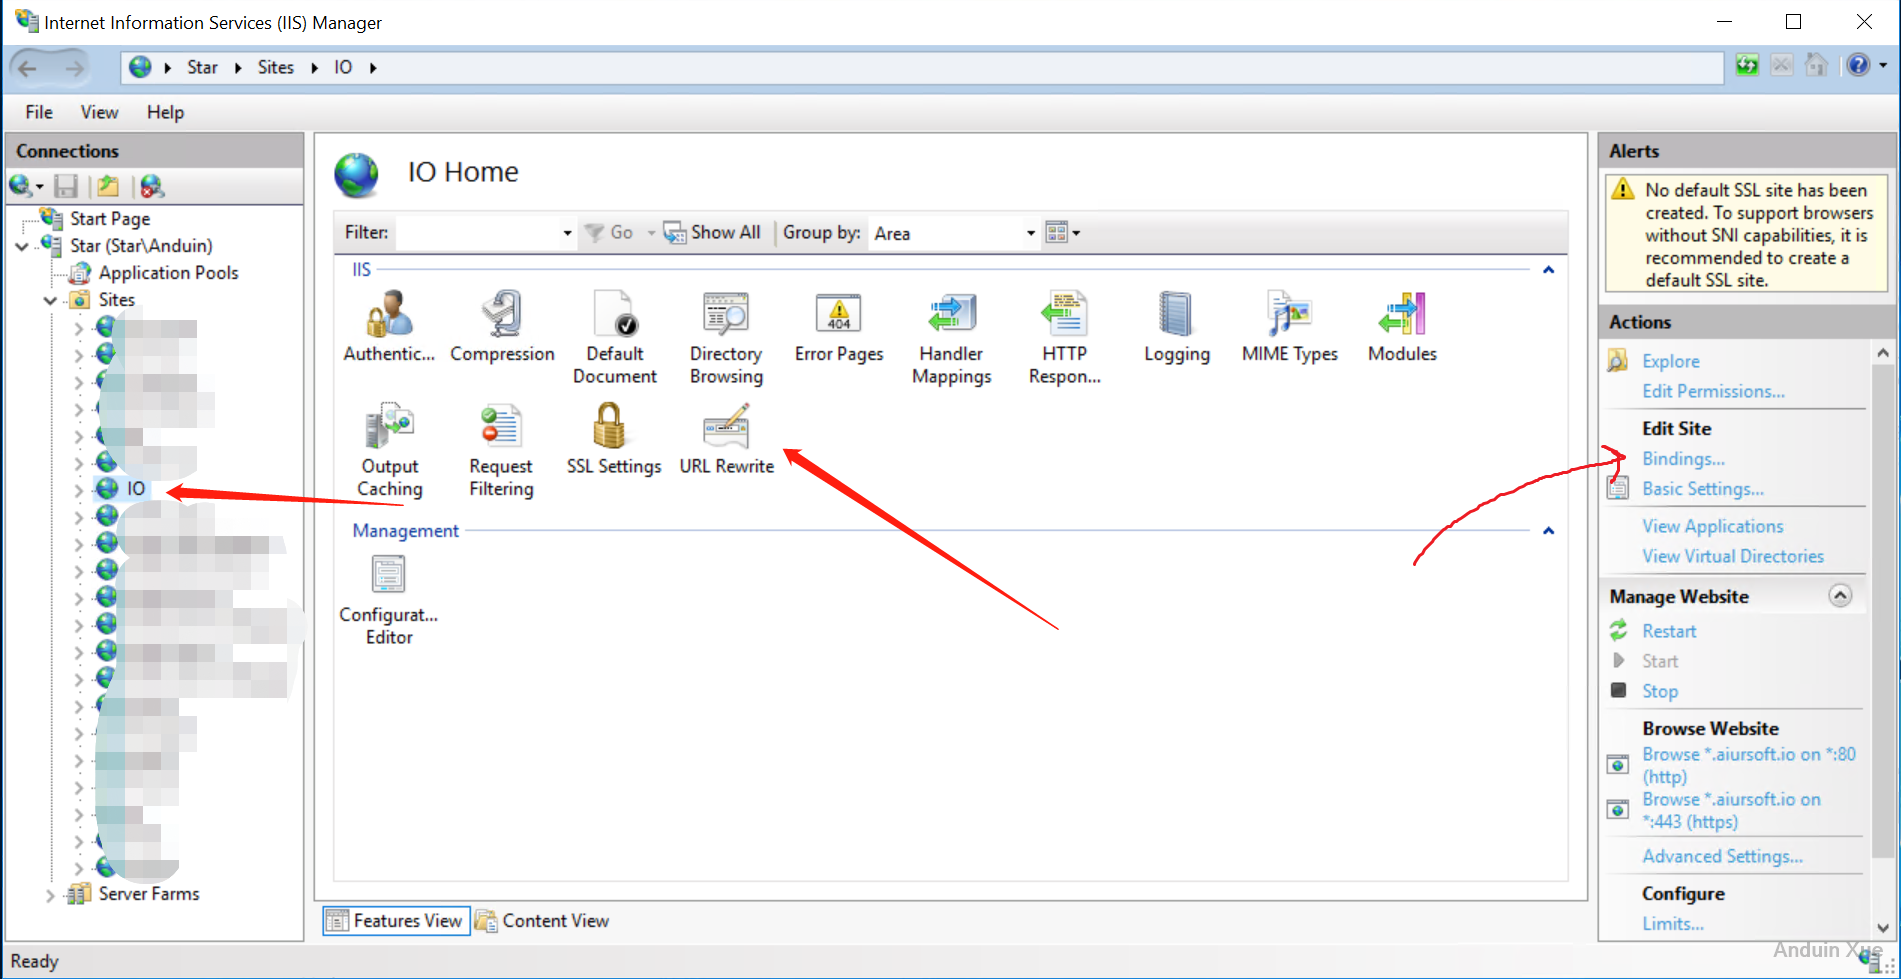
After installing it, you may see a new panel in your IIS management tools named Application Request Routing:

To enable reverse proxy, open the proxy settings:

Make sure the Enable Proxy checkbox is checked. Save the settings and reboot your IIS.

Now basic preparation is complete. To create a new reverse proxy rule, Create a new website and config the domain bindings.
In your binding settings, the domain names shall be your final front-end domain. In my example, it shall be *.aiursoft.io because I want to configure a revere proxy to proxy from https://probe.aiursoft.com/download/open/{site-name}/* to https://{site-name}.aiursoft.com/*.
After setting the domains and HTTPS cert, you can create a new file named web.config under your site root path.
First, paste the following XML to your web.config file. This content makes nothing change.
<?xml version="1.0" encoding="utf-8"?>

<configuration>
  <system.webServer>
    <rewrite>
      <rules>

      </rules>
    </rewrite>
  </system.webServer>
</configuration>
I gonna create some new rules. First, I want to enable HTTPS access only. So I gonna redirect all HTTP traffic to HTTPS. Add the code to the <rules> tag.
        <rule name="HTTPS force" enabled="true" stopProcessing="true">
          <match url="(.*)" />
          <conditions>
            <add input="{HTTPS}" pattern="^OFF$" />
          </conditions>
          <action type="Redirect" url="https://{HTTP_HOST}/{R:1}" redirectType="Permanent" />
        </rule>
This matches any content without TLS encryption. And stop processing the request and redirect to the site with the same host {HTTP_HOST} and bypass the path {R:1}.
Then I gonna create the real reverse proxy logic. Add the following content to the <rules> tag.
        <rule name="Probe" stopProcessing="true">
          <match url="(.*)" />
          <conditions logicalGrouping="MatchAll" trackAllCaptures="true">
                        <add input="{HTTP_HOST}" pattern="([_0-9a-z-]+).aiursoft.io" />
          </conditions>
          <action type="Rewrite" url="https://probe.aiursoft.com/download/open/{C:1}/{R:1}" appendQueryString="true" logRewrittenUrl="false" />
        </rule>
This stop processing requests which match the pattern: ([_0-9a-z-]+).aiursoft.io and rewrite(reverse proxy) it to real probe download address.
After writing this, the reverse proxy is working online. Aiursoft.IO is a pretty complicated example. If you want to reverse proxy Google.com, simply add:
        <rule name="Google" stopProcessing="true">
          <match url="(.*)" />
          <action type="Rewrite" url="https://www.google.com/{R:1}" appendQueryString="true" logRewrittenUrl="false" />
        </rule>
After configuring the reverse proxy, I wanna enable HSTS feature to get better security. Add the following code to your <system.webServer> tag.
Finally, your config file shall be like:
<?xml version="1.0" encoding="utf-8"?>

<configuration>
  <system.webServer>
    <rewrite>
      <rules>
        <rule name="HTTPS force" enabled="true" stopProcessing="true">
          <match url="(.*)" />
          <conditions>
            <add input="{HTTPS}" pattern="^OFF$" />
          </conditions>
          <action type="Redirect" url="https://{HTTP_HOST}/{R:1}" redirectType="Permanent" />
        </rule>
        <rule name="Google" stopProcessing="true">
          <match url="(.*)" />
          <action type="Rewrite" url="https://www.google.com/{R:1}" appendQueryString="true" logRewrittenUrl="false" />
        </rule>
      </rules>
    </rewrite>
    <httpProtocol>
     <customHeaders>
        <add name="strict-transport-security" value="max-age=15552001; includeSubDomains; preload" />
     </customHeaders>
    </httpProtocol>
  </system.webServer>
</configuration>
And just test it:

To publish your reverse proxy server to Azure App Service, simply publish the web.config file to the root folder of your app service.
To use reverse proxy in Azure app service, you need to manually enable a service called ARR. Simply open the Kudo controller, go to the folder: site.
And add a file named applicationHost.xdt with web.config. Change the content of it to:
<?xml version="1.0" encoding="UTF-8"?>
<configuration xmlns:xdt="http://schemas.microsoft.com/XML-Document-Transform">
  <system.webServer>
    <proxy xdt:Transform="InsertIfMissing" enabled="true" preserveHostHeader="false" reverseRewriteHostInResponseHeaders="false" />
  </system.webServer>
</configuration>
Save and restart your Azure App Service. And your proxy just works.
这篇文章详细地介绍了如何通过IIS和Azure App Service实现反向代理功能,内容结构清晰、步骤明确,具有很强的实践指导意义。作者以自身项目Aiursoft.IO为案例,将复杂配置分解为可操作的模块(如扩展安装、规则编写、安全加固),并结合截图和代码示例,为读者提供了直观的学习路径。这种将技术文档与实际场景结合的方式,显著提升了文章的实用价值。
文章的核心理念——利用现有Windows基础设施和Azure服务替代额外Linux虚拟机——体现了对资源成本的优化意识,符合当前云服务高效复用的趋势。尤其在Azure App Service的ARR配置部分,通过
applicationHost.xdt文件实现自定义扩展,展现了对Windows生态的深入理解。同时,HSTS头部的配置说明(strict-transport-security)不仅满足功能需求,更主动强化了安全性,这一细节值得赞赏。文章的闪光点在于对技术细节的精准把握。例如,通过正则表达式
([_0-9a-z-]+).aiursoft.io提取子域名并映射到目标路径的逻辑,既展示了IIS重写模块的强大功能,又避免了冗余代码;而针对HTTPS强制跳转的规则(HTTPS force)则通过{HTTP_HOST}和{R:1}变量保留了路径完整性,体现了对请求上下文的深刻理解。这些设计均体现了作者对IIS生态的熟练掌握。若需进一步完善,可考虑以下方向:
web.config与applicationHost.xdt的区别,或推荐学习IIS ARR模块的官方文档。Log stream查看错误日志),或提供<serverVariables>标签的调试示例。curl -v https://example.aiursoft.io检查响应头是否包含X-Proxy-Server或自定义头部,以确认请求是否成功穿透代理。preserveHostHeader等参数。建议验证当前ARR在Azure的启用条件(如是否依赖特定服务计划),避免误导读者。此外,下载链接的更新状态(如
RequestRouter和Rewrite模块是否仍托管于微软官网)以及applicationHost.xdt文件的部署路径(是否应放置于site根目录而非子文件夹)需进一步确认,以确保配置的时效性和准确性。总体而言,文章为Windows环境下的反向代理实践提供了高质量的参考,建议作者在后续扩展中加入常见错误场景的应对策略,并进一步对比IIS与Nginx/HAProxy的配置差异,以帮助读者更全面地理解技术选型。
这篇文章详细介绍了如何在IIS中使用URL重写模块配置反向代理服务器,并将其部署到Azure App Service的过程。整个过程逻辑清晰,步骤明确,适合有一定技术基础的开发者阅读。
对于刚刚接触反向代理和URL重写的读者来说,文章中的示例非常实用。例如,通过配置一个简单的Google反向代理来展示基本原理,这样可以帮助读者快速理解核心概念。此外,文中提到的HSTS配置也是一个很好的安全实践,能够有效提升网站的安全性。
不过,在实际部署过程中有几个地方可能需要进一步探讨:
性能优化:在高流量场景下,如何调整ARR(Application Request Routing)和反向代理的参数以提高吞吐量和响应速度?是否有推荐的硬件配置或优化技巧?
错误处理与日志记录:文章中提到的日志功能可以帮助排查问题,但是否可以进一步完善错误处理机制,比如在请求失败时提供更友好的提示信息?此外,如何监控反向代理服务器的状态和性能指标也是一个值得关注的问题。
扩展性:文中示例主要涉及单机部署,但在生产环境中可能需要支持多实例的负载均衡。如何将ARR与Azure的负载均衡器结合使用,以实现更高可用性的架构?
安全增强:除了HSTS外,是否可以添加其他安全措施,如Rate Limiting或Web Application Firewall(WAF),来进一步保护反向代理服务器和后端服务?
对于读者来说,这篇文章是一个很好的起点。建议在实施前先进行充分的测试,确保所有配置符合实际需求,并关注Azure App Service的相关文档以了解最新的功能和限制。
如果你有其他问题或者需要进一步的帮助,请随时分享你的经验或遇到的具体挑战!
I enjoyed reading your blog post on using IIS or Azure App Service as a reverse proxy. The step-by-step guide, with clear explanations and helpful screenshots, makes it easy for readers to follow along and implement the reverse proxy themselves. The inclusion of specific examples, such as Aiursoft.IO and Google.com, is also beneficial for readers to understand the concept better.
The core idea of using IIS or Azure App Service as a reverse proxy is well-explained, and I appreciate the detailed instructions on installing the necessary packages, configuring the settings, and creating the reverse proxy rules. Your blog post is a valuable resource for those looking to set up a reverse proxy using IIS or Azure App Service.
One improvement that could be made is to provide a brief introduction to the concept of a reverse proxy and its benefits at the beginning of the blog post. This would help readers who may not be familiar with the topic to better understand the context and purpose of the tutorial.
Another suggestion is to include a summary or conclusion at the end of the blog post, highlighting the key points and takeaways for readers. This would help reinforce the concepts and steps discussed in the tutorial.
Overall, your blog post is informative and well-structured, making it easy for readers to follow and implement the reverse proxy using IIS or Azure App Service. Keep up the great work!
SIR, OpEn THE dOOR pLEasE. I'M gOIng TO InspECT YOUR WaTER METER.