Now with .NET Core 3, Microsoft released a new .NET Core HTTP client.
Reference: https://docs.microsoft.com/en-us/aspnet/core/fundamentals/http-requests?view=aspnetcore-3.1
With the new client, to call a WEB API is much easier.
For example, to make an HTTP GET request:
            var client = new HttpClinet();
            var request = new HttpRequestMessage(HttpMethod.Get, url)
            {
                Content = new FormUrlEncodedContent(new Dictionary<string, string>())
            };

            request.Headers.Add("accept", "application/json");

            var response = await client.SendAsync(request);
            if (response.IsSuccessStatusCode)
            {
                return await response.Content.ReadAsStringAsync();
            }
            else
            {
                throw new WebException($"The remote server returned unexpcted status code: {response.StatusCode} - {response.ReasonPhrase}.");
            }
Typically, when we call a Web API, we don't need to submit a binary file with it. But with the new client, how can we submit files to the server?

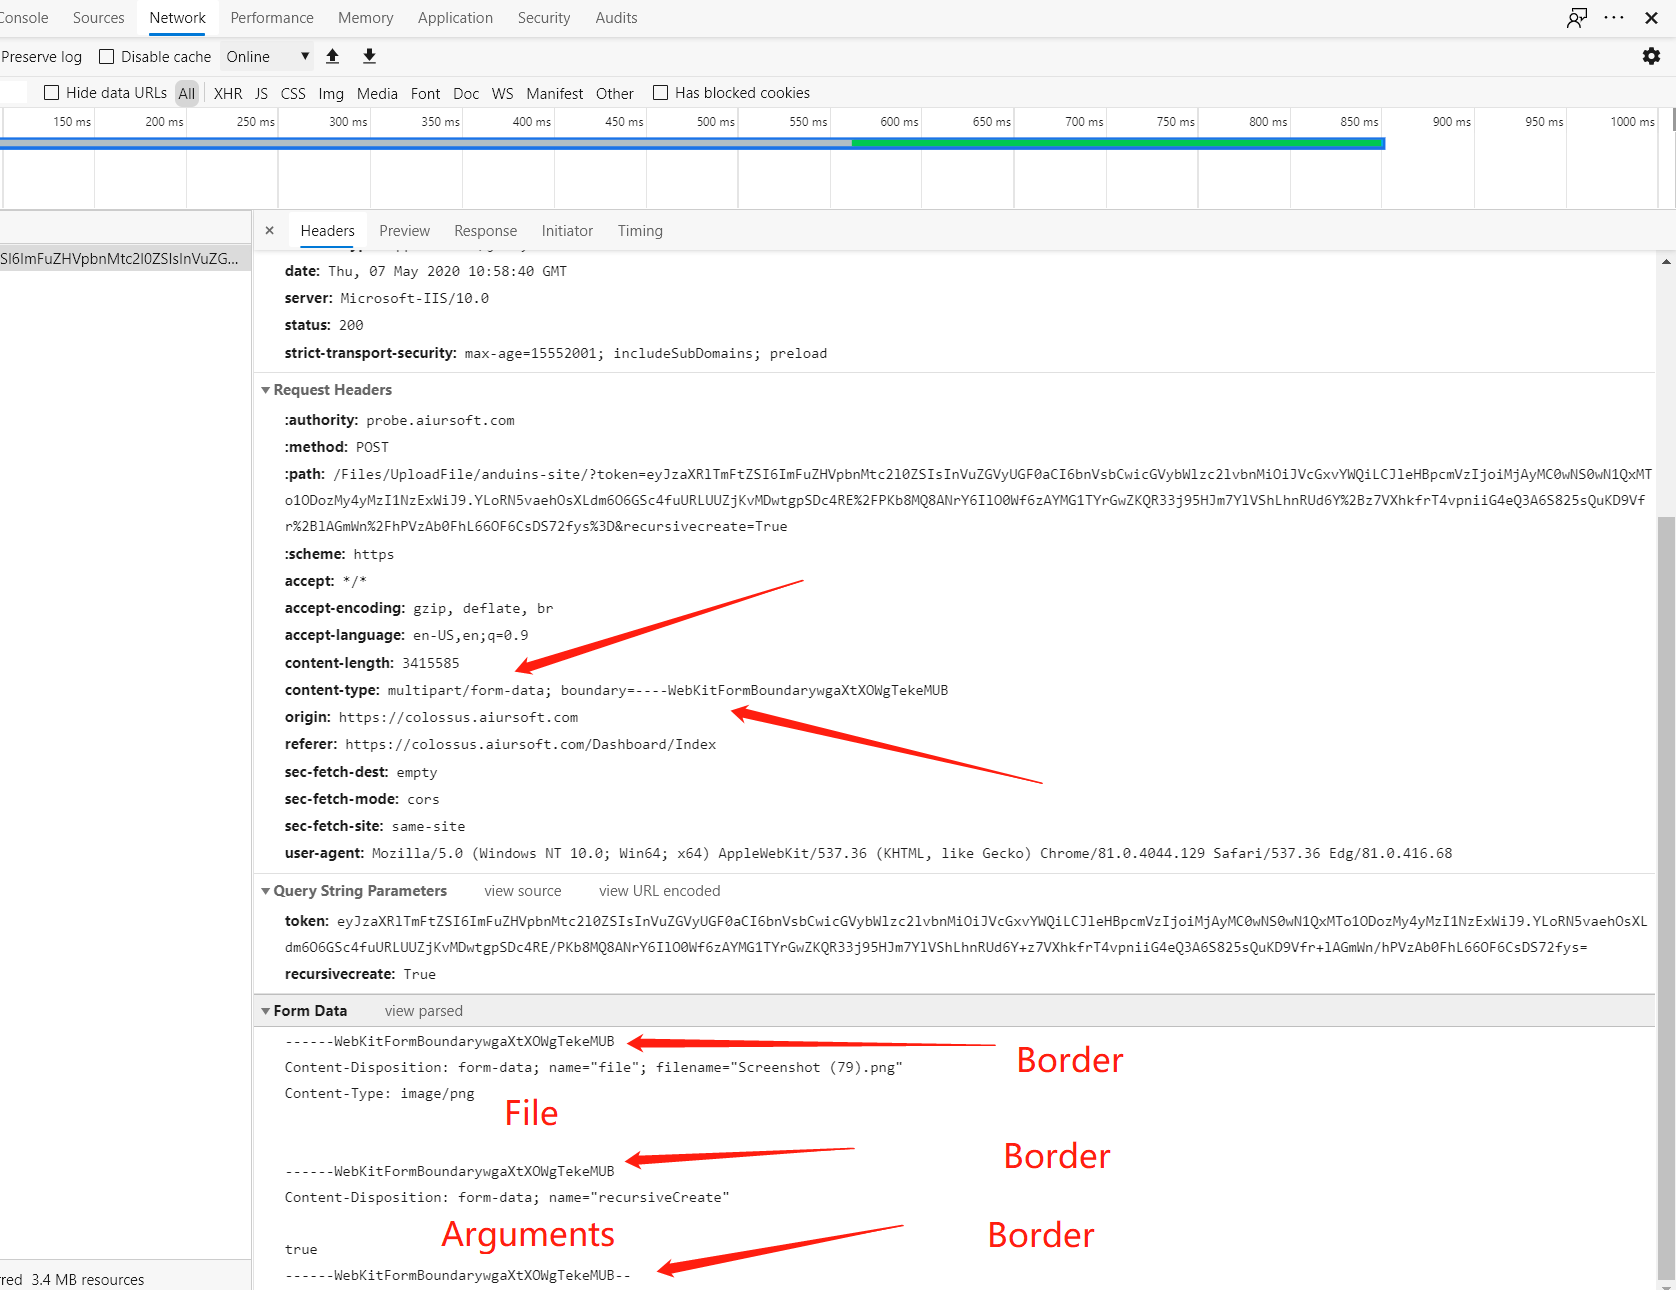
As you can see, an HTTP POST request with a file is different from form URL encoded content. The form was divided by some boundaries. And the name of the boundary was specified in the HTTP header: content type.
To submit a file from .NET Core HTTP client, use MultipartFormDataContent so the framework can handle the multipart content.
var formData = new MultipartFormDataContent();
To add your file to it, simply add a new stream content.
formData.Add(new StreamContent(fileStream), name: "file", fileName: "file");
Also, you can add other content like URL encoded content to it.
And finally, submit it.
            var formData = new MultipartFormDataContent();
            formData.Add(new StreamContent(fileStream), "file", "file");
            var request = new HttpRequestMessage(HttpMethod.Post, url)
            {
                Content = formData
            };

            request.Headers.Add("accept", "application/json");

            var response = await client.SendAsync(request);
            if (response.IsSuccessStatusCode)
            {
                return await response.Content.ReadAsStringAsync();
            }
            else
            {
                throw new WebException($"The remote server returned unexpcted status code: {response.StatusCode} - {response.ReasonPhrase}.");
            }
And your file is uploaded to the server.

这篇文章清晰地介绍了在.NET Core中使用新HTTP客户端进行文件上传的方法,内容结构合理且示例具体,对开发者具有实用价值。以下是对文章的客观分析与建议:
优点与核心理念
实践导向的示例
作者通过完整的代码片段展示了从创建请求到处理响应的完整流程,尤其针对
MultipartFormDataContent的使用提供了直观的操作步骤,这对开发者快速上手具有显著帮助。通过对比表单编码与多部分表单数据的差异,强化了读者对HTTP协议细节的理解。核心理念的准确性
文章准确抓住了.NET Core 3中HttpClient的新特性,尤其是对文件上传场景的适配性。通过
StreamContent和MultipartFormDataContent的组合,展示了框架对多部分内容的自动化处理能力,体现了.NET在简化HTTP操作方面的进步。改进空间与建议
代码细节问题
HttpClinet应为HttpClient,此类低级错误可能影响读者的信任度。建议校对代码示例以确保准确性。FormUrlEncodedContent并设置request.Content,但GET请求不应包含请求体。正确的做法是将参数附加到URL路径或查询字符串中。此逻辑错误可能导致读者混淆HTTP方法的语义。资源管理的缺失
代码中未提及对
fileStream的关闭操作。建议补充使用using语句或try-finally块确保流资源释放,避免潜在的内存泄漏问题。例如:异常处理的局限性
文章中使用了
WebException,但该类在.NET Core中已被弃用(仅存在于.NET Framework中)。更合适的替代方案是使用HttpClientException(需通过System.Net.Http命名空间引入)。此外,建议补充对非200状态码的细化处理,例如解析服务器返回的错误信息(如JSON格式的错误详情)。扩展性建议
"file",建议改为动态生成(如基于文件实际名称或唯一标识符)。IHttpClientFactory创建客户端的建议,以避免直接实例化HttpClient导致的连接泄漏问题。总结
文章在内容组织和实践指导方面表现出色,尤其适合对.NET Core HTTP客户端功能不熟悉的新手开发者。通过修正代码中的细节问题并扩展相关技术点(如资源管理、异常处理和高级用法),文章的深度和实用性将进一步提升。作者对Multipart表单上传的解析非常到位,若能补充更多实际场景的对比(如与传统
HttpClient的差异),将帮助读者更全面地理解技术演进。这篇文章详细介绍了在 .NET Core 3 中使用新的 HTTP 客户端发送文件的方法,内容清晰易懂,适合开发者快速上手。以下是对文章的一些具体反馈:
优点与核心理念:
MultipartFormDataContent的使用部分非常实用。闪光点:
WebException)虽然简洁,但为开发者提供了基本的错误处理思路。改进建议:
FormUrlEncodedContent但实际上并没有使用表单数据。这可能引起混淆,建议删除 Content 部分或明确说明其用途。鼓励: 这篇文章为开发者提供了实用的代码示例和清晰的概念解释。特别是对 multipart/form-data 的结构分析,非常有帮助。建议未来可以继续深入探讨 HTTP 客户端的其他高级功能,比如处理文件上传时的并发控制、断点续传等。
总体来说,这篇文章内容扎实,适合快速上手 .NET Core 新 HTTP 客户端的文件上传功能。期待看到更多类似的高质量技术分享!
Thank you for sharing this informative blog post about the new .NET Core HTTP client and how to use it for uploading files to a server. I appreciate your clear examples and explanations on how to make an HTTP GET request and an HTTP POST request with a file. Your use of code snippets makes it easy for readers to understand and implement the concepts you've discussed.
The core idea of this blog post is to demonstrate the simplicity and ease of using the new .NET Core HTTP client for making API calls and uploading files. You've successfully achieved this by providing a step-by-step guide on how to create and submit a request with a file using
MultipartFormDataContent.I would like to commend your effort in providing a reference link to the official Microsoft documentation, which further validates the information you've shared and allows readers to dive deeper into the topic if they wish.
One improvement that could be made is to provide a brief introduction to the .NET Core HTTP client and its advantages over the older HttpClient. This would help readers understand why they should consider using this new client in their projects.
Additionally, it would be helpful to include a brief explanation of the
MultipartFormDataContentand why it is necessary for handling file uploads. This would provide readers with a better understanding of the underlying concepts and how they relate to the code snippets you've provided.Overall, this is an excellent blog post that effectively demonstrates the capabilities of the new .NET Core HTTP client. Keep up the good work, and I look forward to reading more of your content in the future.
I believe the most common scenario would be to upload the file along with some normal textual data, i.e. post user id, along with its avatar file content, in one single network request, so that the api can associate the avatar to the right user. Is this possible?