Architect
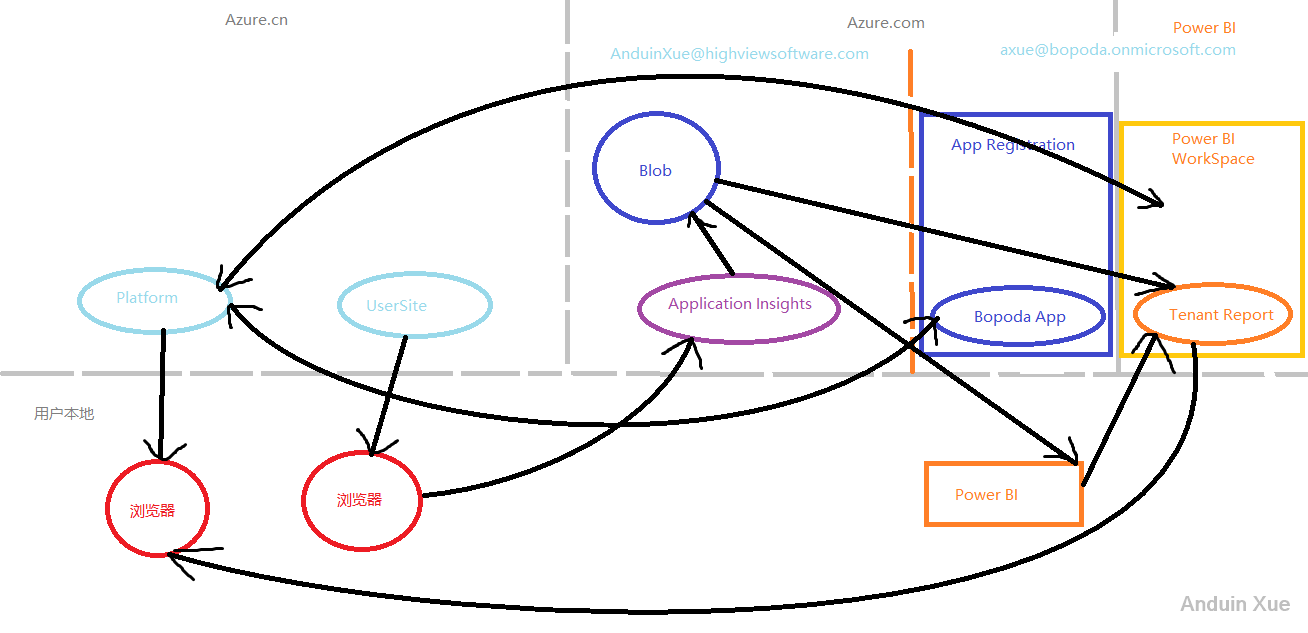
This User Story requires the following steps:
- Get video playback data.
- Submit the data to global Azure AI service via JavaScript.
- Verify that we can see the video playback data in the Azure portal.
- Get the data from global Azure AI service to Power BI.
- Use Power BI Embed to display the data in our web page.
- Add a filter to your embed dashboard to only display current tenant data.
KPI for video paly (per video, per user) Reporting (Application Insights + Power BI)
Document about Application insights custom events upload: https://docs.microsoft.com/en-us/azure/application-insights/app-insights-usage-overview#custom-events
Document about the AMP Application Insights plugin is here: http://amp.azure.net/libs/amp/latest/docs/PLUGINS.html https://github.com/Azure-Samples/media-services-javascript-azure-media-player-application-insights-plugin
Document about how to connect Application Insights to Power BI is here: https://docs.microsoft.com/en-us/power-bi/service-connect-to-application-insights
Document about how to config Power BI embed is here: https://docs.microsoft.com/en-US/power-bi/developer/embed-sample-for-customers https://github.com/Microsoft/PowerBI-JavaScript
Document about how to add a filter to data is here: https://github.com/Microsoft/PowerBI-JavaScript/wiki/Filters
Setp 1: Get video playback data
Add this code to the user site:.
protected string GetTenantCode()
{
    return HttpContext.Request.Host.ToString().Split('.')[0];
}
And add the tenant code to view model.
Step 2: Submit the data to Azure Application Insights
Make sure you have application insights JavaScript SDK avaliable.
Create a new Application Insights in Azure global. You can get the following code from Azure.
var appInsights = window.appInsights || function (a) {
    function b(a) { c[a] = function () { var b = arguments; c.queue.push(function () { c[a].apply(c, b) }) } } var c = { config: a }, d = document, e = window; setTimeout(function ()

    .......

     b("_" + f); var g = e[f]; e[f] = function (a, b, d, e, h) { var i = g && g(a, b, d, e, h); return !0 !== i && c["_" + f](a, b, d, e, h), i } } return c
}({
    instrumentationKey: "xxxxxxxxxxxxxxxxxxxxxx"
});
window.appInsights = appInsights, appInsights.queue && 0 === appInsights.queue.length && appInsights.trackPageView();
Add the following code to view to submit your event to Azure Application Insights.
appInsights.trackEvent("LivePage", {
    Tenant : '@Model.Host',
    PanelId : '@Model.Panel.CodeName',
    PanelTitle : '@Html.Raw(Model.Panel.Title)'
});
Step 3 Sync the data from Application Insights to Azure Blob Storage
Application Insights Connector
The Application Insights Connector for Power BI is a convenient way to connect and show your basic application usage data. At the time of writing this guide, only basic events get plumbed through to Power BI thought his connector. For some users, this may have value and provide a basic overview of the content that is not playback specific.
- Log into Power BI
- In the bottom left corner, select GET DATA. If the left pane menu is not expanded, you will see the arrow, which is the button for GET DATA.
- Under CONTENT PACK SERVICES, select GET under the SERVICES tab.
- Select APPLICATION INSIGHTS > CONNECT
- Follow the on-screen wizard to enter your Application Insights resource details. You can find all details about your Application Insights resource from the Azure Portal

30 days of data is retained in Power BI through this connector.
Long term retention dashboards
For longer term retention, and media central dashboards, its important to pull the data source from somewhere that allows for long term retention of data. Application Insights has a feature to continuously export your data into Azure Storage in blobs. Power BI has the ability to use Azure Storage as an input location for a dataset; which can be scheduled to refresh. Power BI can refresh datasets up to 8 time per day for Pro and once per day for free.
Azure Blob Storage
- Go to your Application Insights resource in the Azure Portal
- Select SETTINGS > CONTINUOUS EXPORT > ADD
- Select CONFIGURED to select the data types you want to export. You should at least have CUSTOM EVENTS and METRIC on.
- Select DESTINATION STORAGE CONTAINER to select or create a new storage container.
- Select the storage account and add a container with Access Type as blob.
- Click OK
Note it may take some time for the first export to complete - you will see "awaiting telemetry" as the status. You must wait until the first export is complete to continue.

After doing this step, you will get the json data in Azure blob. An example of the data is here. You need to download the TenantDashboardDataSource.json.
Step 4: Get the data from Azure Blob to Power BI
In order to connect blob storage with Power BI, you will need to use the Power BI Desktop which is available which you can download it here.
- Open "TenantDashboard.pbix" in the Power BI Desktop tool. It is normal to see "X Something is wrong on one or more fields" for each graph as the data has not yet been added.
- Select EDIT QUERIES in the HOME menu on the top bar. AMP_data should be selected.
- Select ADVANCED EDITOR and replace the entire query with the text from "TenantDashboardQueryFromBlob.dax".
- Make sure to replace
AZURESTORAGENAMEfrom the query lineSource = AzureStorage.Blobs("AZURESTORAGENAME")to the name of your blob storage - Make sure to replace
CONTAINERNAMEfrom the query lineampdata = Source{[Name="CONTAINERNAME"]}[Data]to the name of your container in the blob storage
- Make sure to replace

- Select the SOURCE under APPLIED STEPS and then select EDIT CREDENTIALS

- Enter your account key which can be obtained from the Azure Portal. Go to your storage account resource, select the keys icon, and then copy the key into Power BI.

- Select CLOSE AND APPLY in the query editor
- Click PUBLISH and select destination
You can now view your live report in Power BI where you can modify and share.

Step 5: Embed the data to your own web page
With Power BI Embedded in Azure, you can embed reports, dashboards, or tiles into an application using app owns data. App owns data is about having an application that uses Power BI as its embedded analytics platform. Using app owns data is typically an ISV developer scenario. As an ISV developer, you can create Power BI content that displays reports, dashboards, or tiles in an application that is fully integrated and interactive, without requiring users of the application to have a Power BI license. This tutorial demonstrates how to integrate a report into an application using the Power BI .NET SDK along with the Power BI JavaScript API when using Power BI Embedded in Azure for your customers using app owns data.
Prerequisites
To get started, you need a Power BI Pro account (this account is your master account) and a Microsoft Azure subscription.
- If you're not signed up for Power BI Pro, sign up for a free trial before you begin.
- If you don’t have an Azure subscription, create a free account before you begin.
- You need to have your own Azure Active Directory tenant setup.
- You need Visual Studio installed (version 2013 or later).
Register an application in Azure Active Directory (Azure AD)
You register your application with Azure Active Directory to allow your application access to the Power BI REST APIs. This allows you to establish an identity for your application and specify permissions to Power BI REST resources.
Accept the Microsoft Power BI API Terms.
Sign into the Azure portal.

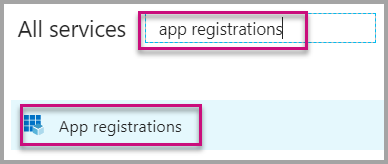
In the left-hand navigation pane, choose All Services, select App Registrations, and then select New application registration.

Follow the prompts and create a new application. For apps owns data you need to use Native for the application type. You also need to provide a Redirect URI, which Azure AD uses to return token responses. Enter a value specific to your application (for example:
http://localhost:13526/Redirect).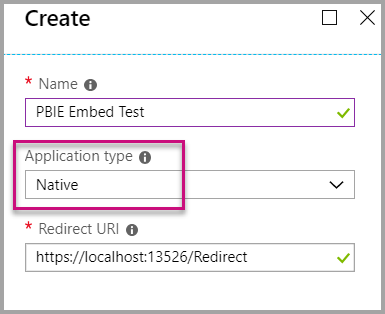
Apply permissions to your application within Azure Active Directory
You need to enable additional permissions for your application in addition to what was provided on the app registration page. You need to be logged in with the master account, used for embedding, which needs to be a global admin account.
Use the Azure Active Directory portal
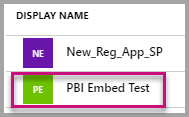
Browse to App registrations within the Azure portal and select the app that you are using for embedding.
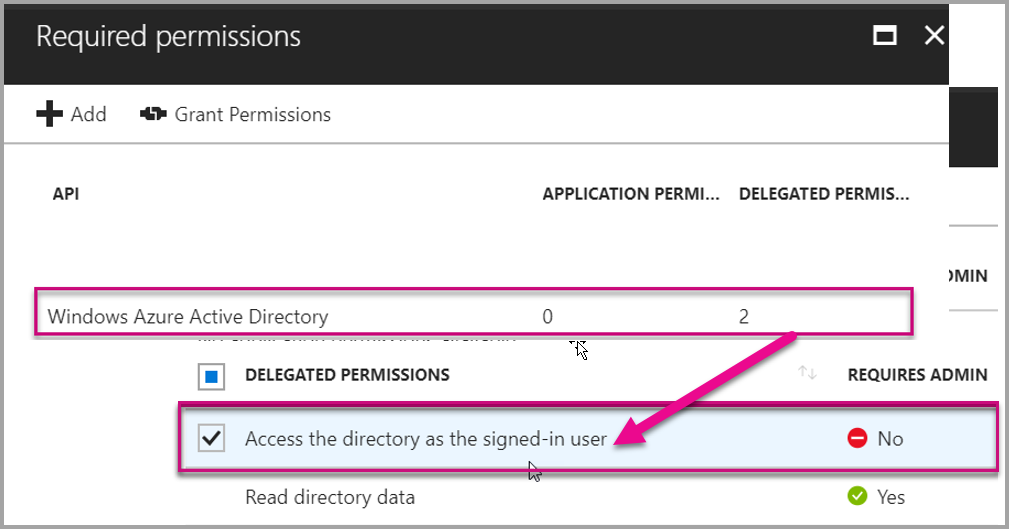
Select Settings, then under API Access select Required permissions.

Select Windows Azure Active Directory and then make sure Access the directory as the signed-in user is selected. Select Save.
Select Add.

Select Select an API.

Select Power BI Service, then select Select.

Select all permissions under Delegated Permissions. You need to select them one by one to save the selections. Select Save when done.

Within Required permissions, select Grant Permissions.
The Grant Permissions action needs the master account to avoid being prompted for consent by Azure AD. If the account performing this action is a Global Admin, you need to grant permissions to all users within your organization for this application. If the account performing this action is the master account and is not a Global Admin, you need to grant permissions only to the master account for this application.

Create an app workspace
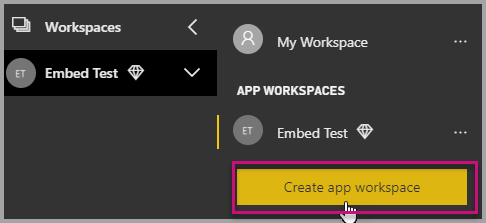
If you are embedding reports, dashboards, or tiles for your customers, then you have to place your content within an app workspace. The master account must be an admin of the app workspace.
Start by creating the workspace. Select workspaces > Create app workspace. This is where you place the content that your application needs to access.
Give the workspace a name. If the corresponding Workspace ID isn't available, edit it to come up with a unique ID. This needs to be the name of the app, too.

You have a few options to set. If you choose Public, anyone in your organization can see what’s in the workspace. Private, on the other hand, means only members of the workspace can see its contents.

You can't change the Public/Private setting after you've created the group.
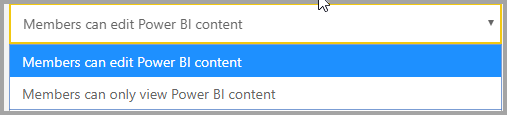
You can also choose if members can edit or have view-only access.
Add email addresses of people you want to have access to the workspace, and select Add. You can’t add group aliases, just individuals.
Decide whether each person is a member or an admin. Admins can edit the workspace itself, including adding other members. Members can edit the content in the workspace unless they have view-only access. Both admins and members can publish the app.
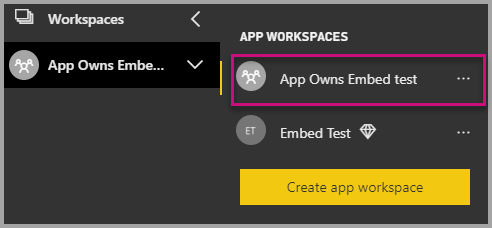
Now you can view the new workspace. Power BI creates the workspace and opens it. It appears in the list of workspaces in which you’re a member. Because you’re an admin, you can select the ellipsis (…) to go back and make changes to it, adding new members or changing their permissions.
Embed your content using your application
Follow these steps to start embedding your content to an application.
Open up the Web.config file in your application. There are 5 fields you need to fill in to run the application successfully. The clientId, the groupId, the reportId, the pbiUsername and the pbiPassword.

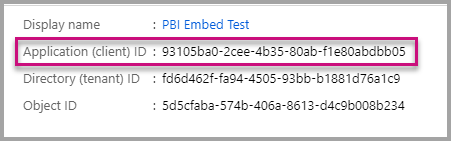
Fill in the clientId information with the Application ID from Azure. The clientId is used by the application to identify itself to the users from which you're requesting permissions. To get the clientId, follow these steps:
Sign into the Azure portal.
In the left-hand navigation pane, choose All Services and select App Registrations.
Select the application that you want to get the clientId for.You should see an Application ID that is listed as a GUID. Use this Application ID as the clientId for the application.
Fill in the groupId information with the app workspace GUID from Power BI.

Fill in the reportId information with the report GUID from Power BI.

Fill in the pbiUsername with the Power BI master user account. Fill in the pbiPassword with the password for the Power BI master user account.
Run the application!
First select Run in Visual Studio.

Embed your content within your application
Even though the steps to embed your content can be done with the Power BI REST APIs, the example codes described in this article are made with the .NET SDK.
Embedding for your customers within your application requires you to get an access token for your master account from Azure AD. It is required to get an Azure AD access token for your Power BI application using app owns data before you make calls to the Power BI REST APIs.
To create the Power BI Client with your access token, you want to create your Power BI client object which allows you to interact with the Power BI REST APIs. This is done by wrapping the AccessToken with a Microsoft.Rest.TokenCredentials object.
using Microsoft.IdentityModel.Clients.ActiveDirectory;
using Microsoft.Rest;
using Microsoft.PowerBI.Api.V2;

var tokenCredentials = new TokenCredentials(authenticationResult.AccessToken, "Bearer");

// Create a Power BI Client object. It is used to call Power BI APIs.
using (var client = new PowerBIClient(new Uri(ApiUrl), tokenCredentials))
{
    // Your code to embed items.
}
Get the content item you want to embed
You can use the Power BI client object to retrieve a reference to the item you want to embed.
Here is a code sample of how to retrieve the first report from a given workspace.
A sample of getting a content item whether it is a report, dashboard, or tile that you want to embed is available within the Controllers\HomeController.cs file in the sample application.
using Microsoft.PowerBI.Api.V2;
using Microsoft.PowerBI.Api.V2.Models;

// You need to provide the GroupID where the dashboard resides.
ODataResponseListReport reports = client.Reports.GetReportsInGroupAsync(GroupId);

// Get the first report in the group.
Report report = reports.Value.FirstOrDefault();
Create the embed token
An embed token needs to be generated which can be used from the JavaScript API. The embed token is specific to the item you are embedding. So at any time you embed a piece of Power BI content, you need to create a new embed token for it. For more information, including which accessLevel to use, see GenerateToken API.
Here is a sample of adding an embed token for a report to your application.
A sample of creating an embed token for a report, dashboard, or tile is available within the Controllers\HomeController.cs file in the sample application.
using Microsoft.PowerBI.Api.V2;
using Microsoft.PowerBI.Api.V2.Models;

// Generate Embed Token.
var generateTokenRequestParameters = new GenerateTokenRequest(accessLevel: "view");
EmbedToken tokenResponse = client.Reports.GenerateTokenInGroup(GroupId, report.Id, generateTokenRequestParameters);

// Generate Embed Configuration.
var embedConfig = new EmbedConfig()
{
    EmbedToken = tokenResponse,
    EmbedUrl = report.EmbedUrl,
    Id = report.Id
};
This assumes a class is created for EmbedConfig and TileEmbedConfig. A sample of these are available within the Models\EmbedConfig.cs file and the Models\TileEmbedConfig.cs file.
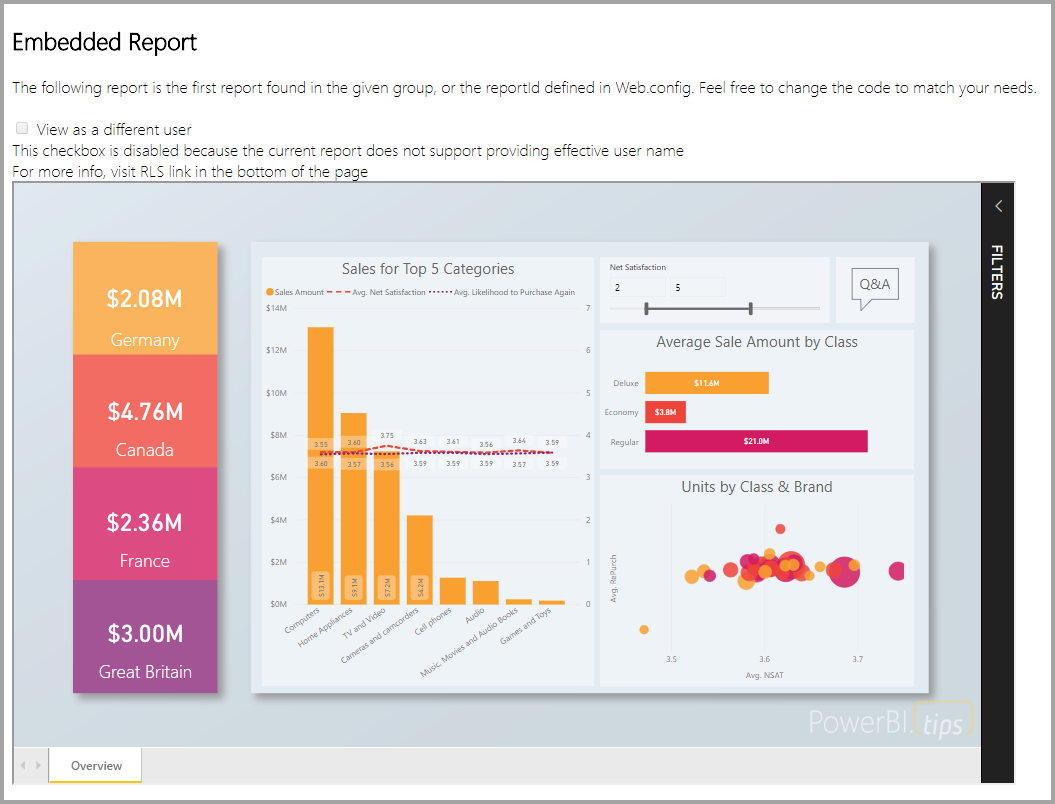
Load an item using JavaScript
You can use JavaScript to load a report into a div element on your web page.
For a full sample of using the JavaScript API, you can use the Playground tool. This is a quick way to play with different types of Power BI Embedded samples. You can also get more Information about the JavaScript API by visiting the PowerBI-JavaScript wiki page.
Here is a sample that uses an EmbedConfig model and a TileEmbedConfig model along with views for a report.
A sample of adding a view for a report, dashboard, or tile is available within the Views\Home\EmbedReport.cshtml, Views\Home\EmbedDashboard.cshtml, or the Views\Home\Embedtile.cshtml files in the sample application.
<script src="~/scripts/powerbi.js"></script>
<div id="reportContainer"></div>
<script>
    // Read embed application token from Model
    var accessToken = "@Model.EmbedToken.Token";

    // Read embed URL from Model
    var embedUrl = "@Html.Raw(Model.EmbedUrl)";

    // Read report Id from Model
    var embedReportId = "@Model.Id";

    // Get models. models contains enums that can be used.
    var models = window['powerbi-client'].models;

    // Embed configuration used to describe the what and how to embed.
    // This object is used when calling powerbi.embed.
    // This also includes settings and options such as filters.
    // You can find more information at https://github.com/Microsoft/PowerBI-JavaScript/wiki/Embed-Configuration-Details.
    var config = {
        type: 'report',
        tokenType: models.TokenType.Embed,
        accessToken: accessToken,
        embedUrl: embedUrl,
        id: embedReportId,
        permissions: models.Permissions.All,
        settings: {
            filterPaneEnabled: true,
            navContentPaneEnabled: true
        }
    };

    // Get a reference to the embedded report HTML element
    var reportContainer = $('#reportContainer')[0];

    // Embed the report and display it within the div container.
    var report = powerbi.embed(reportContainer, config);
</script>
Step 6: Add a filter to your embed Power BI page
Pass the current tenant name to your web page.
Add the following code to your web page.
var filter = {
    target: {
        table: "aicontainer",
        column: "Tenant"
    },
    operator: "In",
    values: ['@Model.TenantName.ToLower()']
};
Add activate your filter:
var config = {
    type: 'report',

    ...

    ...

    filters:[filter]
};
var report = powerbi.embed(reportContainer, config);
You're done. Those steps took me about 16 hours to finish.
这篇文章详细拆解了Power BI嵌入开发的完整流程,从数据准备到权限配置,再到前端交互实现,展现了系统的工程化思维。在Azure AD与Power BI的权限联动环节,文章对TokenCredential的封装方式值得借鉴——通过将认证结果与PowerBIClient绑定,既保证了调用链的清晰度,又规避了硬编码凭据的安全隐患。
值得注意的是,嵌入令牌的生成策略采用了面向不同资源的差异化权限控制。通过GenerateTokenInGroup方法针对特定报告生成"view"级访问令牌,这种细粒度的权限管理在多租户场景下尤为重要。而EmbedConfig类的封装则体现了前后端分离架构的设计理念,将鉴权信息、资源标识与前端配置解耦,为后续功能扩展预留了空间。
在前端实现层面,文章展示了powerbi.js客户端库的典型用法。通过将权限配置、资源地址与渲染容器进行绑定,实现了安全的动态加载机制。特别是针对过滤器的实现,通过构造包含表名、字段名和操作符的JSON结构,配合JavaScript API的filters数组参数,既保持了代码的可读性,又确保了数据隔离的安全边界。
对于开发人员而言,文中提到的16小时开发周期反映了此类集成项目的复杂度。建议在实际部署时,可以借助Power BI的沙盒测试环境验证嵌入配置,同时利用ADAL库的令牌缓存机制优化认证性能。此外,在处理多租户数据隔离时,可考虑结合Row-Level Security策略与前端过滤器形成双重保障,这将显著提升系统的安全性与扩展性。
这篇文章提供了详细的指导,帮助开发者将Power BI报告嵌入到网页中,并通过添加筛选器来增强用户体验。以下是对此文章的一些关键点总结和建议:
生成嵌入令牌:确保正确设置访问级别为“view”,并验证API调用的参数和URL是否正确。这一步是成功加载报告的基础。
配置嵌入选项:在创建
EmbedConfig对象时,仔细检查嵌入URL是否准确无误,并确保所有必要的字段如令牌、ID等均正确包含在内。使用JavaScript API:提供的代码示例涵盖了基本的嵌入配置,但建议添加错误处理机制,以应对网络问题或权限错误等情况。
添加筛选器功能:注意确保筛选条件中的字段名称和值与Power BI报告的数据模型完全匹配。此外,考虑动态获取
TenantName的方式是否可靠,避免因获取失败导致筛选无法应用。实际应用中的注意事项:在部署时,可能会遇到跨域请求问题或API调用限制,建议提前测试并采取相应的解决措施。
总结:文章为开发者提供了一个清晰的实施路径,但实际操作中可能需要根据具体情况调整和优化。通过仔细阅读Power BI嵌入文档,并结合实际环境进行充分测试,可以确保嵌入功能的稳定性和可靠性。
总之,这篇文章是一个很好的起点,帮助开发者快速入门Power BI嵌入开发,但在实际项目中仍需注意细节处理和错误预防,以确保最终用户体验的良好。
In this blog post, the author provides a detailed guide on how to connect Azure Media Player statistic information to Power BI embed. The primary focus is on embedding Power BI content within a web application using the Power BI REST APIs and JavaScript API.
The author does a great job of breaking down the process into six clear steps, which include setting up an Azure Active Directory (AAD) application, granting permissions, authenticating with AAD, creating a Power BI client, getting the content item to embed, and generating an embed token. Furthermore, the author provides code samples for each step, making it easier for readers to follow along and implement the solution in their own projects.
One of the highlights in this blog post is the extensive use of code samples and references to the sample application, which can be found in the Controllers\HomeController.cs file. This not only helps readers understand the process better but also provides them with a solid starting point for their own projects.
However, there are a few areas where the blog post could be improved. Firstly, it would be helpful to provide a brief introduction to Azure Media Player, Power BI embed, and their applications, as this would help readers understand the context and relevance of the guide. Additionally, the author could provide more explanation on certain concepts, such as the EmbedConfig and TileEmbedConfig classes, to help readers better comprehend the code samples.
Lastly, the author mentions that the entire process took them 16 hours to complete. It would be beneficial to provide some tips or suggestions on how to streamline the process or overcome potential challenges that readers might face.
In conclusion, this blog post provides a comprehensive guide on connecting Azure Media Player statistic information to Power BI embed, with detailed steps and code samples. However, providing more context and explanation on certain concepts would make the guide even more accessible to readers.
👍👍