
Brief steps
This article helps you change the following items if your cloud provider didn't do that for you.
- Check disk information
- Delete other accounts.
- Create your own account instead of root.
- Disable password login and force to use SSH key to log in.
- Disable root account.
- Enable
sudowithout password. - Enable firewall.
- Ajust timezone.
- Enable BBR
Before starting the process, make sure you have a valid SSH key-pair locally.
You can run the following command on your dev box to generate a new SSH key-pair:
ssh-keygen
Check connection and OS
Fist, connect to the server. (With root password).
you@local
$ ssh root@server
Check the disk configuration:
sudo fdisk -l # Check connected disks.
sudo lsblk # Check disk mountings.
sudo df -Th # Check partition usage.
Check installed RAM:
sudo free -h
You can view other accounts via:
$ ls /home
$ cat /etc/passwd | grep -v nologin
Change hostname
Change computer name first:
sudo hostnamectl set-hostname aiursoftcn
Create a new user for you
Add a new user for you. (With password)
root@server
$ sudo adduser anduin
Adding user `anduin' ...
Adding new group `anduin' (1000) ...
Adding new user `anduin' (1000) with group `anduin' ...
Creating home directory `/home/anduin' ...
Copying files from `/etc/skel' ...
New password:
Retype new password:
passwd: password updated successfully
Changing the user information for anduin
Enter the new value, or press ENTER for the default
        Full Name []:
        Room Number []:
        Work Phone []:
        Home Phone []:
        Other []:
Is the information correct? [Y/n] Y
Give the user root privilege.
root@server
$ usermod -aG sudo anduin
Test the new user's privilege.
root@server
$ su - anduin

anduin@server
$ sudo ls
[password]
Copy SSH public key
Back to your local machine. Copy the SSH public key to your server.
you@local
$ ssh-copy-id anduin@server
anduin@server's password:

Number of key(s) added: 1

Now try logging into the machine, with:   "ssh 'anduin@server'"
and check to make sure that only the key(s) you wanted were added.
And test if you can connect to it.
you@local
$ ssh anduin@server
Ensure SSH best practice
Now disable root sign in and password authentication.
anduin@server
$ sudo vim /etc/ssh/sshd_config
Change: PermitRootLogin to no to disable the root user login. And change PasswordAuthentication to no to prevent the password login.
(Dangerous, optional) Skip password for your acction
To skip password for your account, consider execute:
anduin@server
$ sudo visudo
And add the following line at the end of the file:
anduin ALL=(ALL) NOPASSWD:ALL
This might be dangerous that some other program running as you may also execute sudo to get root permission.
Renew Machine ID
If your server is copied from another image, you MUST renew the machine ID to avoid DHCP conflict.
echo "Machine ID is default. Resetting..."
  sudo rm /etc/machine-id
  sudo rm /var/lib/dbus/machine-id
  sudo systemd-machine-id-setup
  sudo cp /etc/machine-id /var/lib/dbus/machine-id
Delete other users and reboot
Don't forget to delete the obsolete user if the provider created it. (Don't delete the root user)
anduin@server
$ sudo deluser default
Reboot the server.
anduin@server
$ sudo reboot
And now the server can only access from you and can not log it in through password or the root account.
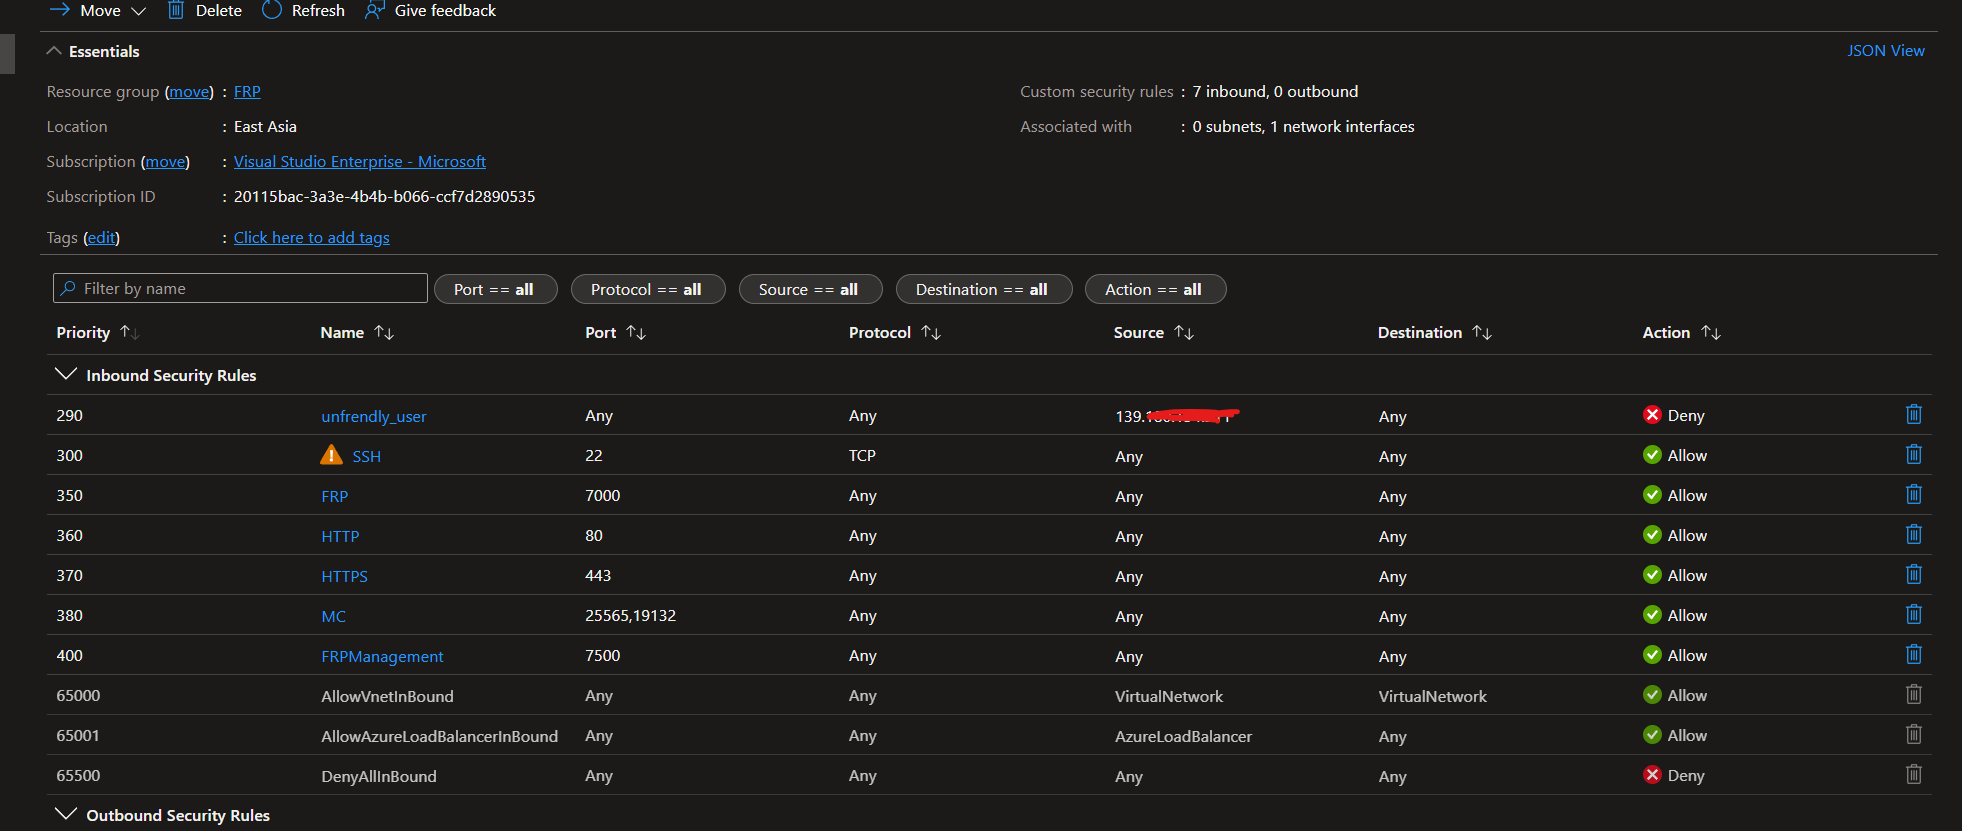
Enable Firewall (Optional)
If you are using the cloud server provider's firewall, do open the following ports:
22 (For SSH management)
Your other business ports. Like 80, 443,
The configuration might looks like this:
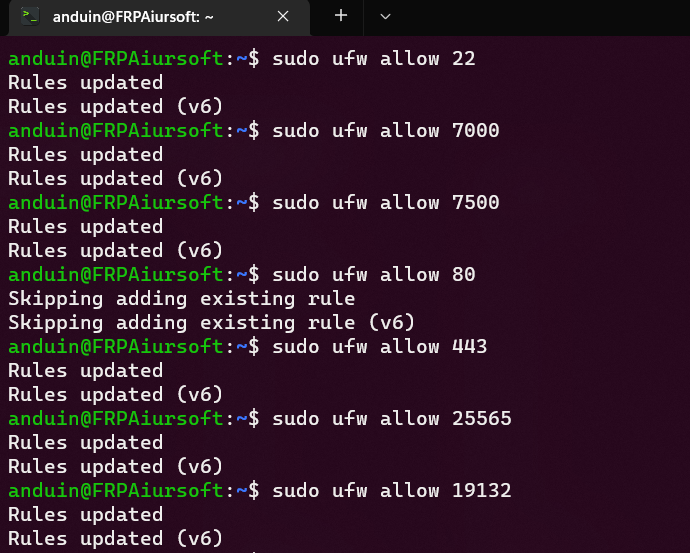
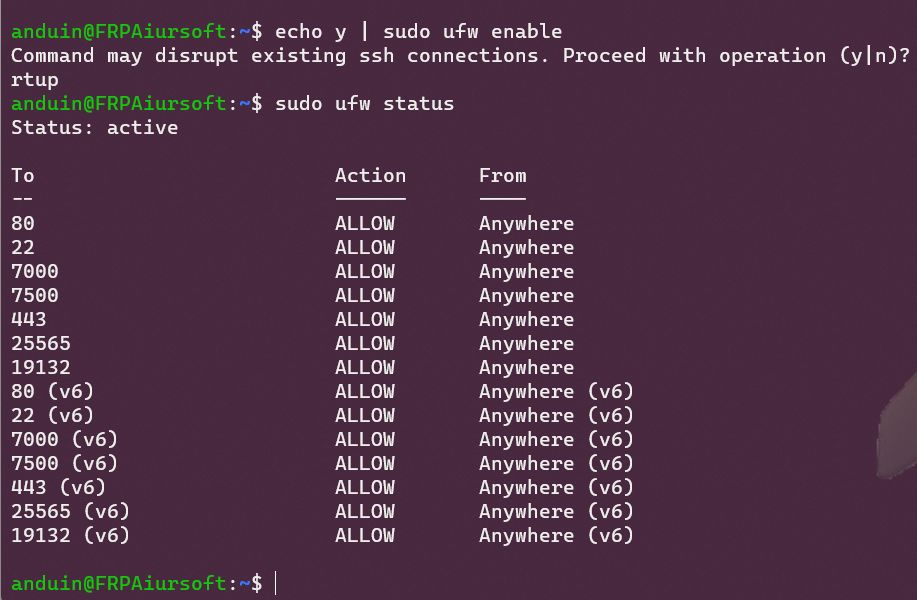
If you are using firewall software like ufw, do the following practice:
$ sudo ufw allow 22
$ sudo ufw allow 80 # Your other business ports.
$ sudo ufw enable
Enable BBR (Optional)
Don't forget to enable BBR to speed up your server!
(Run the following command as root (You can run sudo bash first))
#
enable_bbr_force()
{
    echo "BBR not enabled. Enabling BBR..."
    echo 'net.core.default_qdisc=fq' | tee -a /etc/sysctl.conf
    echo 'net.ipv4.tcp_congestion_control=bbr' | tee -a /etc/sysctl.conf
    sysctl -p
}
sysctl net.ipv4.tcp_available_congestion_control | grep -q bbr ||  enable_bbr_force
Setup Mirror
You can use a mirror to speed up apt.
Run these for example:
echo "
deb http://mirror.aiursoft.cn/ubuntu/ jammy main restricted universe multiverse
deb http://mirror.aiursoft.cn/ubuntu/ jammy-updates main restricted universe multiverse
deb http://mirror.aiursoft.cn/ubuntu/ jammy-backports main restricted universe multiverse
deb http://mirror.aiursoft.cn/ubuntu/ jammy-security main restricted universe multiverse
" | sudo tee /etc/apt/sources.list
Change to performance mode
If you are running on a bare-mental Intel server, you can switch from power-saver to performance.
sudo apt install -y linux-tools-common linux-tools-generic
sudo cpupower frequency-info
sudo cpupower frequency-set -g performance
Change timezone
To switch to UTC, simply execute
$ sudo dpkg-reconfigure tzdata
Scroll to the bottom of the Continents list and select Etc or None of the above; in the second list, select UTC. If you prefer GMT instead of UTC, it's just above UTC in that list.
Remove Snap (Optional)
I understand that a lot of Ubuntu users don't like snap.
If you want to remove snap, simply call:
echo "Removing snap..."
sudo systemctl disable --now snapd
sudo apt purge -y snapd
sudo rm -rf /snap /var/snap /var/lib/snapd /var/cache/snapd /usr/lib/snapd ~/snap
cat << EOF | sudo tee -a /etc/apt/preferences.d/no-snap.pref
Package: snapd
Pin: release a=*
Pin-Priority: -10
EOF
sudo chown root:root /etc/apt/preferences.d/no-snap.pref
echo "Snap removed"
Mount /tmp as RAM (Optional)
You can use sudo df -Th to verify if /tmp folder is tmpfs file system.
To mount /tmp folder as tmpfs file system, run the following command, then reboot.
(sudo cat /etc/fstab | grep -q /tmp) || (echo "Mouting tmp..." && echo "tmpfs /tmp tmpfs rw,nosuid,nodev" | sudo tee -a /etc/fstab)
Enable Auto update (Optional, dangerous)
If your server is a stateless server, or have proper backup, or you don't care about availbility, you can enable auto backup.
To enable that, first run the following command:
cd ~
touch update.sh
echo "sudo apt update && sudo DEBIAN_FRONTEND=noninteractive apt upgrade -y && sudo apt autoremove -y && sudo reboot" > ./update.sh
chmod +x ./update.sh
After that, you may see an update.sh file under your home folder.
You can configure that to run automatically.
Run:
crontab -e
Add this line (Update every day, UTC 0, China 8:00 am):
0 0 * * * /home/anduin/update.sh
Benchmark performance
To benchmark the CPU:
anduin@server
$ sudo apt install sysbench
$ sysbench cpu run --threads=64
For fun, meet your religious beliefs!
And, finally, as for fun, you can do this:
$ sudo apt install neofetch -y
$ neofetch
.-/+oossssoo+/-. anduin@NPill
`:+ssssssssssssssssss+:` ------------
-+ssssssssssssssssssyyssss+- OS: Ubuntu 20.04.4 LTS x86_64
.ossssssssssssssssssdMMMNysssso. Host: Virtual Machine Hyper-V UEFI Release v4.1
/ssssssssssshdmmNNmmyNMMMMhssssss/ Kernel: 5.15.0-1014-azure
+ssssssssshmydMMMMMMMNddddyssssssss+ Uptime: 3 days, 28 mins
/sssssssshNMMMyhhyyyyhmNMMMNhssssssss/ Packages: 793 (dpkg), 4 (snap)
.ssssssssdMMMNhsssssssssshNMMMdssssssss. Shell: bash 5.0.17
+sssshhhyNMMNyssssssssssssyNMMMysssssss+ Terminal: /dev/pts/0
ossyNMMMNyMMhsssssssssssssshmmmhssssssso CPU: Intel Xeon E5-2673 v4 (1) @ 2.294GHz
ossyNMMMNyMMhsssssssssssssshmmmhssssssso Memory: 349MiB / 905MiB
+sssshhhyNMMNyssssssssssssyNMMMysssssss+
.ssssssssdMMMNhsssssssssshNMMMdssssssss.
/sssssssshNMMMyhhyyyyhdNMMMNhssssssss/
+sssssssssdmydMMMMMMMMddddyssssssss+
/ssssssssssshdmNNNNmyNMMMMhssssss/
.ossssssssssssssssssdMMMNysssso.
-+sssssssssssssssssyyyssss+-
`:+ssssssssssssssssss+:`
.-/+oossssoo+/-.
anduin@NPill:~$
使用 88888 hostnamectl set-hostname 没有改变/etc/hosts
I just finished reading your blog post on best practices for authentication after creating a new Linux server. The core idea of the blog seems to be about securing a newly created Linux server by implementing proper authentication mechanisms.
One of the highlights of your blog post is the attention to detail in setting up the server environment. The use of color and formatting to illustrate the server environment is visually appealing and makes the content more engaging for readers.
However, there are a few areas where the blog post could be improved. First, the actual content related to authentication best practices is not clearly presented. The majority of the post consists of formatted terminal output, which can be difficult for readers to understand without proper context or explanation. It would be helpful if you could provide a clear and concise explanation of the best practices for authentication, as well as the rationale behind them.
Secondly, the blog post could benefit from a more structured layout. Breaking the content into sections with headings and subheadings would make it easier for readers to follow and understand the key points. This would also make the content more accessible to readers who may be new to Linux server administration.
Lastly, it would be beneficial to include some examples or step-by-step instructions on how to implement the recommended authentication best practices. This would provide readers with actionable guidance and help them apply the concepts discussed in the blog post.
In summary, while the blog post has a strong focus on the visual presentation of the server environment, it would be more informative and engaging if it provided a clearer explanation of authentication best practices, a more structured layout, and actionable guidance for readers.
good